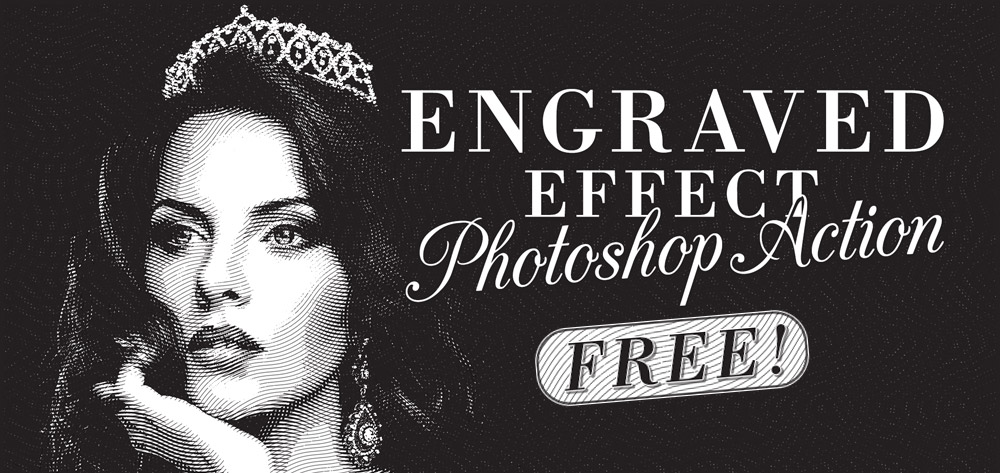
My most popular tutorial of 2014 was my guide to creating a realistic money effect in Photoshop, which explained the steps to achieve an authentic engraved illustration style. The process is quite time consuming, so I figured it would be useful to follow it up with a ready made Photoshop Action that produces the effect automatically with just the click of a button. Choose from 3 levels of detail for your image, then the Action will transform your photo into a realistic engraved illustration.
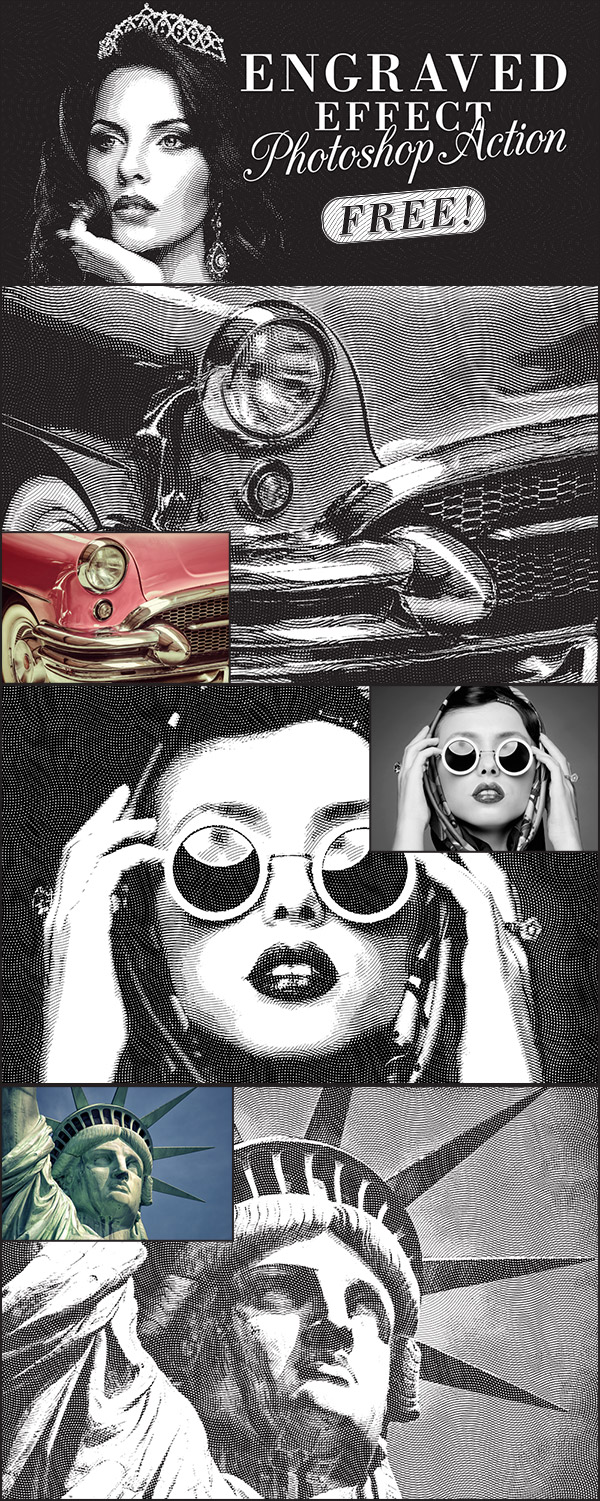
This free Photoshop Action transforms your photographs into realistic engraved illustrations with the click of a button, allowing you to easily create money or wood cut style effects. An unwanted moire effect has appeared on these scaled down preview images, but at 100% scale you can see the fine detail of the engraving lines that build up the illustration with multiple tonal layers. If you want to experiment with this effect yourself, don’t forget to check out my original money effect Photoshop tutorial.
How to use the Engraved Effect Action
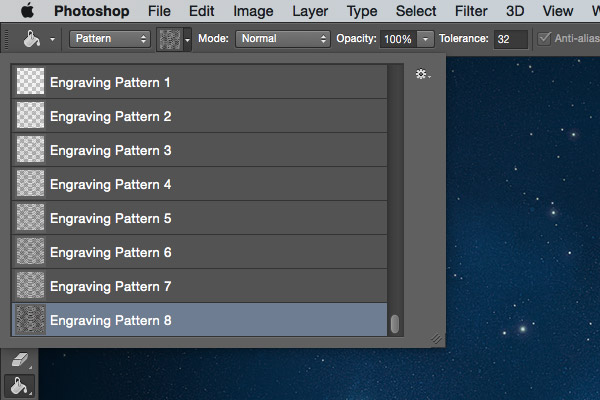
The download package contains the Photoshop .atn Action file and a .pat Pattern file. Load the Patterns first of all so the series of Engraving Patterns are available for the Action to use.
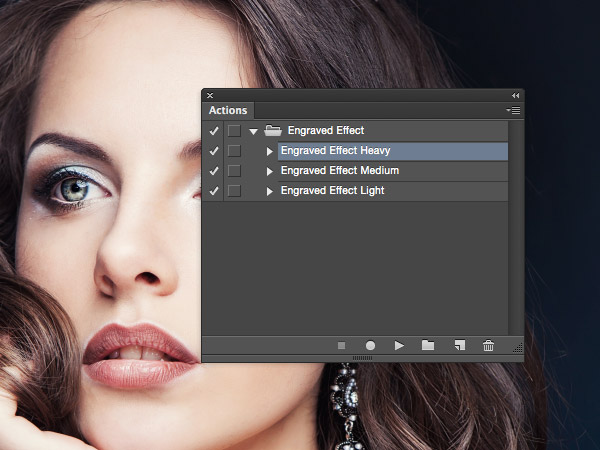
Make sure your image is contained on the Background layer, then choose one of the three levels of detail from the Engraved Effect Action. Press the Play button at the bottom of the Actions panel to apply the effect.
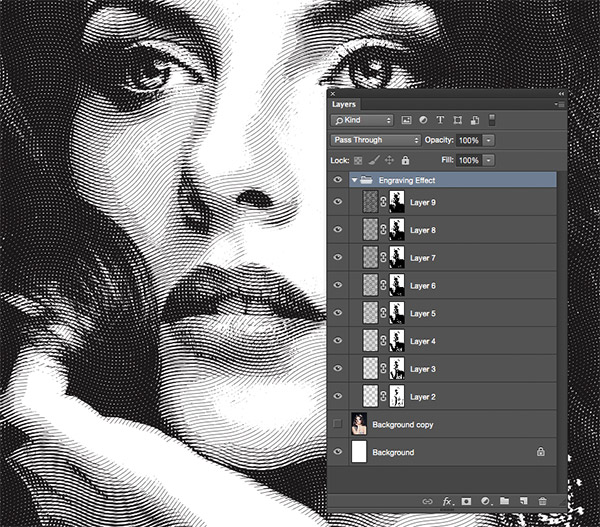
The engraved effect layers are neatly contained within a layer group. Unlink the layers with their masks in order to scale the group down in size to produce a more detailed pattern effect.
Download the Engraved Effect Photoshop Action 1mb
Want more? Check out these great related products
The following resources cost a little money, but I definitely recommend checking these related products out to complement my Engraved Effect Action.
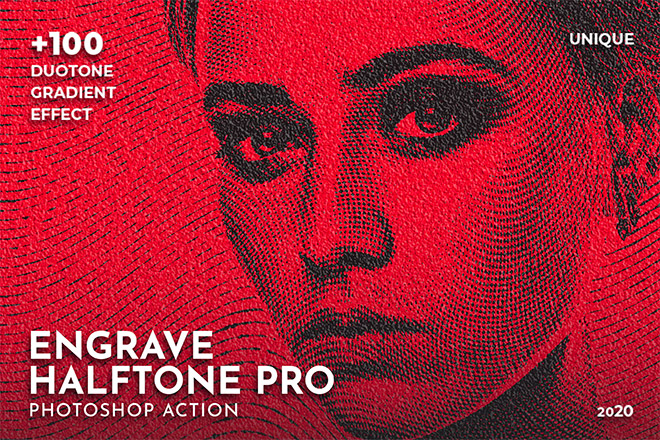
Engrave Halftone Pro Photoshop Action
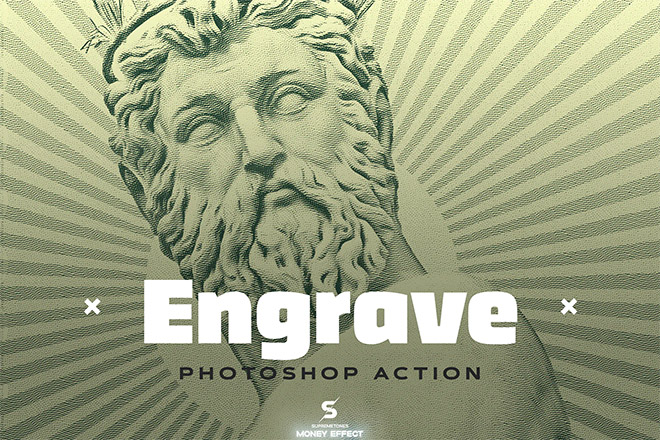
Engrave Photoshop Action Kit

time saver, thanks
My pleasure Asad
It came out really wonderfully.
Thanks Tatiana, I’m glad to hear it’s working!
I like this photo processing. It’s great.
The Photoshop Action makes it easy too!
So cool and Nice, Thanks a lot, Chris…!
Your works are a very good inspiration for mine and my design habits (not to say “The” inspiration…). Thanks for all…
Happy new year from France…
Thanks for your kind word Moos!
This is awesome! Thank you so much!
No problem Kathy, I hope you find a good use for it
Awesome thanks!
I’ve always wondered how to do this, thanks! However, it isn’t working properly on my test. I’m wondering if you can tell me what I’m doing wrong?
I’m using a flattened image with only a background layer. Installed both files and restarted PS CC2014. When I run any of the three actions. it quits at the first fill command with the error message “Could not complete the command because the selected area is empty.”
At this point is has created several layers. The one selected is “Layer 2”, which is empty. There are layers 1-7 which are all empty, plus layer 1 copy and layer 1 copy 2 though layer 1 copy 7, each of which do contain elements of the image.
The fill, however, is being run on an empty layer.
Ideas?
Thanks!
I’ve just done some testing and found the Action isn’t working on images under 804px for some reason, which is very strange!
The step the Action gets stuck on is a simple Select All > Fill, but it works fine (for me) on documents 804px+. Does a larger image work for you?
I’m having the same issue, even with large photos.
I discovered what was happening – I didn’t have “copy” being automatically appended to duplicated layers, so the action couldn’t find the layers it was looking for.
I was having the same problem and I made it to work by first loading (again) the pattern and then loading the action (replacing the action) then will work like a charm.
My bad, this psp action does’nt work in the french version of adobe…. I’m so sad. :)
Unfortunately , I can confirm , this script has been established with English terms on Photoshop. Therefore can not run on the version using french words (“copie” for “copy”, “calque” for “layer”, etc.)
Really a shame not to use it
Except to follow the great tutorial indicated by Chris
Thank you anyway ;-)
Does anyone know if there’s a way to record a universal Action without incurring language problems?
Hi Chris, apparently there’s no way to record “universal” actions – thanks to Adobe :-(
But maybe you find this interesting
> http://www.kyrsoft.com/articles/atn-translator/
Chris, what comes to my mind is http://www.panosfx.com/
I think they do actions in different languages. Perhaps you could run one and see or contact them.
Otherwise, maybe it has to be made in different languages. I really don’t know.
Su
But, I thank you for the action, anyway! LOL Sorry about that!
Su
Same here. Just won’t work.
Reinstalled as mentioned but no go on any size image.
thank you!!!
Thanks so much! Great effect!
I’m really happy you like it Marilee.
Hi, thanks for the great action, i did follow the actual tutorial of this effect before and got amazing results.
But i cannot seem to figure out the way to use this action.
So as mentioned, i loaded the pattern file first then the action, and left the image as the background layer and selected the wight of engraving and clicked play. On the second try, i even renamed the image layer as ‘Background copy’ to see it works. but it gives me a series of messages saying something like ‘ The object “layer 1 copy 4″” not currently available’
what am i doing wrong. thanks!
Hi, so i just got it to work. like mentioned before… used a bigger image and renamed it as “Background”. That’s where my error has been i guess. and then ‘play’. worked like a charm. :) yaaay!
i got to say… it’s freakishly quicker than the actually doing the whole process. awesome work Chris. really love your work. thanks again… keep up the good work…
cheers!
Glad to hear the larger image solved the problem. I’m still confused as to why this even happens! If I figure it out I’ll re-record a new version.
Hi Chris
This action is excellent and works great in PhotoshopCS4. I feel a wee design session coming on.
Thanks again for sharing
Mikey ;-)
This is a nice cap to an excellent tutorial. I had thought about recording the process as an action, but you’ve beaten me to the punch. Nice work Chris!
I’m curious – the moire patterns you mention early in the tutorial are apparent in my images too – regardless of whether I scale the image or the effect up or down – they also appear in print. This isn’t restricted to images treated with your plugin Chris. I make a lot of images in Photoshop that involve very tight line work, both raster and vector, and moire seems to be an unavoidable side effect.
I wonder if you’ve found any solutions – I have yet to locate one.
I’d like to learn how to control the visibility of moire patterns – sometimes it can enhance an image, but sometimes it detracts. Wouldn’t it be wonderful to find a way to eliminate the effect when we don’t want it through simple application of a layer mask?
This is so dope.Thanks Chris
Thank you, Maxwell!
I am having the same issue over and over again. I tried the suggested solution above, but no luck so far.
Everything seems to work except “Engraved Effect Heavy.”
New Action works great!
Thanks Chris
This is a really cool Effect, and very nice of you to create it & share it with everyone. I really like it. The Medium and Light are both working for me.
I’m really thrilled that it’s worked for you Catharine. :)
I have resolved a problem by resizing image to 3000 pix
Thank you…I have been wanting an action that does this for years!
Now you can use it to your hearts content, thank you Don.
This is fantastic! I can’t wait to use this in a project. Thank you very much. :)
I hope it goes well, Jess.
By the way, after you apply this effect, if you drag the original full color image to the top layer, and shift its blending mode to “color”, you get an amazing full color engraved effect.
Im having issues getting it to work as well. I’m using cs5.1.
Good news everyone, I’ve fixed the issue where the effect would only work on images of a certain size.
I was unaware that Photoshop was saving the coordinates of where I randomly clicked with the fill tool. This spot ended up being off-canvas on smaller images, which stopped the process from working.
So.. the new version totally works. Great Work!!!
Muchas gracias por el regalo. Tendré que practicarlo para lograr grandes cosas.
Felicidades por la página, he aprendido un poco más.
Can people who got it to work post the exact dimensions of the image they used and what version of PS?
Got it to work on my home machine. Images were about 3000×2000 running CC 2014 on a PC.
Hi Chris, I don’t suppose it would be possible to make something similar for us Elements users would it? It’s a really cool effect.
Wow, I have been looking for this effect for ages. I was thinking to do it manually. Thank you Chris.
I’m really happy I’ve posted it then, save you some time. :D
Awesome Chris. Thanks a bunch !!!
Hello, I tested the action and does not work. Maybe be a problem with the language? I have Photoshop in Spanish. I mention this because when I click on the Play button start appearing error messages like: Layer 1 is not currently available, layer 2 is not currently available, layer 3 is not currently available, etc.
Could you tell something to help me?
Thanxs!!!!
Hello all,
Cool Script !
Fr Version here : https://dl.dropboxusercontent.com/u/13317342/Engraved/Engraved%20EffectFr.atn
how did you transform the action? There is a script?
Try this:
http://www.kyrsoft.com/articles/atn-translator/
Thanks a lot man.
No problem Hoze.
Hi :)
I’m french, i downloaded it and follow allt he instructions but it’s not working, i don’t understand why, i’ve installed as you mentionned, all good, but it’s not working, please help.
Sorry for my english, if someone here can translate it should be amazing !
Damien
FR version on my comment.
Enjoy.
Allô DMasson,
maybe you could tell how exactly you did the trick to change the action language to french… That would be really nice :-)
merci beaucoup pour cette version Fr !
This is seriously the coolest thing ever. Thanks for sharing!
I’m really glad you think so Sarah, thank you.
New Action works great!
Thanks Chris.
I’m thrilled that it works for you Lon. :D
It’s not playing nice for me. It keeps saying layer 1 etc is not available…I changed the background names from ‘background’ nothing, “Layer 1” nothing…any clues? I did the original tutorial and was bowled over by that…
you just need to rename the image layer as ‘Background’ before applying the action. It worked for me. Do try the newer version. It totally works. :)
Thnak you. Great Photoshop Action!
Thanks for the comment, Andy.
Unfortunately, your Photoshop actions only work with English language Photoshop versions. It would be helpful, if you mention this in the Readme files.
If you rename the layers in your actions, they might work in other languages, too.
Maybe DMasson (bonjour Monsieur :-) ) could be so incredibly nice and tell us about his magic trick and how he changed the actions to a french version, so other users with other language versions of photoshop could transform the action into a version suitable for their language too?
That would be really cool!!! :-)
Renaming the layers, even changing the system language didn’t work… unfortunately.
Wow! What a great and unique effect/action! Thanks so much for making it available to us! I’m looking forward to using it on some posters. :-)
I hope it all goes well, Natasha. Thank you for your comment. :D
Dear Chris,
I have a problem using this action.
‘The command “Make” is not currently available.’
Can you help me?
Thanks.
Wow looke awesome…i want to try..now
hello all,
How i change langage ? héhé that’s not easy…
First, look that : https://www.youtube.com/watch?v=Z29L6ttw3o4
After, edit your xml and search and rename word LAYER, COPY, Background, etc.
Compiling from xml and TADAAAA it s ok
Thanks :-)
I did like recommended here and it worked:
http://www.kyrsoft.com/articles/atn-translator/
Hi.
Those who need to install the English version of Photoshop to run Actions should read this: http://helpx.adobe.com/creative-cloud/kb/change-installed-language.html
Also available in French: http://tv.adobe.com/watch/learn-creative-cloud/installing-multiple-languages-of-a-desktop-application/
;-)
cool stuff :)
Thanks for the comment!
awesome trick ! thanks a lot for this action
Even with renaming the layer “Background” and increasing the size of the image I am still getting errors, for some reason it is not renaming the layers, etc
Any ideas?
Im on PS CC2014
Thanks article i follow u :)
Doesn’t work if you have disabled option “Add “copy” to Copied Layers and Groups” in Layers Panel Options
This is the solution. Thanks Olegs.
Great script, simple to apply at http://www.medyator.net
Hi !! it’s just cool ! but I can not use because it says ‘The object “layer 1 copy 4 ” “not currently available’. Could you make a short video tutorial . Thanks in advance!
Try this:
http://www.kyrsoft.com/articles/atn-translator/ to have the actions translated.
My Language setup is English also I tried 4000 px 300 dpi resolution image and didn’t work. I add picture as “Background” with lock or changed layer name as “Background” but no way it doesn’t still work. When I click on the Play button start appearing error messages like: Layer 1 is not currently available go on like that. What are we doing wrong? Please help us!
Great Tutorial
What an amazing Freebie, thank you Chris!
Is this something that only works with older versions of Photoshop — or doesn’t work with Photoshop CC 2014? I could not get this to work correctly at all. It seems to have created several layer copies, but kept giving me a “The command threshold is not currently available” message — which I have no idea what that means. Wish it had worked.
Same problem here. I run a new version of PS CC. Would really like this to work.
Thank you for this amazing action. Watched the original tut and thought that was just a lot of work…
The action is superb, and love the various levels available.
You rock!
I really like this site, but this one proves totally useless, – it doesn’t work… I get all these above mentioned problems like of layer names.
Is it not sufficient to change language preferences to English in the program to get the Actions to work? Do I need to have a different version of Photoshop installed.
This is not me being unappreciative, this is a great site. Adobe clearly messed up here it seems.
Try this:
http://www.kyrsoft.com/articles/atn-translator/ to have the actions translated. You can’t change language preferences in PS…
This still doesn’t work. I get one error message after another concerning layers.
E.g:
The object “layer “Layer 2” of layer “Layer 3” of layer “Layer 4” of layer “Layer 5”” is not currently available.
Stuff happens, but I can’t seem to get it to function properly.
Try this:
http://www.kyrsoft.com/articles/atn-translator/ to have the actions translated.
“All the great things are simple”- Thanks a lot for sharing! Yes, your action sometimes works sometimes doesn’t. But your tutorial is so understandable. Once you understand how it works it doesn’t take a lot of time to make everything by yourself. And you are able to change width/angle/curve of line so to get different result. Thanks again!Great job!
The action works great. It looks pretty sweet on top of the original photo too. Thanks, Chris! I’ve been a lurker and downloader of your content for years.
Keep getting a dialog box that says “Could not transform because the initial bounding rectangle is empty”
I’m using an English version of Photoshop CS6 and my layer is named “Background”. These are the only issues that I’ve read concerning problems. Is there something else I need to look for?
Hope I get this to work – looks amazing!
hey Chris do you have a tutorial on how to take an image of let’s say a dog and convert to only a black and white image no other colors. But still look like the image.
How to load action for portable Photoshop?
I have a error: “Could not use tha paint bucket bacause no pattern has been fedined.”
Thanks a bunch for the great freebies.