
Using an unsuitable image resolution is one of the most common errors designers make when creating designs for print. The result is a fuzzy print quality, or having your file is rejected by your local printing company. If you don’t keep an eye on your image resolution right from the start you may end up having to completely recreate your design file from scratch, so here’s a handy guide on what to look out for, and how to ensure your designs are set up with the correct image resolutions.
What is an image resolution?
The resolution of an image refers to the density of the pixels (or printed dots) that make up that image or graphic. The higher the resolution, the crisper and more detailed the image will be. A lower resolution will be fuzzy, and less detailed. Image resolutions are measured in DPI (Dots Per Inch) and PPI (Pixels Per Inch). There are differences between the two – DPI refers to a printed document, and the amount and spacing of the Cyan, Magenta, Yellow and Black dots, whereas PPI refers to the pixels on a screen. They aren’t the same thing, but designers and print professionals tend to use the terms DPI and PPI interchangeably. Sometimes they’ll say DPI but mean PPI. For example, a 72dpi design for screen should really be referred to as 72ppi.
300ppi vs 150ppi vs 72ppi
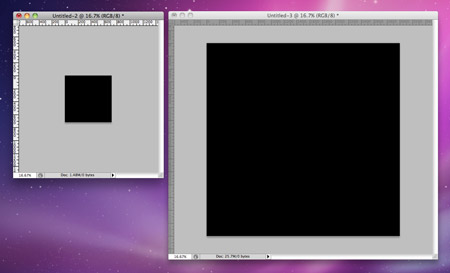
If you create a 10×10 inch document at 72ppi, and another 10×10 inch document at 300ppi in Photoshop, you’ll notice they’re totally different sizes on screen. This is because of different number of pixels used in every inch. In the 72ppi document, you can only fit a max of 720 pixels across the whole width of the document, but this is 3000 pixels in the 300ppi version.
When creating designs for the web, we can usually suffice with 72ppi. If we calculate the resolution of a fairly dated 15″ 1024×768 monitor, that works out to 68ppi, whereas a more modern 1440×900 15″ MacBook Pro display would work out to 96ppi. As monitor sizes and resolutions increase they will be capable of displaying much higher quality imagery, but for now 72ppi seems to be the rule of thumb.
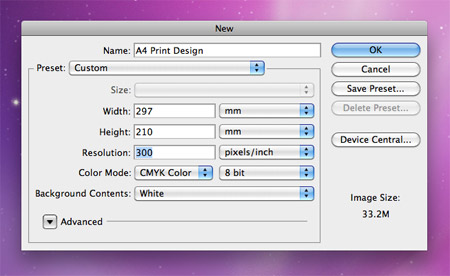
When creating designs for print we’ll usually need to use a 300dpi resolution document. Your printer might say “Make it 297x210mm at 300dpi“, so you would make a 300ppi A4 document (notice that misuse of DPI and PPI). If you accidentally created this document at 72ppi, you would have to start from scratch and recreate the design because you can’t magically generate the extra pixels you require out of thin air. If you DID change the resolution from 72 to 300, Photoshop would GUESS what colour pixels to insert, but as you can imagine the end product isn’t going to look too good. This is known as Resampling.
You CAN change a 72ppi image file into a 300ppi file by Resizing. This is when Photoshop takes the number of pixels it has to play with and divides them up so that there’s 300 pixels in every inch instead of 72. However Photoshop will soon run out of pixels, therefore the document would be much smaller. This isn’t any use for your print artwork, as your 297x210mm file would end up at 72x50mm in size, but it is crucial when working with photographs or posters. More on that later.
Sometimes you’ll be asked to create a print document at 150ppi. This is usually the case when working with large format graphics that will only be seen from a long distance, so the close up quality doesn’t matter so much. The lower resolution makes life easier for your computer, and results in a much smaller file size.
If you’re creating a super large document (like a billboard), your printer might ask you to create the artwork at smaller dimensions, but at a higher resolution (say, 600ppi). This again helps because the smaller document is going to mean smaller filesizes. They can resize the artwork in order to bump it up to the full dimensions, using that original 600ppi resolution to create a larger document at 150dpi.
Resizing vs Resampling
When altering an image size in Photoshop you have two options, resize or resample. If you resample (the default option in Photoshop), you’re altering the pixel size of the document. If you resize (Uncheck the resample box), you’re altering the resolution and therefore the printed size of the document.
As we know, resampling a document up is bad. Photoshop will have to guess what pixels to insert into the gaps. Resampling a document down is OK, as we’ve already got more than the amount of pixels we need.
If you Resize an image, you’ll keep the same pixel size, but alter the actual print size and the resolution. Let’s see how this is useful in the real world:
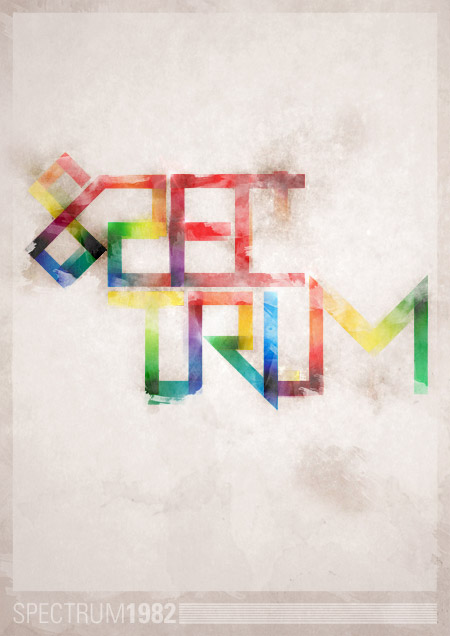
I designed this piece of artwork at A3 dimensions (297x420mm) at 300ppi. I’ve decided I want to get it printed as a poster. What size poster can I print?
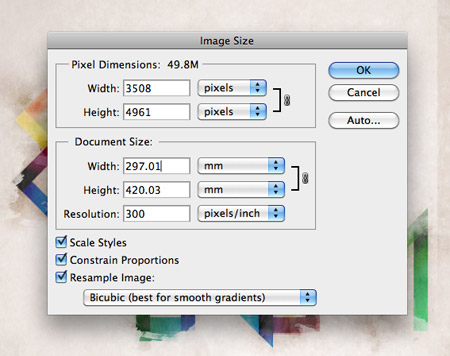
The best answer would be A3, because the original 300ppi version would result in the best quality print. However my local printer will accept files of at least 150ppi.
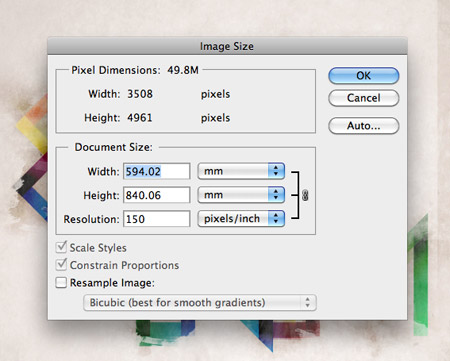
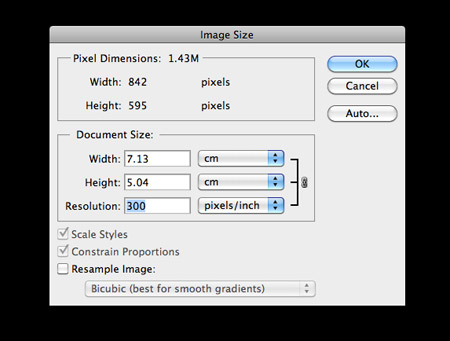
By unchecking the resample box in the Image Size settings, I can change the resolution from 300 to 150 without affecting the original image quality. Only putting 150 pixels into every inch instead of 300 means you can fill more inches. The result is a 594x840mm, which is just about A1 size.
This 150ppi A1 file won’t be as crisp at the 300ppi A3 file, but the difference won’t be noticeable unless the two prints were seen side by side.
For more print related articles and tutorials, be sure to check out these two older posts: Designing for Print – Setting up Crops and Bleed & The Ultimate Guide to Designing with Black

Wow, thanks man.
This article is really helpful on understanding the difference.
My mistakes are now fixed.
Great job.
Cool article!.. I really didn’t notice about this before since I start to work on print design…
Thanks for this very useful resource and the two older ones.
Using the correct image resolution is one of the most important and useful things I learnt at university. I only made the mistake of not creating the right image resolution once, as I had to recreate my whole design again due to it being fuzzy when printed. However it was never really fully explained to me why this occurred or how to resolve the matter. After reading this article I now fully understand the importance of this process and must say I found it very interesting to read.
As you mentioned, designers tend to refer to PPI (pixels per inch) and DPI (dots per inch) as the same thing. Instead of referring to them differently depending on whether the design is on screen or a print. Which I have to admit I used to be guilty of until I started working in the design industry. Getting this matter wrong doesn’t sound professional, especially when you are talking to clients.
I don’t personally use resampling, but I think the main thing to remember with this is that resampling a document up is not good but its fine to resample a document down as the amount of pixels needed is already more than enough. Also a print document should use 300ppi and a web design should incorporate 72ppi.
printers do not print with ppi, therefore dpi is commonly used when talking about the resolution of a document destined for print. it’s not inherently wrong, just a generally accepted term nowadays.
nicely written article, concise and well put!
Hi Chris,
thanks for this well explained and useful article. It’s not always easy to jump from web to print and vice-versa.
Well done, my friend. You totally nailed it!
Great job Chris, very valuable info…
How about having an image at 72dpi at 1024×768, changing it to 300dpi and also changing the resolution back to 1024×768? The result would be a printable image with high DPI but also good resolution, wouldn`t it?
http://www.webdesignerdepot.com/2010/02/the-myth-of-dpi/
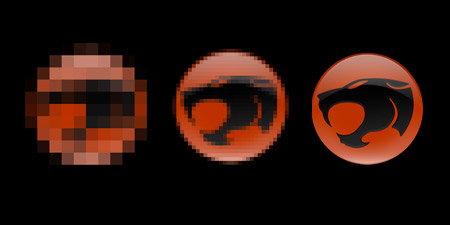
The fact that the Thundercats are on the prowl in this tutorial makes it that much sweeter.
Watch your photography as well! There really is no set resolution for digital cameras so if you are using photography in your artwork make sure that your original image matches the resolution of your canvas.
For those who are working in large documents like full resolution posters its worth noting that with the latest versions of photoshop you can actually get away with working at 200dpi and bumping up to 300dpi to save and print. The reason for doing this should be apparent to anyone who has worked with a 22×28 or anything larger in an already resource heavy photoshop.
Great post Chris!
@Petr: Yes it would be printable, has a highresolution, BUT it would be rather small (as print 8.7cm x 6.5cm) because you dont increase the pixels. DPI is just a value that tells the printer how many dots (most of the time pixels) are one square inch.
The fact that you helped me understand the difference between resampling and resizing is fantastic. Thanks for the awesome post! Cheers!
Great little guide Chris. Don’t forget we can now design in 326ppi for retina displays (i.e. iPhone 4!).
I accept most of your article but this just confuses me:
“If you’re creating a super large document (like a billboard), your printer might ask you to create the artwork at smaller dimensions, but at a higher resolution (say, 600ppi). This again helps because the smaller document is going to mean smaller filesizes. They can resize the artwork in order to bump it up to the full dimensions, using that original 600ppi resolution to create a larger document at 150dpi.”
How can you state the file size will me smaller in such a case? Would you not have the same filesize for a 10″x20″” image at 300dpi (3000×6000 pixels) as 20″x40″ at 150dpi (3000×6000 pixels)? It would seem a printer who asks for a smaller image at a higher resolution is just confused as most people…
-Rob A>
Good article, bookmarked it and resubmitted via twitter and digg. Nice to have all this info on one page with good photos.
Spot on! Chris, always a good read! So many “online” designers going “offline” to further develop their business and skills. And pointers and guides like these are always welcome. Brilliant!
Hi Chris,
great article you’ve written here, enjoyed reading it! I’ve also written an article about resolution & print design on the gonzoblog.nl (glad to see the same points are made in both posts ;-P)
And yes, I agree resolution is important: ‘bad’ resolution can ruin a great brochure design, so thumbs up for resolution!
Thanks for sharing, Cheers and Ciao …
Chris Spooner teaches what the school forgets to! Nice and very simple and understandable.
As a print designer I was trained to use dpi and ppi. Ppi is the measurement system used on the digital input side of design for print, dpi is the measurement system used for the output side.
Dpi is important when talking with commercial printers because it has a bearing on their “screen frequency” which is a measure of resolution they use in their process and it has a bearing on print quality. For example if my chosen printer was going to use a 175 screen frequency I would produce the final artwork at 350dpi with all the images sized precisely at 100% of final size.
HTH
Great article Chris.
interesing article…
Good tips, thanks
this website is awesome. I love the photoshop articles… and this one is great too.
Some of it is a little over my head but I hope to be able to use these design tips someday.
A great and informative article!
There arn’t many well-explained articles out there.. Thanks!
followed your link from We Graphics – thank you so much for this well explained article!I
Thanks for posting this! A very helpful article indeed :)
I wanna learn how you did the pixelation on the logo. I want to a design go from vector to highly pixelated. Is that possible? (sorry im really new at this).
Thanks!
Thanks chris, u always got good articles that are educative to young designers still learning
thank you for the article, i just wanted to ask, this is my first print job and the thing im making is 433 cm by 213 cm, so it’s big
what i have to create isn’t using vectors but more like real images
i put it at 300 ppi on photoshop and when i put an image in the image is TINY on the canvas.. what should i do? im very confused
Thanks for posting this!
Excellent article.
A client once sent me a banner artwork in Microsoft Office :|