This post was originally published in 2015
The tips and techniques explained may be outdated.
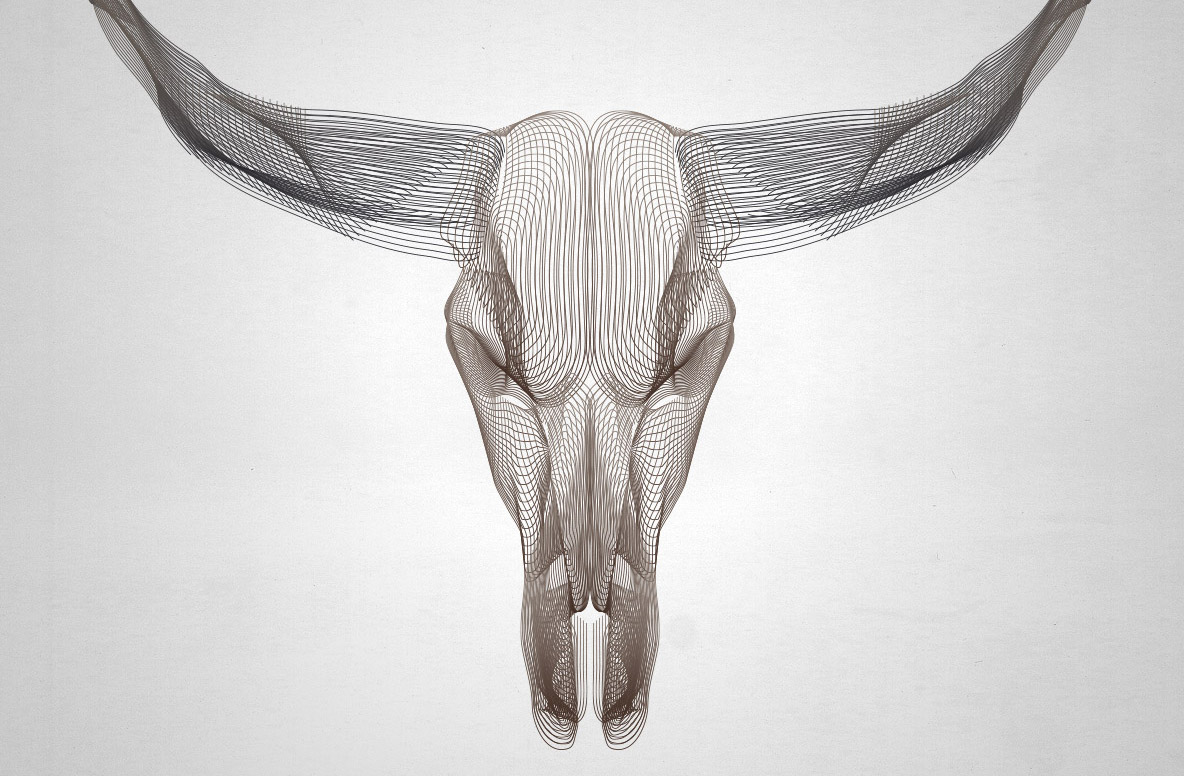
I love Adobe Illustrator for its power to produce awesome artwork with just basic tools and techniques. In today’s tutorial we’re going to use nothing but Illustrator’s Blend tool to create a wireframe that’s so detailed you would think it was made in a complex 3D programs. By just drawing a few basic paths with your mouse, Illustrator can generate a series of intricate lines that resembles an animal skull. It takes a little trial and error to find the perfect layout, but once you do the results are epic!
I’ll be creating this wireframe longhorn buffalo skull as part of this tutorial, but the technique works for any kind of animal head. Stags, rams and bulls are all great subjects to play with. Their horns can be tricky, but they produce the most striking results.
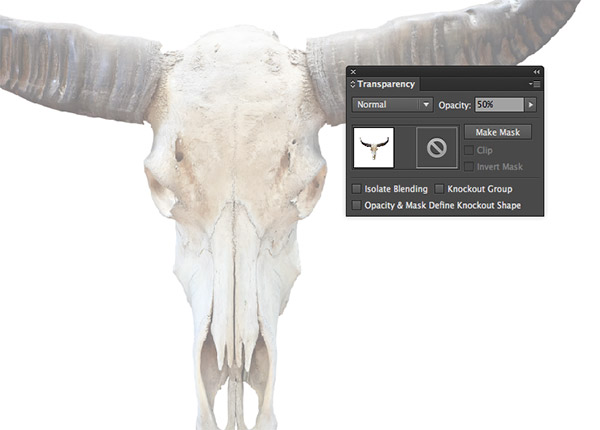
Find a reference photo of an animal skull and place it into an Illustrator document. I’m using this Long Horn Buffalo Skull image from Shutterstock. Reduce the Transparency of the image to around 50%, then press CMD+2 to lock it into place to avoid accidentally selecting it.
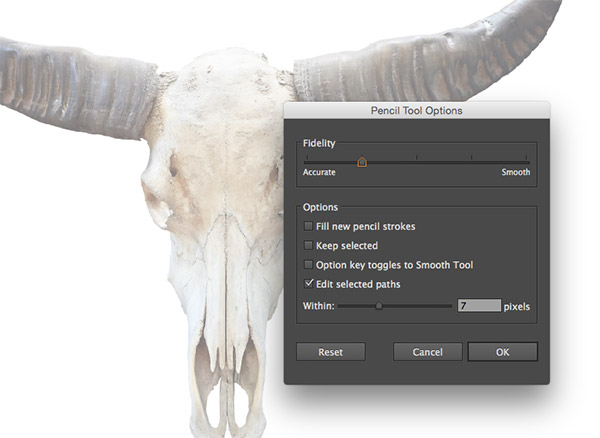
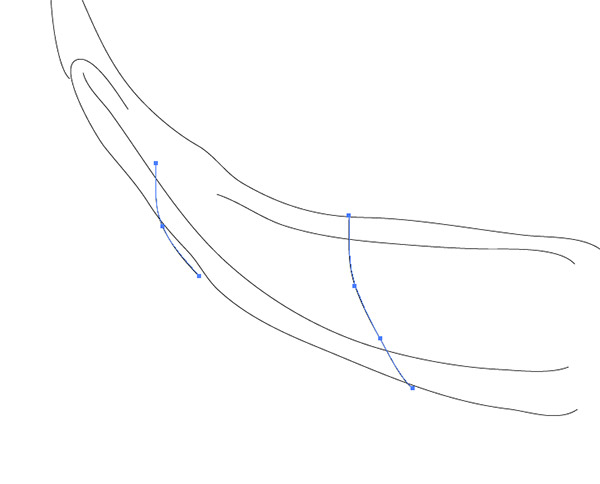
Double click the Pencil tool from the toolbar to edit its options. Move the Fidelity slider towards the Accurate end of the scale and deselect the Keep Selected option.
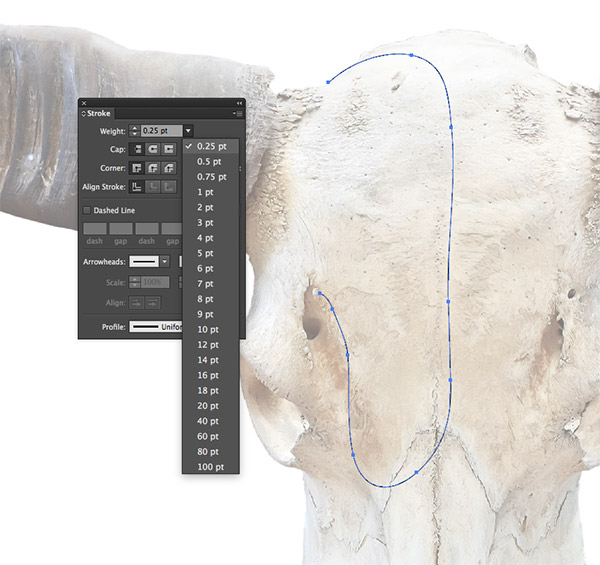
Clear out the default fill colour, leaving just a black stroke, then reduce the stroke weight to 0.25pt. Begin roughly tracing around the prominent areas of the skull, leaving open ended paths.
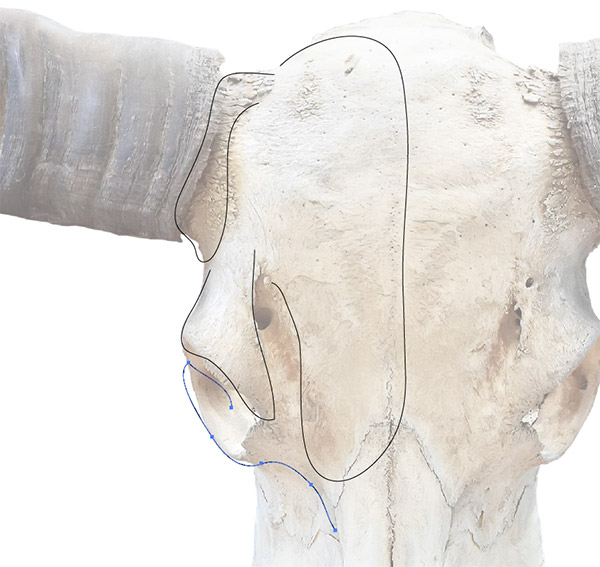
These paths don’t have to be accurate at all. It also requires a little trial and error to determine which placements generate the best results. I found that looping paths back to form “U” shapes provided good results. Focus on just one half of the skull. The wireframe can be duplicated for the other side.

In areas of detail, overlapping the strokes helps produce high density blends. It’s worth following the next few steps, then using the CMD+Z shortcut to come back to this point and edit paths to test different blend results.

Draw a selection around all the strokes that make up the skull, leaving the horns for now. Go to Object > Blend > Make.
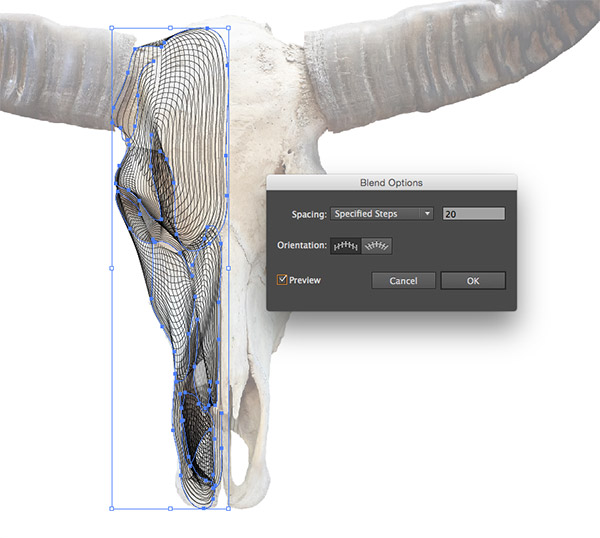
Go back to Object > Blend > Blend Options and change the Spacing to Specified Steps. Turn on the preview and adjust the number to create a cool wireframe effect. If there’s any unusual blends, press CMD+Z and use the Pencil tool to edit selected paths to tweak the result.
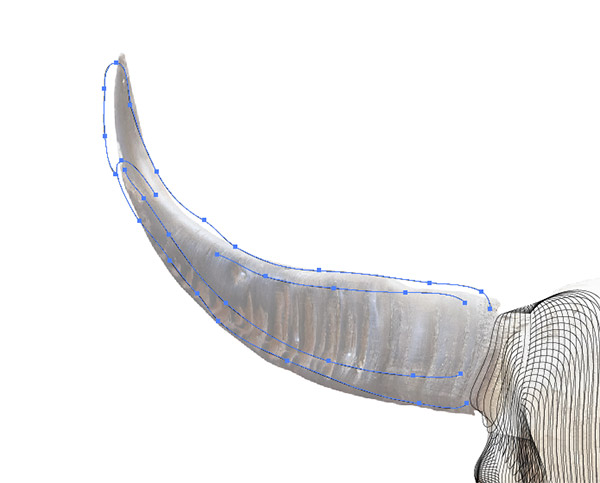
When the skull is looking good, use the same technique on one of the horns. Trial and error is really the key to find the paths that accurately depict the subject. There will be a lot of undoing to tweak the paths to eliminate stray lines.
In my example, I added a couple more lines perpendicular to the main horn outlines. With these paths added to the blend the result was much more detailed with twists and turns.
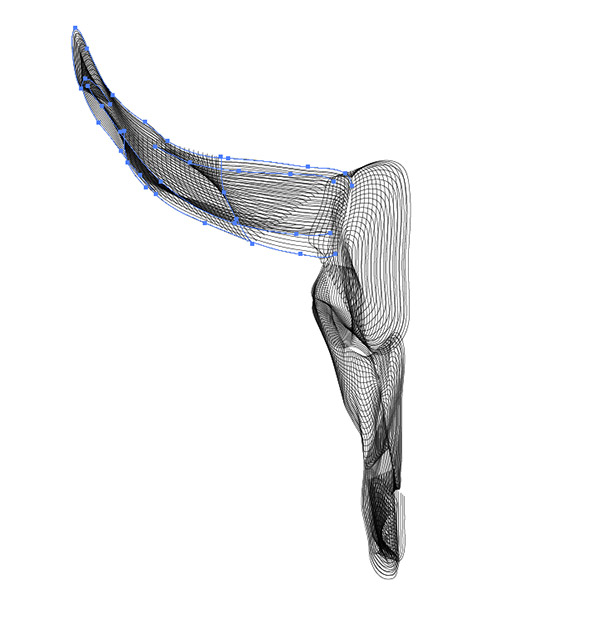
Select the blended horn and move it into place over the main skull. Simply overlapping the two elements neatly merges them together.
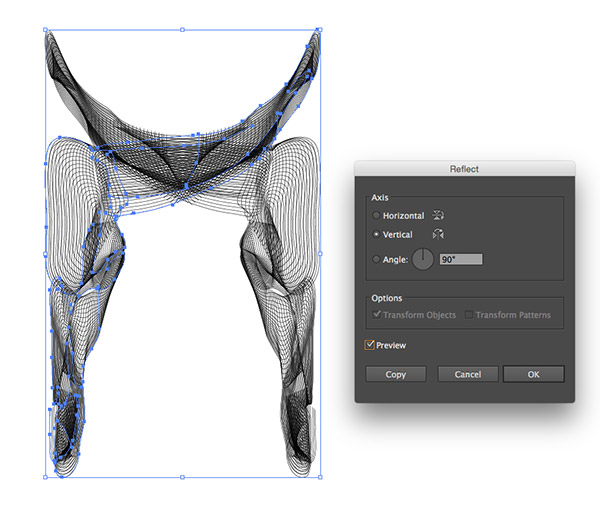
Make a selection of both the skull and horn blends, then go to Object > Transform > Reflect. Press the Copy button to create a duplicate for the other half.

Move this second half into place on the other side. Overlapping the two halves slightly helps blend them together to eliminate any gaps.
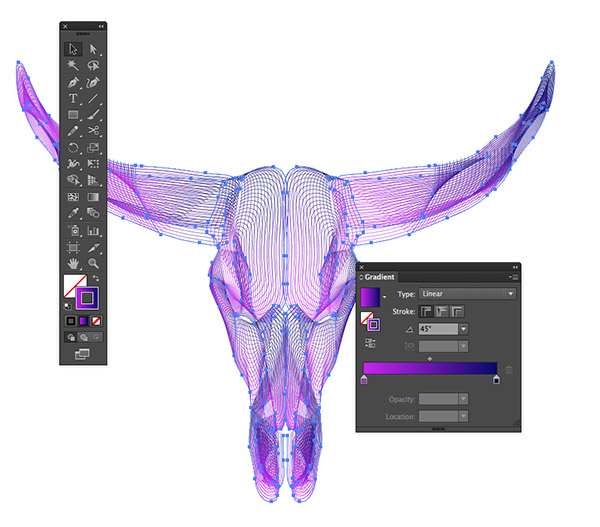
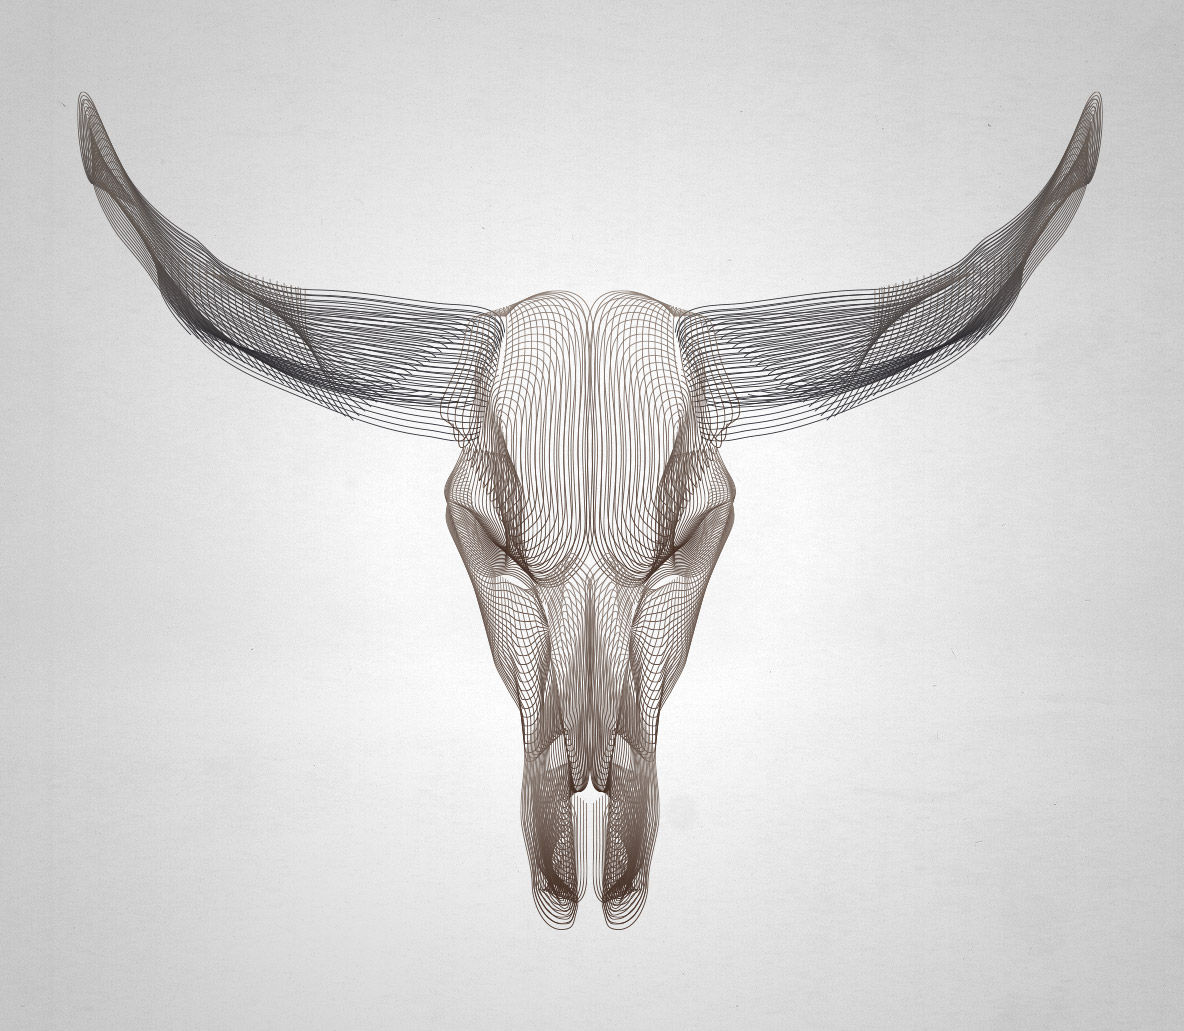
Further cool effects can be created by adding a gradient directly to the stroke. Go for something bright and vibrant, or colour pick samples from the original photograph for a more subtle style.
The final result is a cool 3D style wireframe that looks like it was created with complicated NURBS. In reality all it took was some squiggly lines and Illustrator’s powerful blend tool!
Love this design? Get the t-shirt!


Really awesome, will try this in my work. Thanks for sharing Chris.
Cool!
Nice one!, really simple and great effect also didn’t realise you could add gradients to strokes so learned something there ;)
I am SOOOO trying this right now!!
Thanks Chris!
Chris I’ve been using the blend tool for a long time and it never occurred to me to use it this way! Nice down and dirty trick! Thanks for the great tutorial.
It’s one of those tools that can be used in all kinds of different ways. It’s also great for blending colours together too.
Neat effect.
Great tutorial! Easy to follow along and great practice with the blend tool. Thanks!
Chris…you just keep knocking me out!
Darn, that’s real brilliant, Chris. I’ve been using the Blend Tool a lot, and it’s one of my favorite tools, but I’ve never seen it being used in this light. Thanks!
wow cool! how i can do that..
Chris Brillaint Tutorial from your side! I’m following your videos on YouTube and almost tried everyone of them.. Hopping to see more awesome stuff from you.
Thanks for taking the time to watch my videos too, Saqib.
I’ll have to create one based on this technique sometime in the future.
cool use of the blend tool. Gee wish i had a ranch as a client right NOW. : )-
This is just outstanding! Taking animal Skulls and make this amazing concept is brilliant… Thumbs up!!
Ridiculously awesome post. Thanks so much!
Awwsome .. Chris !
Cheers :)
thank your informasi