This post was originally published in 2013
The tips and techniques explained may be outdated.
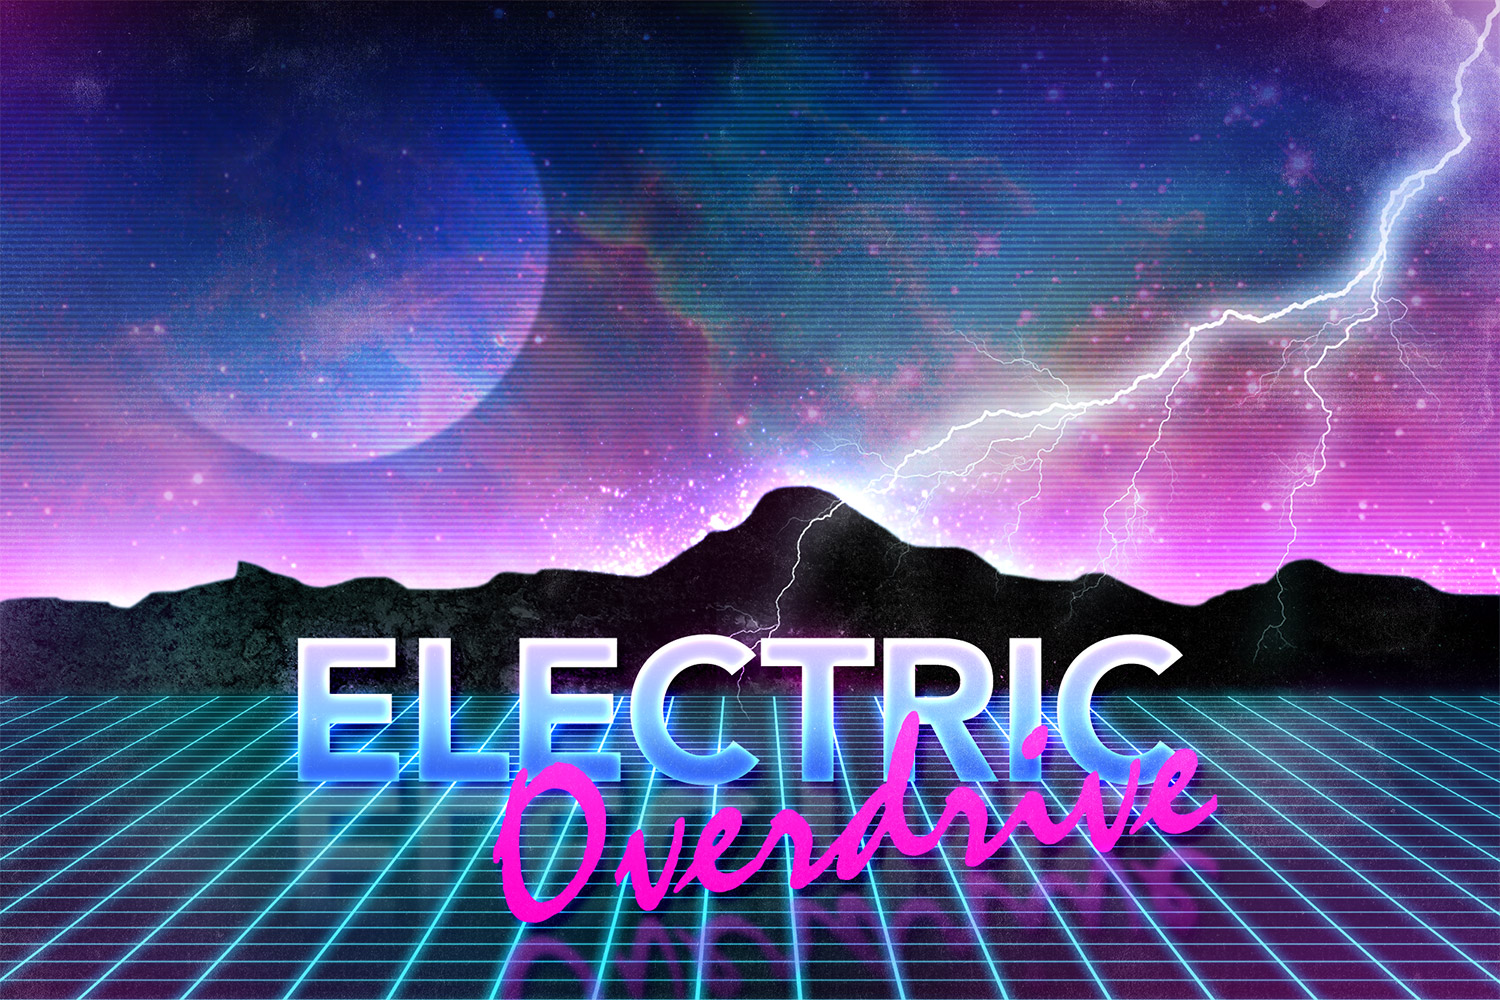
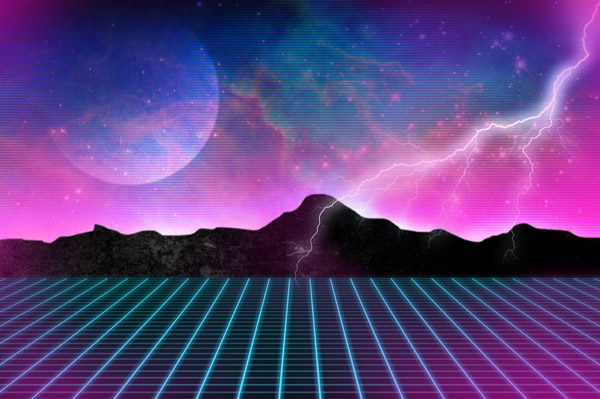
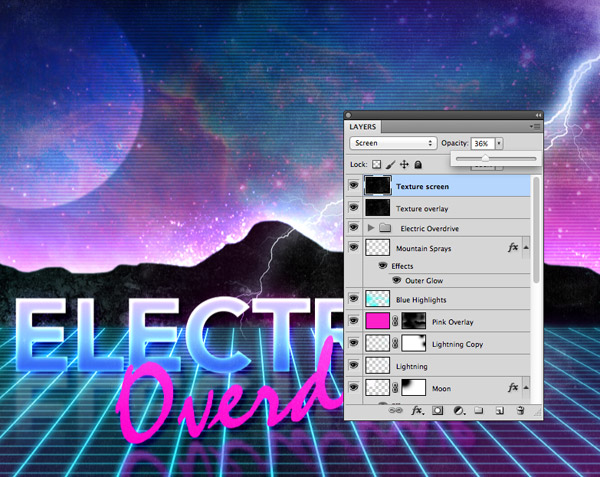
Earlier this year I posted a showcase of 80s inspired neon art featuring all kinds of bright fluoro colours and retro futuristic scenes. Having enjoyed browsing this style of art and listening to albums of 80s style electro synth music I decided to have a go at creating a design of my own. Follow this step by step tutorial to see how I put together the Electric Overdrive artwork with various texturing and lighting effects in Photoshop.

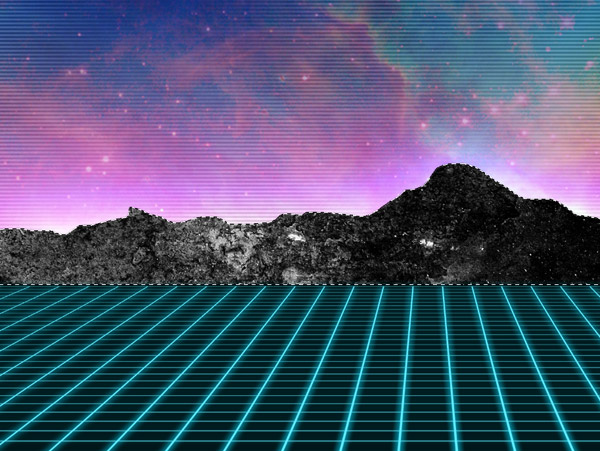
The design we’ll be creating makes use of all the typical elements of 80s style retro futuristic art. Desert mountain ranges, Tron style grids and galactic star fields are all combined with intense RGB colours.

We’ll take the first few steps in Adobe Illustrator to create a grid which we can then copy over to Photoshop. Draw a line on the artboard and drag out a duplicate by holding the Alt key. Repeatedly press CMD+D to repeat this transformation, then copy/paste the lines and rotate them by 90° to create a grid layout.
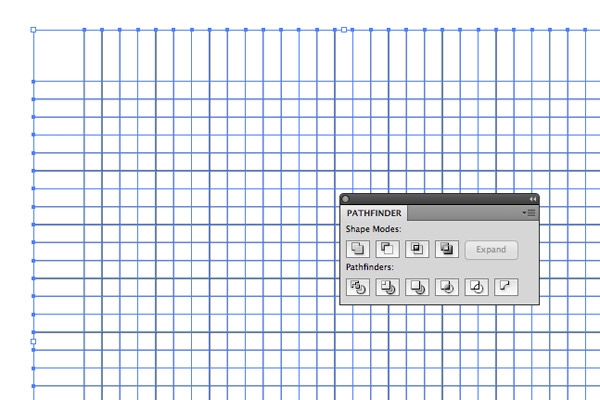
Select all the lines that make up the grid and hit the Divide option from the Pathfinder palette.
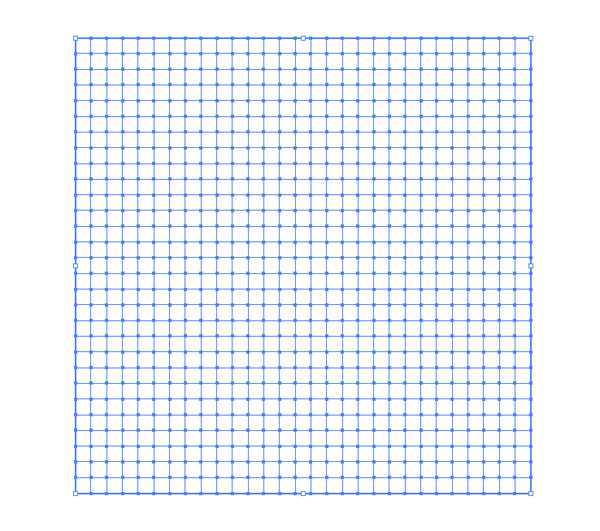
Dividing the lines will eliminate the excess around the edges. Add a white stroke to the paths and copy the object ready for pasting into Photoshop.
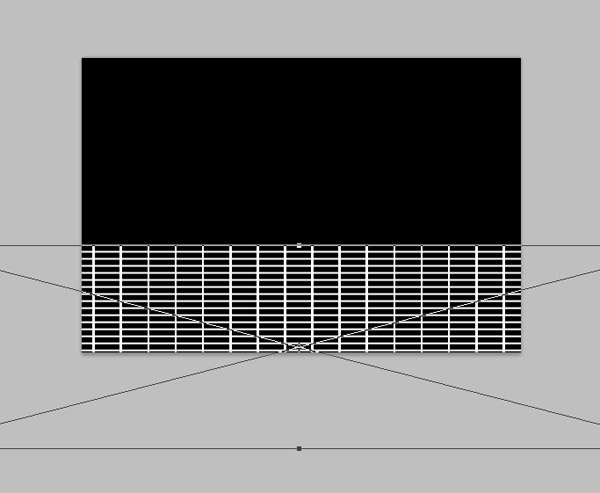
Create a new document in Photoshop at your desired dimensions and fill the background with black. Paste the grid element and scale it up way beyond the canvas size. Squash the grid to begin manipulating its perspective. Hit Enter to apply the transformations.
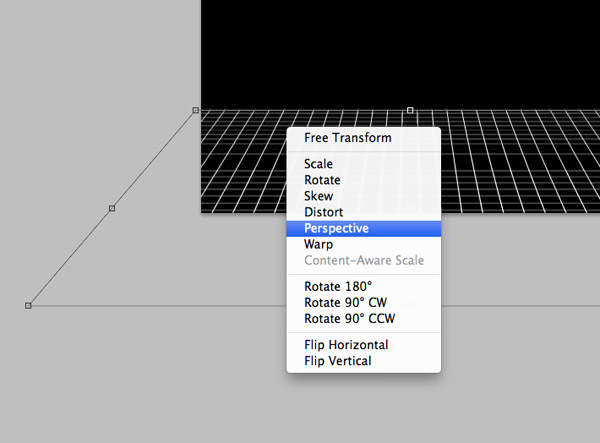
Press CMD+T to transform the grid again, but this time right click and select the Perspective option. Drag a top corner handle inwards to give the impression that the grid is flowing into the distance.

Add a bright cyan Color Overlay and an Outer Glow layer style to give the grid an illuminated appearance.
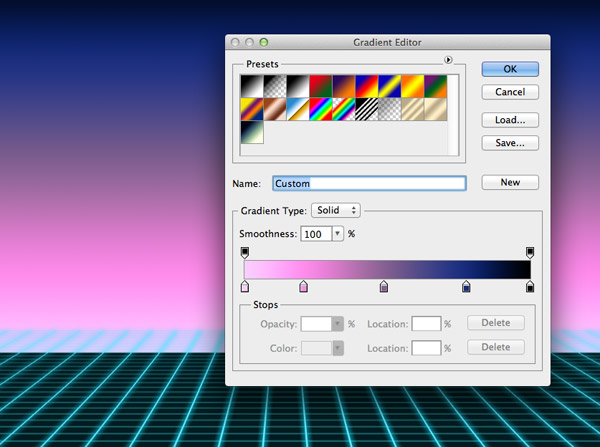
Set up a gradient using a range of bright colours. Here I’m using #f9ceff, #ff8deb, #876193, #162b79 and #000000. Drag this gradient on a new layer to flow vertically between the grid and the top of the canvas.
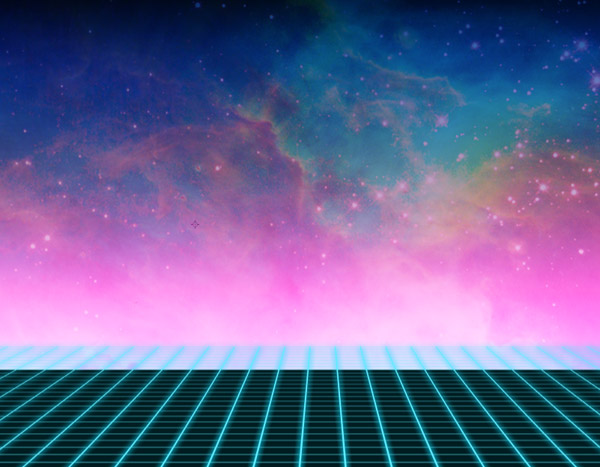
Use the Hubblesite public domain library to find a vibrant nebulae image to paste over the background gradient. Set the blending mode to Soft Light to allow the colours to interact.
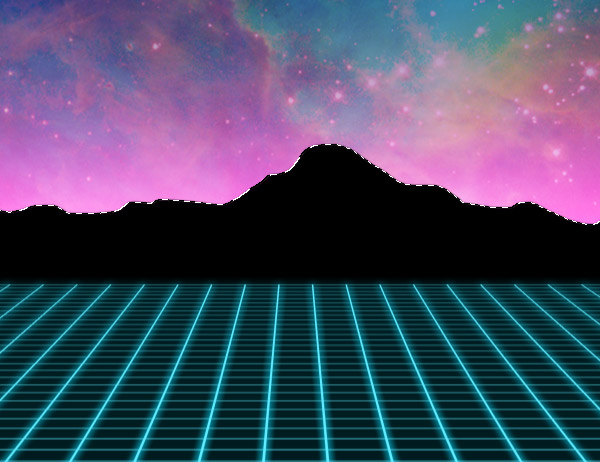
Use the Lasso tool to freehand draw a rough mountain scape across the canvas. Fill this area black on a new layer then add a 3px Gaussian Blur to take away the crisp edges.
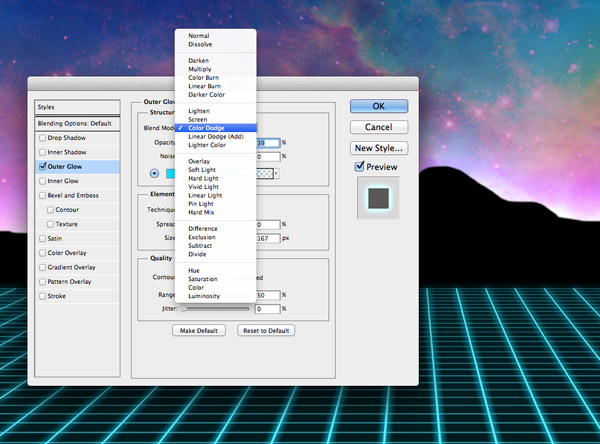
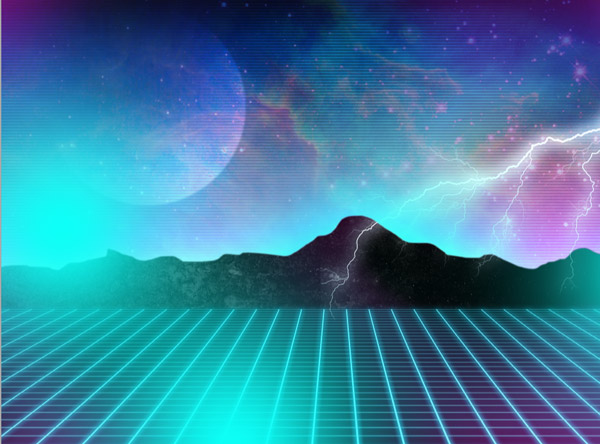
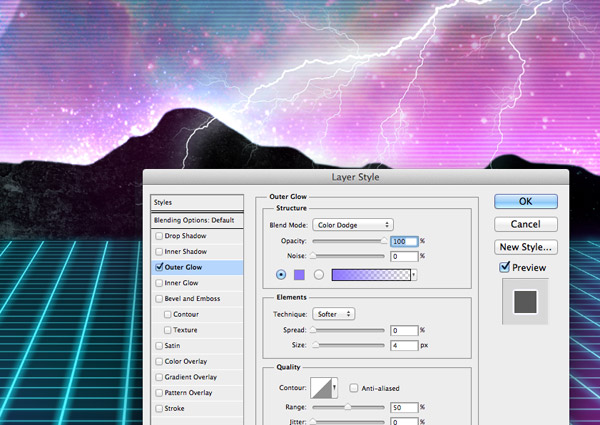
Double click the mountains layer and add an Outer Glow effect. Use a bright cyan (#00e4ff) and scale up the size of the glow effect. Change the blending mode to Color Dodge to allow the glow to burn out the background colours, but reduce the opacity to reduce the impact of the effect.
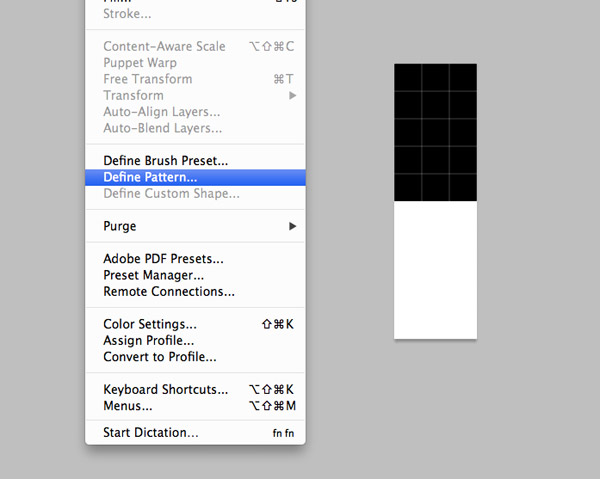
Create a new document using the dimensions 3px by 10px. Zoom right in and fill the upper five pixels with black. Go to Edit > Define Pattern then close the document.
Head back to the working document and create a new layer. Switch the Gradient tool for the Paint Bucket and change the option in the upper toolbar from Foreground to Pattern. Select the newly defined pattern from the list and click anywhere on the canvas.
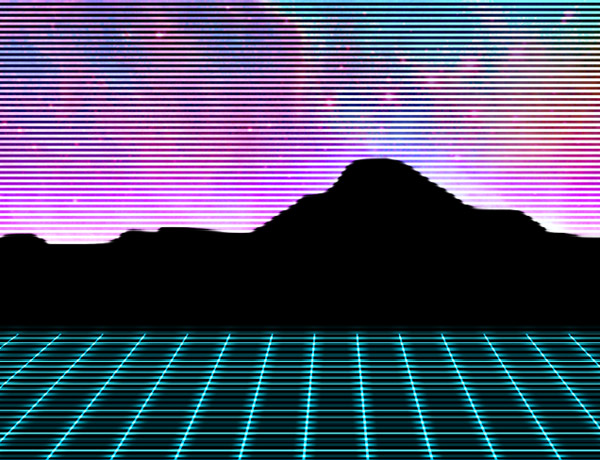
Change the blending mode of the pattern fill layer to Overlay then reduce the opacity to around 20%. Add a layer mask to the pattern layer and use a large soft brush to randomly erase away portions of the scanlines.
Open up a concrete texture and paste it into the document. CMD+Click the thumbnail of the mountains layer to load its selection then press CMD+Shift+I to Inverse. Delete the excess then desaturate and increase the contrast of the texture. Reduce the opacity to 30% and set the blending mode to Screen.
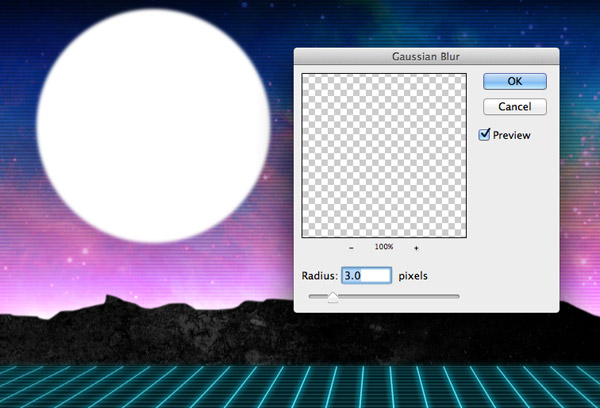
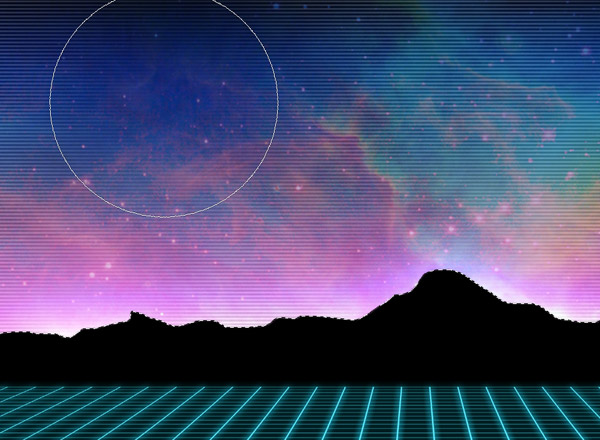
Draw a white circle in the sky area to represent a planet or a moon and add a 3px Gaussian Blur to remove the sharp edges. Change the blending mode to Overlay.
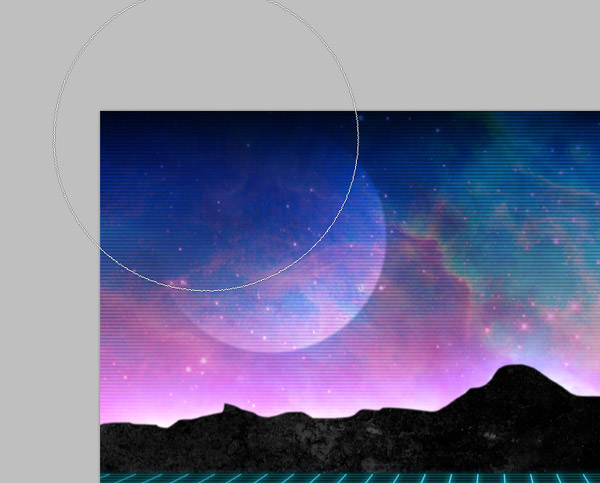
Add a layer mask to the moon layer and use a large soft brush to erase out the upper left side to give it a more realistic appearance.

No 80s design would be complete without a bolt of lightning. Add this lightning stock image to the document.
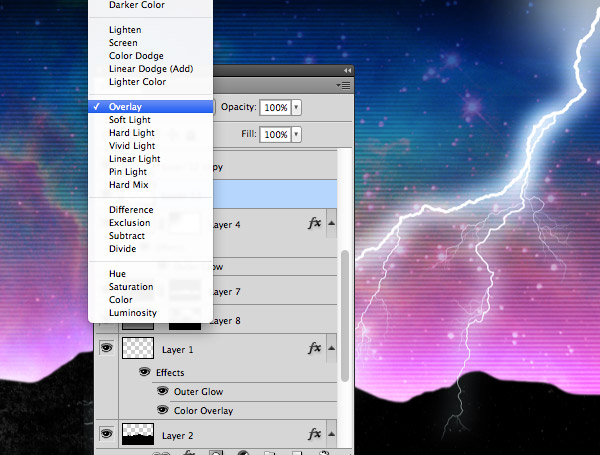
Duplicate the lightning layer and change the original to Overlay to allow some of the underlying colours of the design to blend with the lightning glow.
Fill a new layer at the top of the stack with bright pink (#ff03ca). Add a layer mask and begin erasing out the colour with a soft brush, leaving small areas around the edges. Switch the brush colour from black to white to erase and restore areas of pink.
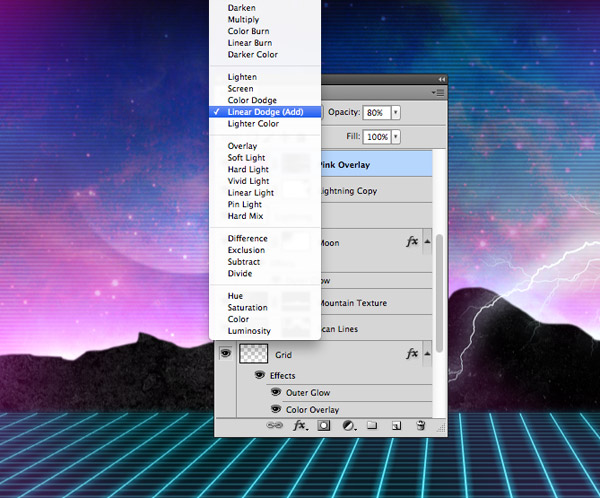
Change this pink layer’s blending mode to Linear Dodge and set the opacity to around 80% to add some subtle colour variations to the design.
Set the foreground colour to a vibrant teal (#00fff2) and dab random spots across the design with a large soft brush. Set this layer to Soft Light at 50%.
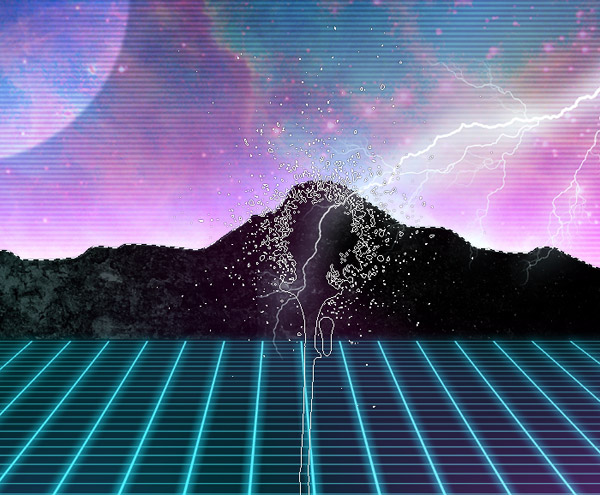
Open up my set of Spray Paint Photoshop brushes and select a brush with lots of splatters. Load the selection of the mountain layer then inverse it. On a new layer add some overspray around the mountains, using the selection to avoid painting over the actual mountain area.
Add an Outer Glow effect to the overspray layer using the Color Dodge blending mode to illuminate the sprays.
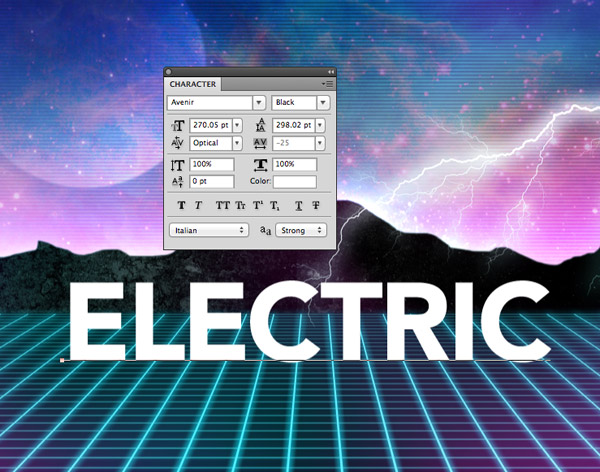
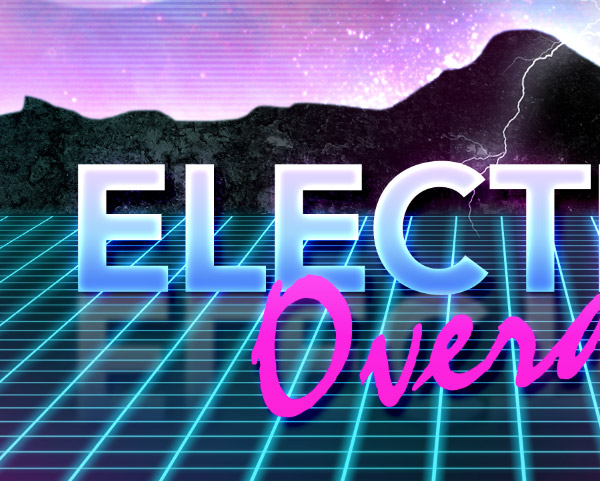
The design is now ready for some 80s inspired text. Add the word Electric in a strong font such as Avenir Black. Align it to the grid that represents ground level.

Next we’ll add a series of layer styles to bring the text to life with various vibrant effects. Begin with a Gradient using the colours #ead5ff, #a0d6ff and #3971ef.
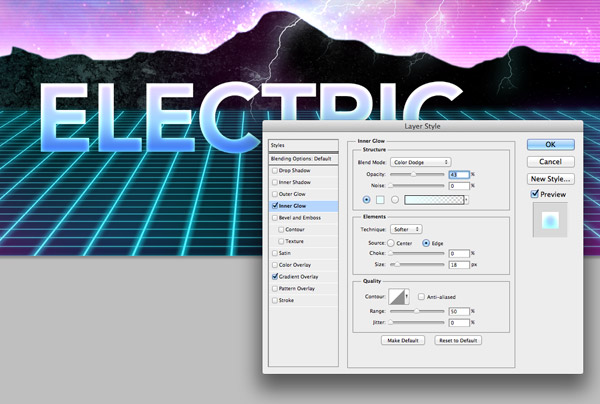
Add an Inner Glow effect using a light cyan (#eafeff) set to Color Dodge at 45% opacity and enough Size to smoothly flow around the edge of the letters.
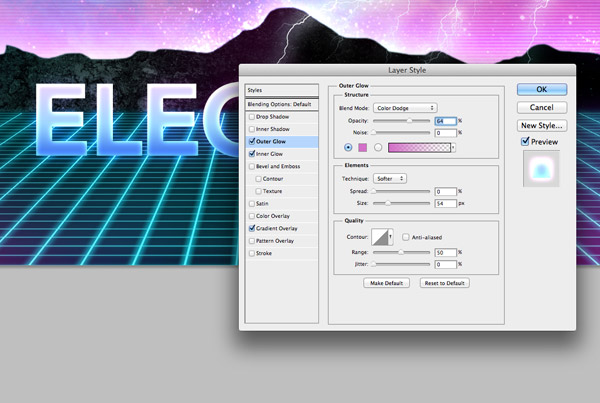
An large 55px Outer Glow with a dark pink (#d36fc8) also set to Color Dodge at 65% opacity will add more colour variation as the areas around the text are illuminated.
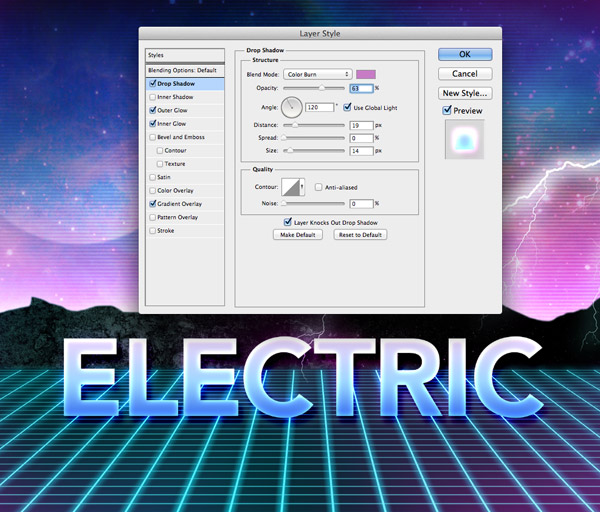
Finally add a Drop Shadow with the same dark pink (#d36fc8) using the settings Color Burn, 65% opacity, 19px distance and 14px size to darken the areas around the text to help lift it from the screen.
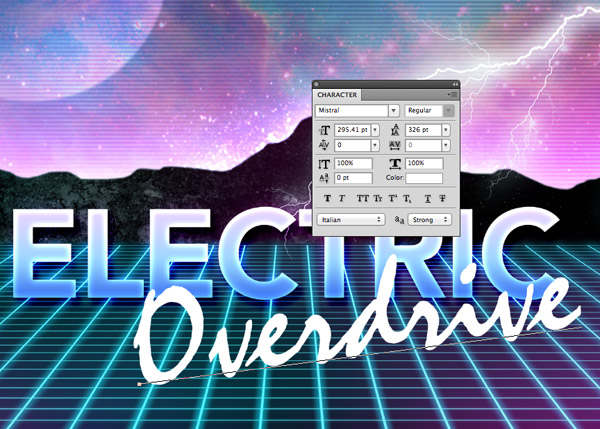
Add the word Overdrive in a brush font such as Mistral and angle it to overlap the Electric text.

Copy and paste the layer style from the Electric text but remove the Inner Glow and change the gradient colours to #ff5ef6 and #ff00d8.
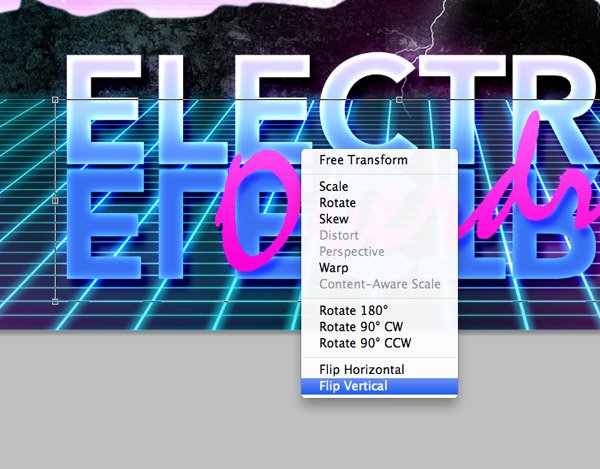
Duplicate the layer of the Electric text, Transform and select Flip Vertical. Position this duplicate on the underside of the original.
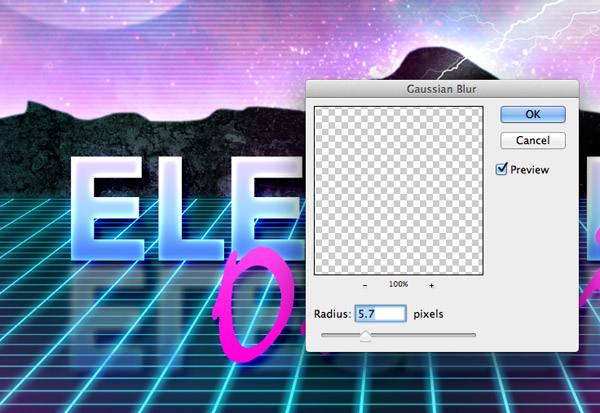
Add a 5-6px Gaussian blur to the duplicate text, change its blending mode to Screen and reduce the opacity to 60% to create a reflection on the grid surface.
Add a layer mask to the reflection layer and use a soft brush to erase the lower portion to allow the text to gradually fade away.
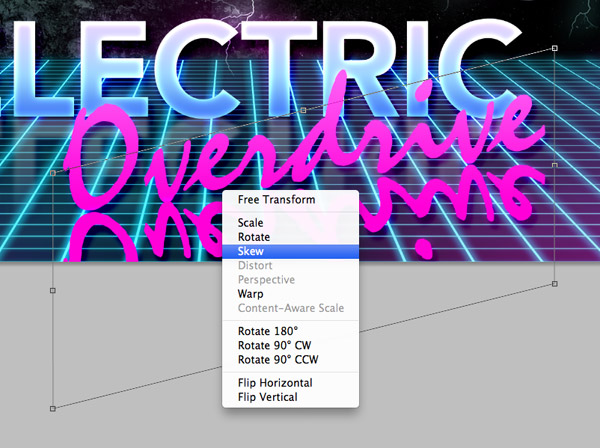
Repeat the process with the Overdrive text layer, but with this element being angled the reflection will need to be Skewed using the Transform tool.
Rasterize the text and apply the same Screen blending mode and 60% opacity to ground the text within the scene.
Add some white splodges on a new layer below the text and change the blending mode to Soft Light. This little touch will just illuminate more areas around the text and add more colour variations.
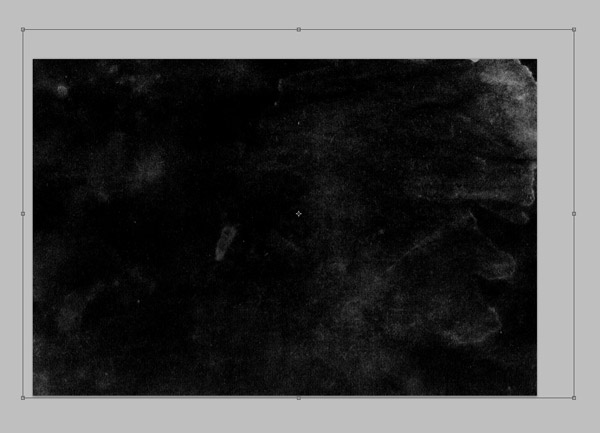
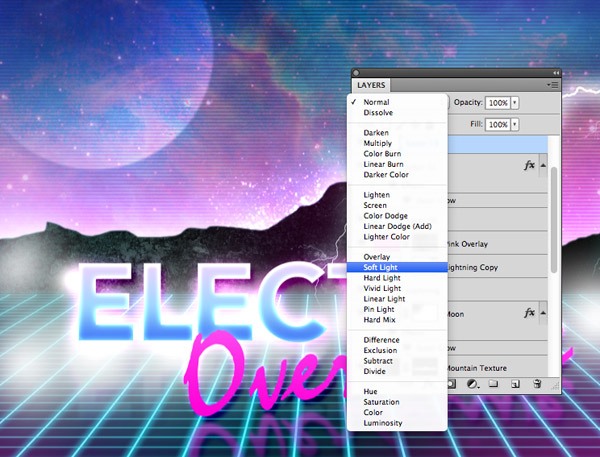
Open up a subtle grunge texture, invert it and paste it over the design. Add a Sharpen filter to bring out the details then change the blending mode to Overlay.
Duplicate the texture overlay layer and change its blending mode to Screen. Adjust the opacity of these two texture layers to fine tune the overall brightness and contrast of the image. Doing this using textures helps apply grainy details in the process.
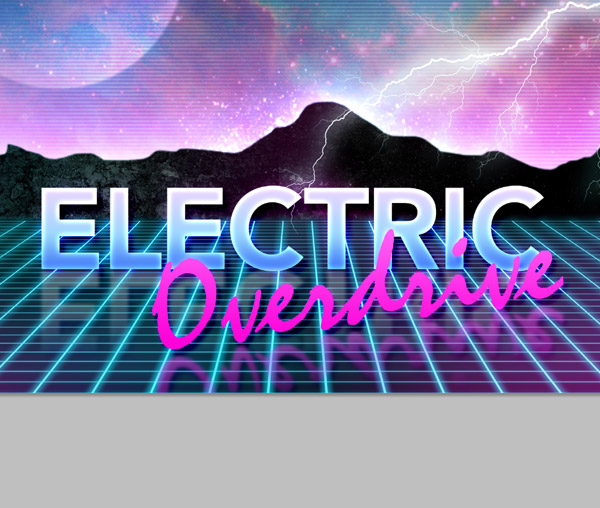
The final artwork really captures the vibrant neon effects of those 80s retro futuristic designs. Why not mock up your version as cover art for an 80s inspired synthpop album?

This is awesome.
Awesome artwork and fresh tutorial design concept. Loved it.
I haven’t read all of this just yet, but the colors that are used are – amazing – they really caught my eye.
I’m pretty sure had a lot of cassette tapes with this type of cover on them, lol
Well, that looks really nice!
Love your blog <3
This is great, such a fun design.
That hot pink Mistral script reminds me of a certain movie!
Another knockout tutorial, Chris.
That’s a wicked tutorial.
And uses so many PS tools so effectively.
Nice one Chris!
This is awesome and such a fun tutorial! Very nice one Chris, beautiful and attractive effects you put in this tutorial :)
That is awesome, love the colors! Thanks for the tutorial!
Epic tutorial Chris ty.
Wow! Thank you for such in-depth tutorial – it is really easy to repeat now, even for starting designers, plus it gives some great ideas even for prefessionals
I admire the way of art and the design
I loved your blog. I will tell all my friends on twitter. The color is super
Hey Chris!
Hey Chris! Sharing this today on our Arsenal Facebook!
Thanks dude! Its very cool! Illustrator & Ps is just the coolest ever!!
Waah this electric landscape is just amazing, really great final resultat and a Photoshop tutorial very usefull. Thank you Chris.
Singing…..”In the 80’s….the 80’s”….
Good stuff, thanks for sharing Chris!
Cool, very good imitation of the Farcry 3 Blood Dragon cover art
Very nice. I have used similar techniques before, however the addition of the lightning bolt stock image really kicked it up a notch :)
Great tutorial, thanks. I’m looking to design a site with a heavy Grand Theft Auto: Vice City vibe, and this will be really helpful for the logo.
Hi Chris and all,
Fab tutorial but I’m a bit stuck. When I paste the grid and try to transform it the perspective option is greyed out when I right click? (I inserted it as a smart object, is this where I went wrong?)
Can anyone help please?
Thanks,
Laura
You should def mention that it’s an imitation of the Farcry 3 Blood Dragon cover… unless they copied your tutorial. In which case, fantastic job. :)
OMG! He’s the witcher!
I love this tutorial, so well written and the result is AWESOME
thank you! *-*
Trying to create a similar effect but I don’t have Illustrator. Do you have to have Illustrator for the first step? I have PS. Is there a free alternative to Illustrator?