This post was originally published in 2008
The tips and techniques explained may be outdated.
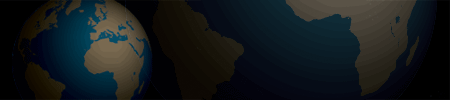
Adobe Illustrator has some nifty built in features when it comes to working in three dimensions. This example gives a quick walkthrough on using such features to create a 3D rotatable globe, allowing the earth to be revolved in order to show the desired countries and continents.

One of the first steps is to source a continental layout of the globe in 2D format, follow the recent post; Free Vector Maps and Country Outlines and download the vector world map from MacDaddy.

Open up the map in Illustrator and select the main vector shapes, click the 'New' icon in the Symbols palette. With this symbol saved into the palette delete out the shapes.

Draw a circle on the artboard with a blue fill.

With the Direct Selection Tool (White Arrow) select just the right hand point.

Hit delete to remove this point and leave a semi-circle.

With the semi-circle still selected go to Effect > 3D > Revolve.

In the 3D Revolve options change the source to the Right Edge and Surface to Diffuse Shading.

Click the Map Art button and select the previously created symbol of the world map, scale the artwork to fit and also check the Shade Artwork checkbox.

This will leave you with a three dimensional sphere mapped with the continents of the world.

Should you want to adjust the angle of the globe, open up the Appearances palette and double click on the 3D Revolve effect to open back up the options window.

As you can imagine this feature is not limited to maps of the world, imagine the advantage of drawing up a drinks can and being able to place a label design for review.

Fantastically simple but great effect!! Thanks Chris!
Hi, I tried it but when I click on scale to fit I don’t have your result it seems like the top left corner of the symbol is locked in the centre of the map art window and can move only rotate or maximise
Mik
nice tutorial! This is a cool effect. Its posible to make an animation like this with two of these globes in different rotations using the blend tool and then exporting the images into a video format.
On your example part of Alaska is duplicated as island.
Map art should be adjusted to remove duplication.
Thats pretty nifty, I could have done it for my label bottle design instead of using Cinema 4D.
You can see my bottle design outcome here:
Nice tutorial yet again.
Wow…thats pretty cool…never would have thought of that. Illustrator rocks…especially the live trace feature, helps make some really quick and cool art for clients.
gracias………
As always wonderful
Thank you so much I need it for a project I have in mind ;D
where is the ‘map art’ button?
I like this article very much!
I didn’t know that things you tell in this post!
Thank you for all information, Spoon Graphics!!!
I live your unburdened and useful articles!
<a href=”http://www.noutweb.com/blog” title=”Blog “>Nout van Deijck, Blog (about (web)design, typography, scince and news)
Wow sir! its really fantastic but i try in flash mx. i don’t know abut Adobe Illustrator…
i want to learn this. plz! help me.
Nice work! I love how well Illustrator makes 3D objects look so smooth.
This tutorial looks great but I have just spent 4 frustrating hours trying to get the map to “scale to fit”. As soon as I click the button the map scales down so small I can hardly see it and if you try to enlarge it the handles disappear along time before it is anywhere near large enough. I am using Illo CS3, anyone got any ideas?
Red: I am having the same problem. I do not get the scaling handles without clicking the “Scale to fit” button, but when I do the artwork becomes too small. I’m also using Adobe Illustrator CS3
detailed tutorial.. thanks
I’m afraid I can’t help out on the CS3 issues, I suppose it’s about time I got some money together and upgraded!
Chris
YAA Gr8!
do suggest the CS3 methoD
nice tutorial…thanks
Outstanding Work keep it up and thanks for sharing this tutorial………………..! plz attention me new tutorials for my email adress Thannxxxxxxxx…….
For some reason CS3 doesn’t like the vector file.
I used this vector: http://www.vecteezy.com/vf/482-World-Map-Vector-Graphic
And it worked just fine, less detailed but did the trick.
This tutorial was very useful in my design field. I want to learn more. but i want to video file
hello there!!! this blog rocks!!!! i have a question: how come I can´t see the bounding box of the continents symbol in the Map Art dialog box!???? seems I´m not the only one having that problem, although I´m still using CS2…
this awsome tutorial simple it rocks my mind.
use tutoralis
Fantastic. Thanks very much.
Can u post screenshot how to get to map art button..?
Wow! I’d played around with the 3D effects before, but had no idea one could use it for neat tricks like this one. Thanks for sharing!!!
Goooood Work………!
Thanx
Hi – this is FAB, but I’m having problems with the “scale to fit”, when I select this my map seems to dissapear entirely…help ;)
Read up! :) For some reason CS3 doesn’t like the vector file and it breaks when you try and ‘scale to fit’. I have no idea why.
But, if you use this vector file:
http://www.vecteezy.com/vf/482-World-Map-Vector-Graphic
It’ll work just fine.
Thats awesome! Just tried it and its perfect – thanks SO much!
Fantastic tutorial. This guy is spot on!
Great world map too…. If I do say so myself! Haahaa
Keep up the good work!
fabulous! got it to work no problems in CS3. (i used the vecteezy link for the world map.)
Really cool!
Read in my blog how to create a bottle with label, and a cup filled with liquid. In spanish.
Well, after playing in CS3 in while, the scaling doesn’t work on this image, however, if you scale it down to the size you need then create a symbol out of it, and then paste it, and use shading its ok. THE SCALING FEATURE IS BROKE SOMEHOW
I figured it out!!! I had to edit an instance of the image, and convert it from COMPOUND SHAPE to COMPOUND PATH. After you have selected the layer with just the continents, goto the Pathfinder Window.. select the dropdown menu and click on RELEASE COMPOUND SHAPE, you will then have a COMPOUND PATH. When you release the compound shape you will LOSE COLOR, The color was RGB=230,216,281, if you then use color palette you can recolor and then convert to symbol,specify Flash Registration as centerpoint, and Graphic Instance! After you convert from Compount Shape to Compount Path everything else in tutorial should work!
I had the same problem with not being able to scale to fit. I discovered the error was mine. When selecting the vector map pieces make sure you use the “selection tool” the black arrow, not the white one and group them. Then create your new symbol.
The “map art” button is on the 3d Revolve Options dialogue box after you select Revolve from the Effects/3d drop down menu.
Think You
Thank You.
Cool!!! Good work…
Cool!!! Great
Hi,
I want some below mentioned samples
1. Service Manual Art
2. Wiring Art
3. Exploded View
4. TechIllustrator
5. Medical Illustrations
6. Safety Illustrations (Motiva)
7. Brochure Desings
8. Loggo Design
9. Other works that we can do.
Brilliant.Realy help me..Thanks
it’s amazing and interesting!
nice post
Congratulations!
This blog is the century discover!! Brilliant!! Perfect!! The best of the best!!
Awesome, didnt know how to map art on to a sphere.
Question though, how can I add a bit of shadow at the bottom?
Amazing tutorial!!!
I will be following you everytime, coz ave seen something ave never seen before which is one of my best money making interests.
Big Up
Will this work with an oval instead of a circle?
Does it need to be a symmetrical shape?
thanks
thnks
it really works
love it! thanks,
i had the same problem with the map going down in scale to the right hand corner, and being unable to move or resize it, the problem was when i made the map into a symbol, there is a little box called ‘flash registration’ you need to make sure the centre square is highlighted, then it all works fine :)