
If you want to be a design master, you must first master the Pen tool. The Pen tool is one of the most important items in your Photoshop and Illustrator toolboxes and learning how to comfortably use it will open up new opportunities and speed up your every day workflow. Here’s a couple of techniques I use when working with the pen tool that I hope will help you get to grips with your bezier curves.
The many faces of the Pen tool
The Pen tool comes with all kinds of options for creating, removing and tweaking bezier points and curves. All these options can be quickly selected using certain shortcut keys, or you can choose that specific tool individually from within the Pen tool stack.
Let’s look at the different variations and what they do:
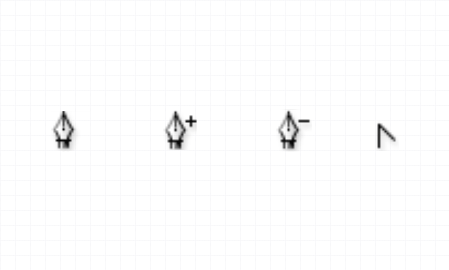
Pen Tool – The Pen tool Swiss army knife. All the following options are built right into the Pen tool and can be accessed using keyboard shortcuts.
Add Anchor Point Tool – This variation of the Pen tool adds additional points anywhere on a path. (Also accessible by hovering over a path)
Delete Anchor Point Tool – This variation of the Pen tool removes existing points from a path. (Also accessible by hovering over a point)
Convert Anchor Point Tool – This variation of the Pen tool creates bezier handles on a point to form a curve. (Also accessible by holding ALT – Illustrator only)
There’s also two other tools that are used alongside the Pen tool:
Path Selection Tool – Used to select a whole path, including all points and curves. (Also accessible by holding CMD – Photoshop only)
Direct Selection Tool – Used to select individual points or bezier handles.
The pen is mightier than the errm… magic wand
There’s two main uses for the Pen tool; Drawing shapes and cutting things out. You can draw shapes with the Pen tool in both Illustrator and Photoshop, but you’re only likely to use it to clip images out in Photoshop.
There’s no end to the type of shapes you can draw with the pen tool, you can make a straight line between two points or add a bend using bezier curves. This mixture of straight lines and curves of any angle allow you to draw any shape imaginable.
There’s load of tools in Photoshop you can use to remove the background from an image. You could use the lasso tool, the Eraser, a layer mask or even the extract filter, but none of them give the the fine control that a carefully drawn path gives you. What’s more, you can save multiple paths in your document so you can reselect or make minor tweaks to the selection later.
My two Pen tool techniques
I use one of two techniques when working with the pen tool. Which technique I use will depend on which application I’m using, as well as what I’m trying to achieve. Despite both Pen tools doing the same job between Illustrator and Photoshop, they don’t work exactly the same. You’ll need to remember to use two slightly different techniques when working between the two applications.
Technique one
This first technique works best in Photoshop, especially when creating a clipping path to cut out an image.
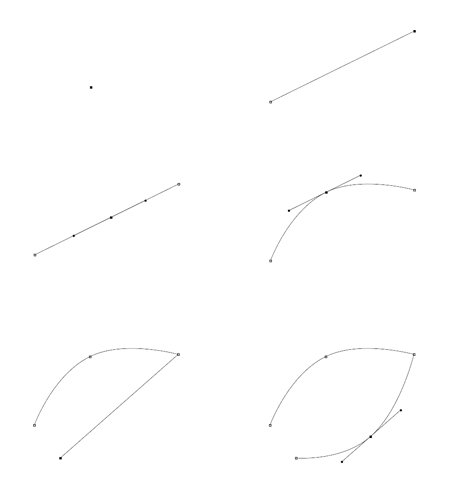
Step one: Add a starting point before the curve, don’t drag out any bezier handles – Just a plain old point.
Step two: Add a second point at the end of the curve. Again, don’t drag out any bezier handles. You should be left with a straight line running between the two points.
Step three: Hover over the straight path line and add a point half way along. In Photoshop this point is automatically given bezier handles. It isn’t in Illustrator, which makes this technique more difficult to use.
Step four: Hold the CMD (or CTRL key on Windows) to switch the Pen tool to the Direct Selection Tool, then drag the new point into position to form a curved line.
Step five: Keep the CMD (or CTRL) key held in order to drag each bezier handle into position to match the curve to the original image.
Step six: Complete the path by returning to the start point. Look out for the small circular icon to confirm that the path is going to be closed.
Technique two
This second technique is more suited to drawing shapes, although the process is slightly different between Photoshop and Illustrator.
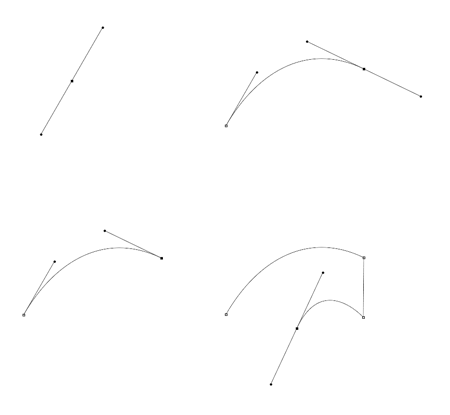
Step one: Click and drag a point. The dragging motion pulls out a single bezier handle which you’ll want to aim in the direction of your desired curve.
Step two: Add a second point to create a curved line by clicking and dragging another bezier handle. Move the handle around into position before releasing the mouse.
Step three: Single click (Illustrator) / Alt-Click (Photoshop) the end point to remove the bezier handle. You can sometimes get away without this step if your line is going to be smooth and flowing, otherwise you might end up with huge loops in your path when trying to navigate acute angles.
Step four: Complete the path by returning to the start point. Look out for the small circular icon to confirm that the path is going to be closed.

Simple but nice!
I will go play with the pen tool straight away.
thanks for this, im rather useless at using the pen tool ahaa.
The pen tool always confuses the heck out of me – I’ll have a go though :(
Yep, after using the pen tool for a while, you realise that sometimes it is easier to apply the curve after the two surrounding points which do not contain bezier curves – nice, simple, striaght-forward advice.
thanx for the tips! I willlearn harder on the pen tool to master it.
I spend a lot of time cutting people out of high resolution photographs for my job and obviously the pen tool is one of the most important for my work. I think it’s worth noting that if you have extensive work to do with a pen tool it becomes significantly easier with a drawing tablet.
Having the tablet and using the tool for hours on end my technique leans towards the second one explained. I always click and drag all of my points as I move along and trace an outline. After using the pen tool for a while you get pretty used to what type of curve each new point is going to create and it becomes a lot more powerful of a tool, something you can use for more applications than you expect.
Great post Chris!
What about using the Pen tool in Fireworks?
nice post chris, i think this tips is very importan, basic great!!
nice post chris, i think this tips is very importan, basic but we must know!
thanks for the tips! great article
My tip# added:
I think beginners should turn on the “Smart Guides” option( CMD + U / Ctrl +U or View -> Smart Guides ) in Illustrator while using the pen tool, it will be of great help !
Nice post, some great tips there. I need some practice using the pen tool with my tablet like Jason mentioned.
I am a beginner in this and I do appreciate finding out how to use the different tools. Thank you
thank you!
Good tip
Thanks Chris, great tips :)
Top 50 Online Design Magazines – http://www.cruzine.com/2010/09/13/top-online-design-magazines/
I dont do a single project without using the pen tool. In Illustrator I usually I roughly draw round the object I want to cut out or trace, then zoom right in and make the line perfect and continue from there.
I haven’t used it as much in Photoshop, as it works differently. What kind of things can be done with it other than making selections
Thanks
Thanks for the reminders. Its been awhile since I’ve had to use the pen tool and I’ve forgotten some of those steps, and learnt a few now ones.
I remember struggling with the pen tool back in 1999, i’m sure this will help a lot of people! :)
the most powerful feature to me:
– klick an drag out drag out bezier handles
– press ALT while moving around the bezier handles to convert the point to a corner point
this makes it a lot easier to cut out detailed stuff
wonderful tutorial. I havn’t noticed the direct selection tool using ‘ctrl’ until now :)
I think you forgot that in Photoshop once you place a point you can’t pick it up and move it again like you can in illustrator (unless I’m forgetting something). Meaning in PS you can use the direct tool to move the point.
Very useful post, thanks!
Nice post, great tips, the tips will hopefully help me to master the pen tool, Cheers!
Is it possible if you can make a video or something? Coz I’m already confused with the pen tool and this tip is confusing even more. lol. Thanks
Thanks Chris! I didn’t know how to remove the bezier handle after the point is created…it was causing me problems every time :)
It really nice chris, I was not aware of selecting direct tool using pen tool(with shortcut cnt).
Thnks.
Thanks for sharing some of your techniques with the pen tool.
This is amazing, in that I had just googled some Illustrator tutorials and found your site, but I was REALLY looking for pen tutorials!
@Michel: The pen tool works sort pretty similar in Fireworks, but as pointed out its a bit different in Photoshop since its used to make outlines on a new layer, not draw things.
So my previous point about the Photoshop pen isn’t completely correct, but it is different.
Very helpful tips for a newbie. I’m making the jump from programming to more designing and web development.
The pen tool is the best!
thanks a lot!
love the pen tool
I LOVE THIS POST. your the man. not. get a life
Would love to see you do better…….;) At least Chris invests time and knowledge to share with us. :D
In my first job, after uni, I spent most of my time with the pen tool in Photoshop/Illustrator. I hated it and got bored quickly but I am very glad now. It is more natural to me now than using a paintbrush.
Nice.
Thanks!
Thanks for the tip, must try to use the pen tool more often.
Hi Chris,
You helped me learn something new today :)
Thanks !