If you have an interest in Photography chances are one day you’ll want to convert one of your images to black and white to achieve that atmospheric and intense look. The actual process can be as easy as clicking a button, but what are the best ways to make your photos black and white in Photoshop? In this post I’ll cover some of the popular techniques and describe which methods give the best results.
How NOT to convert your images to black & white
First, let’s take a look at some of the common mistakes people make when trying to turn their photos to black and white.
Desaturate
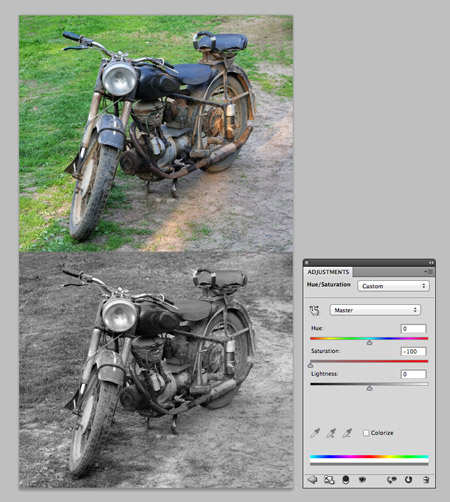
Image > Adjustments > Desaturate or sliding the Saturation level to zero in the Hue/Saturation options are two methods that quickly achieve a black and white effect, but this method is far from ideal. Desaturating an image simply removes the colour, but isn’t that what we want? Well, not really! A photograph is made up of various tones. When you desaturate an image it removes all the colour information and makes all areas of the image that are the same brightness or contrast the same shade of grey. This results in a flat and washed out looking image.
Grayscale
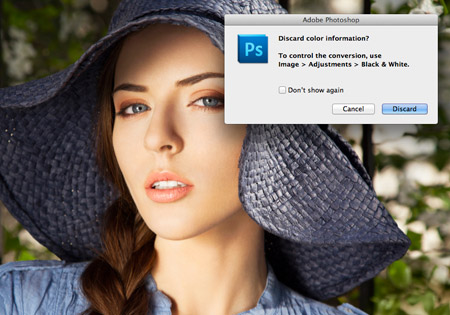
Another quick and dirty method to converting an image to black and white is to change the image mode to Greyscale. This yields similar results to Desaturation, where the image is left flat with low contrast. Photoshop even warns you when attempting this and recommends you use the Black & White conversion for more control.
The best ways to convert your images to black & white
So, we’ve covered what not to do, now let’s take a look at some techniques that will leave your photos looking great.
Channel Mixer

The classic Photoshop black and white conversion technique is to play around with the Channel Mixer. These days the Channel Mixer can be found as an Adjustment Layer as well as under the adjustment menu, which helps keep this conversion non-destructive. The previous methods above discarded the colour information, but with the channel mixer you can finely control the tonal range of your image. Check the Monochrome option then move the Red, Green and Blue sliders to suit. Keep an eye on the total levels though, if you exceed 100% it means you’re blowing out some of the whites.
Black and White

Introduced back in Photoshop CS3, the Black and White adjustment (and adjustment layer) is a tool based on the old Channel Mixer method, but with a few more options. The Black and White adjustment layer gives you all the same channel controls as the Channel Mixer, but also allows you to add a tint for a cool sepia effect or cold horror movie tones. The Black and White adjustment layer also provides some default settings such as High Contrast Blue Filter, which can give you a head start when creating those intense black & white images.
Gradient Map
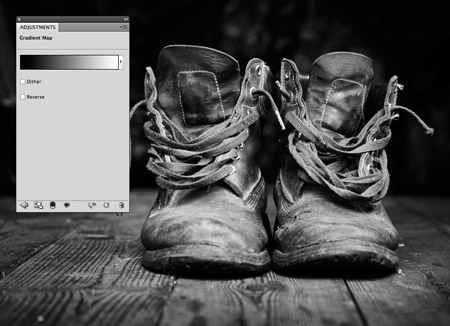
If you’re wanting to quickly make your images black and white, but don’t want to faff around with loads of fiddly slider controls you might want to try out the Gradient Map. The Gradient Map doesn’t remove any colour information, it just replaces it with a colour value from your chosen range. So if you select a black to white gradient the Gradient Map will swap the original colours for a grey tone of the same brightness, which helps maintain the overall contrast of your image. What’s more, you don’t have to stick with pure black or white, choose a dark blue and a creamy white for some cool vintage style film effects.
One step is missing if you’ll be using your b&w-looking photo for print. If it’s still in rgb it’s still build up of the three colors. So don’t forget to set the color profile to dot gain (10/15 or 20).
how would you do that?
Very instructive, thank you. I like the quick gradient map technique, never thought of that.
Hey, these are great round up. Pointed out the best way for making the photo black and white. Nice techniques you have mentioned. so thanks for posting. Keep sharing more.
I must admit I always used the greyscale option then spent ages fiddling with brightness and contrast. The channel mixer and gradient map produce much better results. Thanks for the tips!
It is amazing what you can do with a grey overall. I think I can come up with some good ideas after reading this. Thanks
I was so excited about these tips, I tried them all and them blogged the results. The channel mixer method is my favorite. Thanks so much for sharing!
Dear Chris Spooner, I’m your fan, please updates your tutorial, i waiting you everyday…..
Very useful tips in one place, thank´s!
It gives me a clear picture of how to convert the images to black and white without sacrificing with the quality. Thanks Chris
What about B&W using HDR ! it’s the coolest way ever!
Great tips, thanks. Always helps the print process too if images are edited correctly.
Also, do not forget the power of scripts! :D Thanks to Trevor Morris, this cool little one converts and saves an image to black-and-white using 20 different methods… Works like a charm on any images.
http://morris-photographics.com/photoshop/scripts/bw-variations.html
Great Stuff, and really good idea to convert a color picture in to black and white.
I work for a High School yearbook and we constantly change photos to black and white. I’m trying to develop a better way of doing this.
Currently, we add a Black and White layer, a curves layer, and Brightness Contrast. We use the curves for tonal corrections and boost black and whites with contrast. It’s highly ineffective, but it gets the job done.
I really like the Channel Mixer option, but I can’t get my photos bright enough without exceeding 100%, on top of that, the photos are slightly grayish compared to Gradient Map. I really like the Gradient Map, but I’ve found it doesn’t always work well for every photo, but when it does it’s very vivid, which we want.
Do you have any suggestions?
Very useful tips. Thank you.
Channel mixer option give my photo a great contrast. Thanks for the tips chris.