Resizing an image sounds like one of the simplest things you could do in Photoshop, but there are actually some common mistakes you should avoid. In today’s digital age, you will probably want to resize an image so it fits nicely on a computer screen, however, if you’re a professional designer or photographer, it becomes a little more complicated when you need to factor in print size and resolution. In today’s guide I’ll cover the basics of resizing an image in Adobe Photoshop, and explain when you should (or should not) choose the Resample option.
Watch the video
Subscribe to the Spoon Graphics YouTube Channel
Resize vs Resample
Resizing and resampling are two confusing terms because we tend to use them the wrong way round. We often talk about resizing an image, when what we are actually doing is resampling it! In Photoshop, go to Image > Image Size, or hit the CMD (or CTRL on Windows) + ALT + I shortcut.

By default, the Resample option in Photoshop is checked, which will mean the dimensions of the image will change by adding or subtracting pixels from the width and height. This is known as resampling, and it’s usually what we’re doing when altering the size of a digital image.
If the Resample option is unchecked, you’re now Resizing the image. Photoshop will now redistribute the existing pixels to alter the physical size or resolution of the image. This is typically reserved for graphic designers and photographers who are producing prints.
How to make an image smaller (Downsampling)
Photographs from cameras are pretty huge these days, they contain millions of pixels which make both the dimensions and the file size very large. Making an image smaller is known as Downsampling.
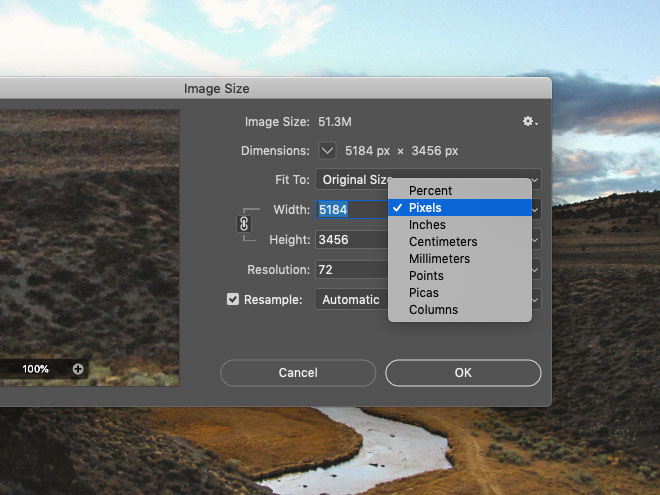
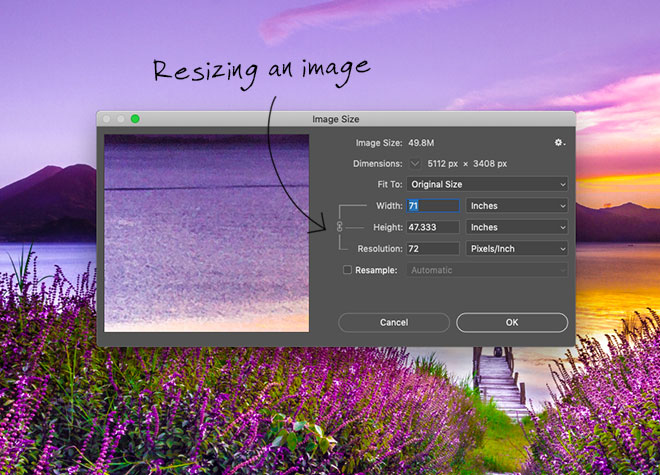
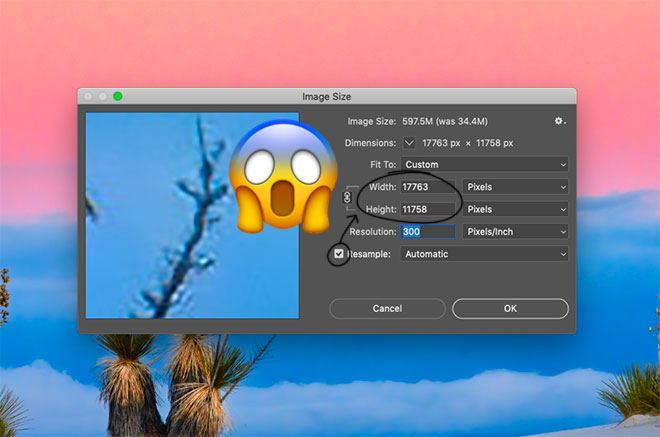
The Image Size window in Photoshop shows the current size of the image. Change the units to Pixels if they aren’t set already. Pixels are the standard unit of measurement for digital screens.

Enter your desired pixel dimension in either the Width or Height field. The Constrain Aspect Ratio’s chain icon is set by default to automatically calculate the other dimension so the image isn’t squashed or stretched. Photoshop provides some information at the top of the window showing the new file size compared to the original size of the image.
How to make an image bigger (Upsampling)
Images are made up of pixels. The number of pixels along the width and height of an image determines its size. It’s easy to make an image smaller because any excess pixels can be thrown away, but if you want to make an image bigger, Photoshop has to conjure up some new pixels to construct the larger size. This is called Interpolation. The general rule of thumb is to never make an image bigger than its current size because it will result in degraded quality with a fuzzy or pixelated appearance. However, the technology behind Photoshop can cleverly upsample an image with the best results possible.
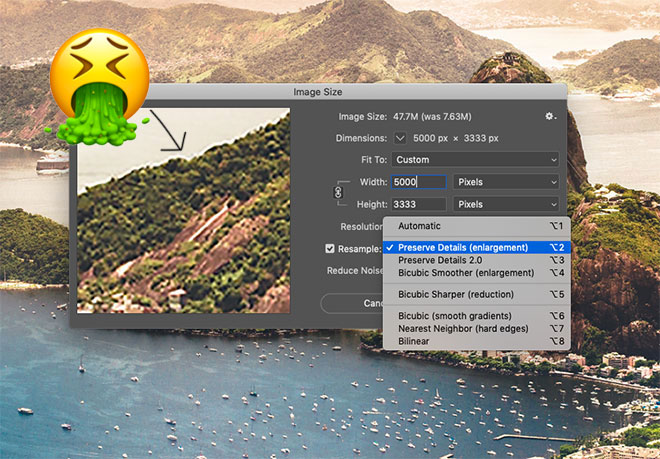
By default, Photoshop will choose the most suitable interpolation method itself with the Automatic option, but you can have finer control over the result by choosing one of several options. Each one is designed specifically for enlargement or reduction. Upsampling an image will never be perfect, but you can minimise the image degradation by smoothing or preserving details, depending on what works best for your specific picture.
How to change the resolution of an image
Traditionally, 72ppi is the go-to resolution for screen use, while 300ppi is the standard for print. PPI (pixels per inch) refers to the digital file, which translates to DPI (dots per inch) when the image is reproduced as a print. These terms are often used interchangeably. A high-quality 300ppi stock photograph will be perfectly suited for print use because it has a combination of large dimensions and high resolution. On the contrary, a 72ppi image might look huge on screen, but the maximum size it can be printed at 300ppi will be pretty small because those 72 pixels in every inch will soon run out when you need to fill each inch with 300 pixels… resulting in a smaller print size.
We know upsampling should be avoided to prevent image degradation, but you can increase the resolution of an image as long as you DISABLE the Resample option. If you don’t, the image will say it’s 300ppi, but thousands of new pixels will be interpolated by Photoshop, resulting in awful quality. To correctly change the resolution, the image should be resized (not resampled).

Uncheck the Resample option, which prevents you from altering the pixels dimensions of the image. You can then change your 72ppi image into a 300ppi image, but notice how the physical size in inches is reduced? Resizing only works with the existing pixels, without interpolating any new ones. You will have a crisp, high-quality 300ppi image with no loss of quality, but the overall print size is small because 300 pixels are added to every inch, rather than just 72, so you can’t fill as many inches!
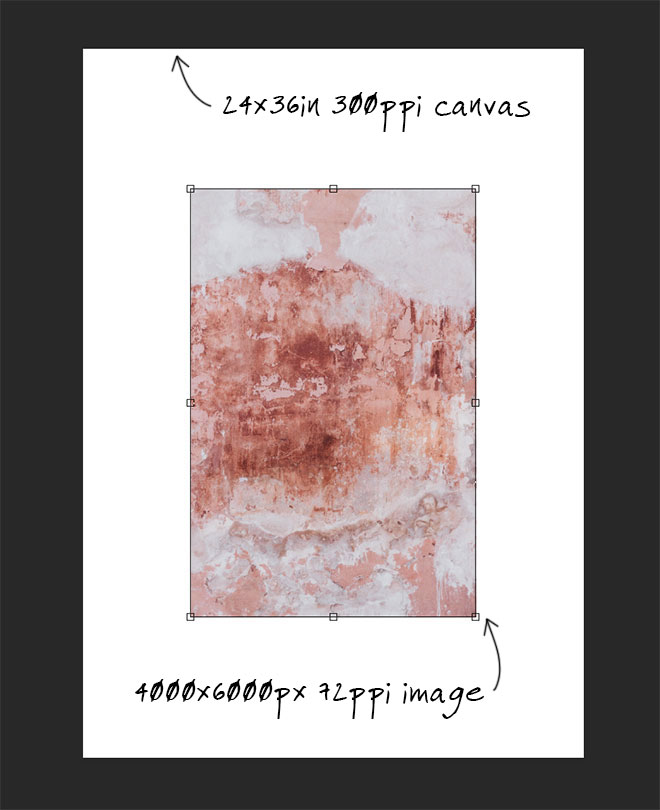
You don’t have to physically change the resolution of all your images when constructing a design. If you create a canvas at your desired dimensions and resolution, whenever you paste an image into the canvas, it will be automatically scaled relative to the document resolution. Remember not to scale your layers larger than their original size either. That is effectively the same as resampling them. Scaling down = Good. Scaling up = Bad. That’s why it’s important to source your assets such as photos and textures at the highest size and resolution possible, so they will be usable in real world projects like posters or canvas prints.

Thank you Chris! This is a super useful topic and will save a lot of headaches!! Can also be helpful when clients want to provide art/photos for projects.
Awesome information. So very useful for non-designers to help them understand, and for me to better explain. Thanks as always for the stupendous factoid.
Awesome information. So very useful for non-designers to help them understand, and for me to better explain. Thanks as always for the stupendous factoid.
I run into print jobs very rarely, and this 300ppi issue is always a pain, so thanks for the clear explanation of what’s going on with resizing and resampling! I always thought resampling did the OPPOSITE! Lol.
Gracias as always!!!
Thank you, Chris! This will prove very useful when explaining these concepts to students.
FINALLY! I meet a designer who understands the importance of sourcing an image at the highest resolution possible! I’m constantly dumbfounded by the art I get from corporate designers or agency designers who provide images they sourced for their websites and say, “Hey, we need to use this image for the 20-foot banner we want for a trade show. It’s maddening!!
Speaking as a corporate designer, a lot of us DO know what we are doing (and, yes, I worked for 12 years doing prepress). There were many times I purchased the highest resolution image from a stock supplier and needed it upsized for a banner. One of our vendors was able to enlarge an image more than 2000% size and make it look like it was shot that way…you’d never know it was any smaller, with crisp sharp detail. I was amazed at their capability. It can be done, you just need to know how.
I feel ya man.. been making signs for over 25 years.. and designers and customers are always giving me a tiny logo or graphics from their webpage.. always raster, always small. then want it 6 foot high on side of a van.
Hi! I’m researching for a coworker he had on what to ask for from clients at the LEAST in terms of a dpi or size of an image for large scale printing so as not to ask for something TOO big. We know bigger is better because then we can downsize, but what do you say when, “Nothing smaller than… ?” I wasn’t able to answer his question, as I only work with smaller production items. I’ve been trying to research this for him.
Thanks so much!!! your emails are so helpful!!
Thank you for all your hard work.
Another fantastic and informative post. I move back and forth between print and digital use for images and am always dealing with this. Thanks, Chris! :)
Either I am misunderstanding this, or doing it in opposite for large format print.
I have been making signs for 22 years… and usually Resample small photos for large prints. The reason.. I don’t want the graphics, once printed, to have half-inch sized pixels… Id rather have it smooth, yet a little fuzzy looking up close. Standard viewing for signs is from a distance (few meters away at least), so it always looks much better than those horroble giant square pixels.
have i got this article right?
A better explanation than many professional manuals written for Photoshop. Thanks. I always purchase the largest format at the highest resolution that the client can afford. Clients are not concerned with the WHY and HOW of design; they simply want their stuff DONE. And what with the unpredictability of client expectation, large format/high res means I can meet their outrageous demands with a minimum of fuss.
Please make a video version of this. Thanks.
One use-case that I noticed was mentioned here is one that I use ALL the time when resizing/resampling an image. When working for on-screen output, I often get client assets, usually, wrong size, wrong format, etc., or from Stock for print. If my on-screen output is 4K, or a larger format than the image can scale to, I often find that when given assets for print (i.e., 300dpi) that I can resize/upscale using a bottom-to-top method in the ‘IMAGE SIZE’ dialog box; 1) Immediately after hitting Ctrl+Shift+I, untick resample on an image that is reporting 300dpi. 2) Take note of the width and height pixel dimensions. 3) Change 300dpi to 72dpi in the RESOLUTION field. 4) Notice the width and height pixel dimensions again. 5) Now, with both WIDTH and HEIGHT proportionally connected, type in one of the fields the desired output/size.
You can do this, as all the pixel information is still contained within the image as you are simply spreading-out the pixels, while maintaining the visual information. The mistake to avoid here is changing either the width or height before the resolution, or unticking RESAMPLE.
Very informative. Thanks so much for sharing this information with us. I knew some of it but didn’t realize that I needed to disable the Resample option when changing the dpi. Thankfully it isn’t something I’ve done very often.
Very easy way to resize image resample instead.