This post was originally published in 2014
The tips and techniques explained may be outdated.
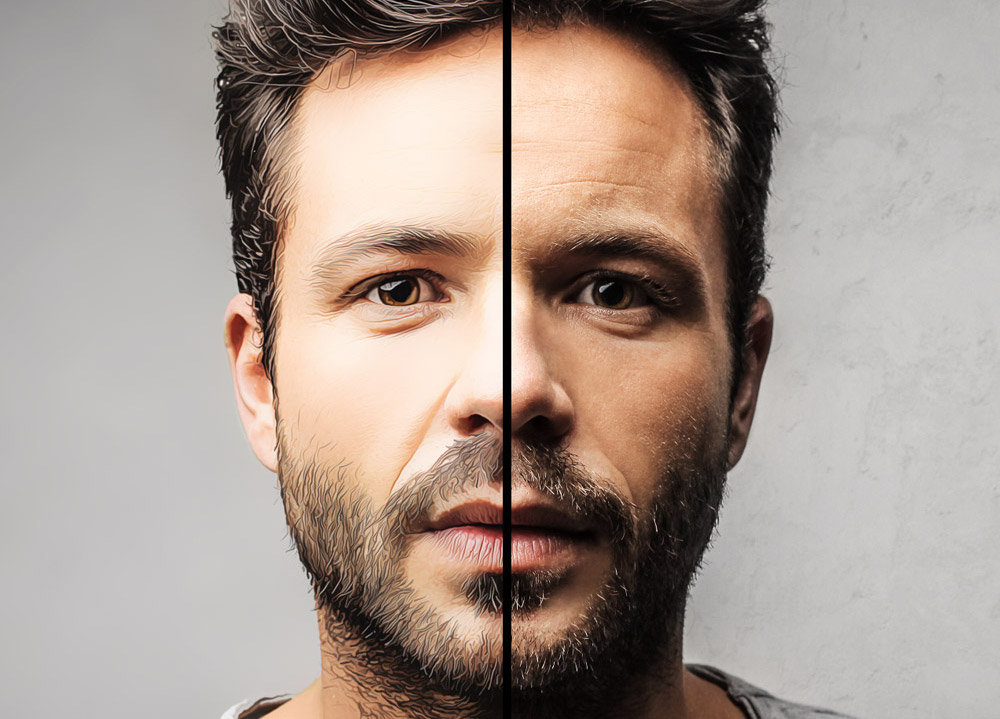
There’s some talented artists out there who can hand paint stunning hyper-realistic art, but those kinds of skills are something us mere mortals can only dream of. Thankfully with the help of Photoshop it’s possible to create cool effects to mimic the style of painted images. In today’s tutorial I show you a few steps that will transform a photograph into a digitally painted piece of art with detailed brush strokes and blotchy colours.
The effect we’ll be creating in this tutorial transforms a photograph with fine brush strokes to produce a realistic painted appearance. This technique is great for simulating illustrated artwork for retro movie posters or just to give your images a cool stylized look.
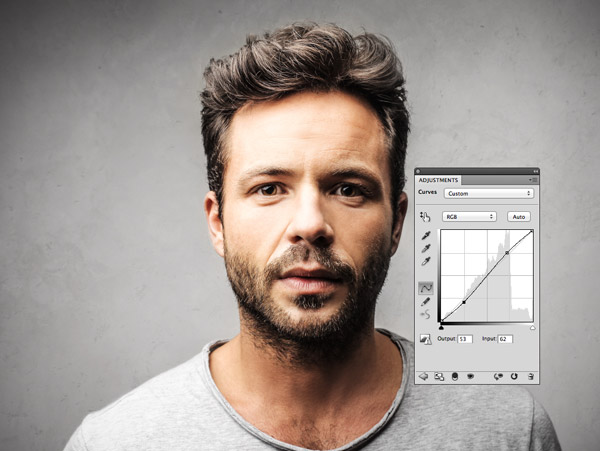
Open up your chosen image in Photoshop. I’m using a portrait photo I picked out from Shutterstock. Add a Curves adjustment layer and darken the blacks and brighten the whites to subtly increase the contrast.
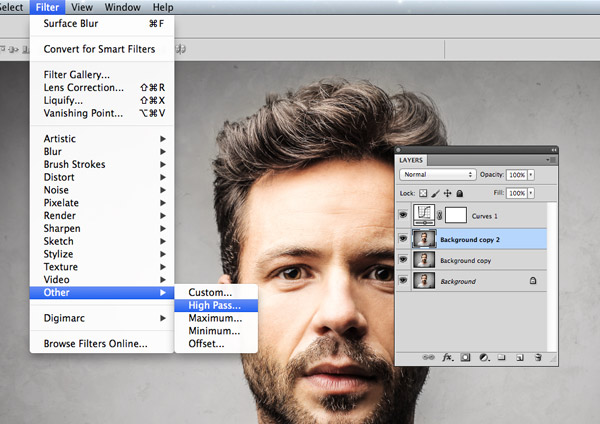
Use the shortcut CMD+J to duplicate the background layer twice, then with the uppermost layer selected add a High Pass effect from the Filters menu.
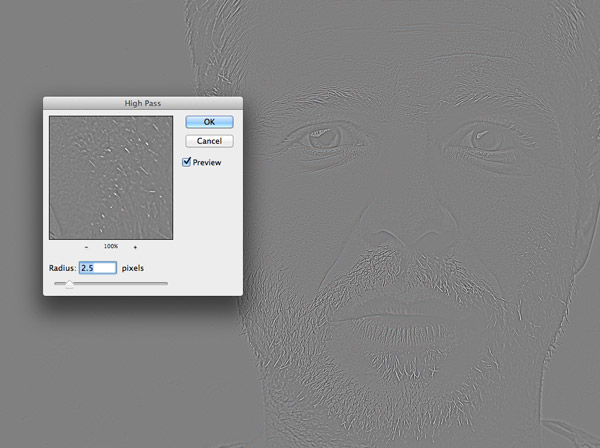
Adjust the High Pass filter radius slider until the details of the photo begin to emerge from the grey background. A low amount of around 1-3px is all that’s required to avoid any haloing.
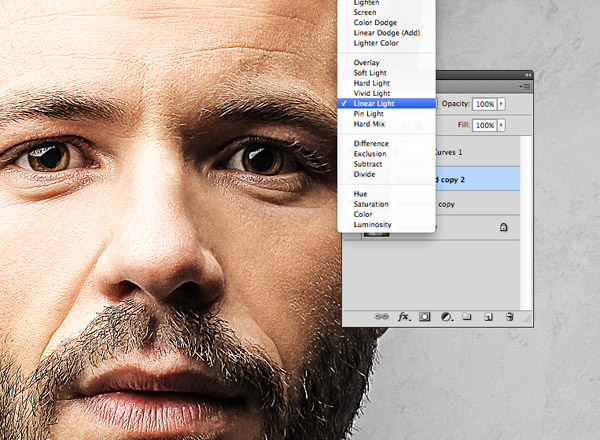
Change the blending mode of this High Pass layer to Linear Light to drastically sharpen the photograph. These sharp areas will help create detailed brush strokes, especially on the hairs.
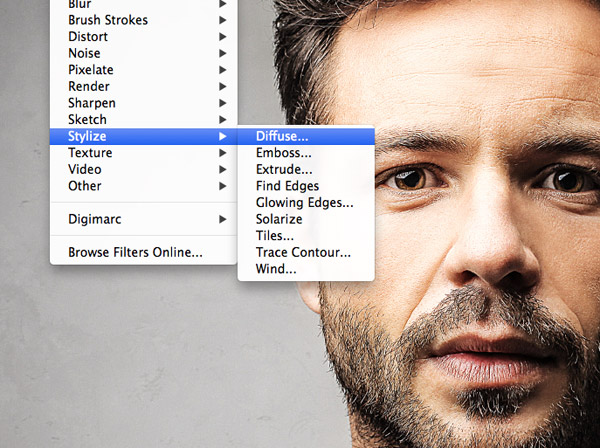
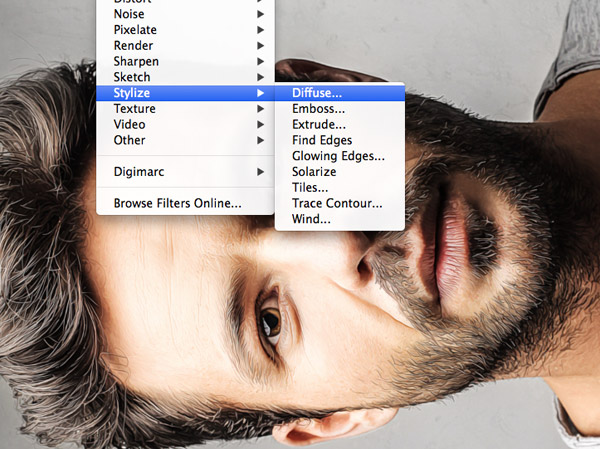
Merge the High Pass layer with the background duplicate below it to make this effect permanent, then head to Filter > Stylize > Diffuse.
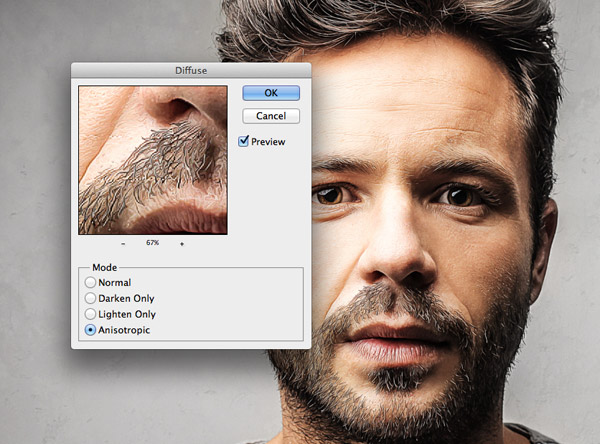
Change the Diffuse mode to Anisotropic. This is the key ingredient to give the image that cool brushed appearance.

If you look closely at your artwork, you may notice some ugly seaming where the diffusing repeats. I’ve come up with a little technique to fix this…
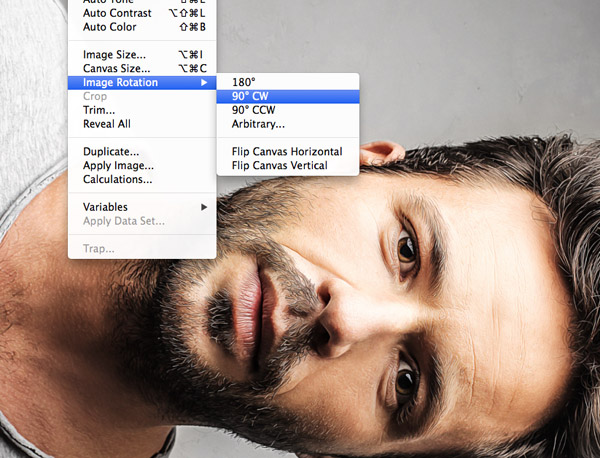
Go to Image > Image Rotation > 90° CW, then use the shortcut CMD+F to repeat the addition of a Diffuse filter.
Rotate the image by 90° again, then apply another Diffuse filter. Repeat this step for a third time then rotate the image for a final time to place it the right way up.
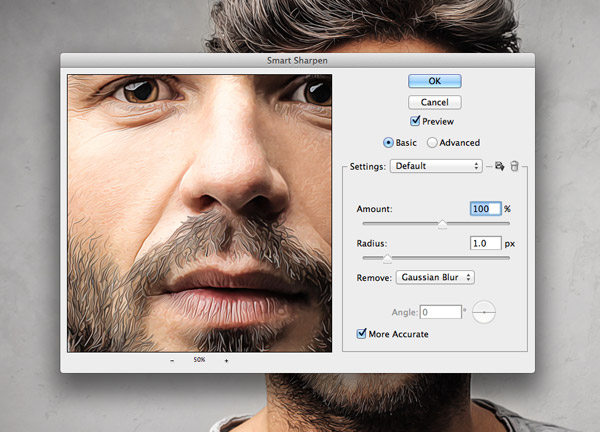
The Diffuse filter adds a cool brushed effect but it has blurred the image slightly. Go to Filter > Sharpen > Smart Sharpen to bring out some of the details. Use an amount of around 100% but a low Radius to avoid over processing the image.
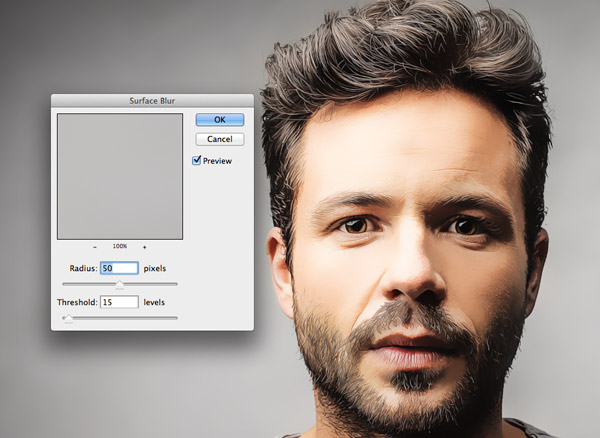
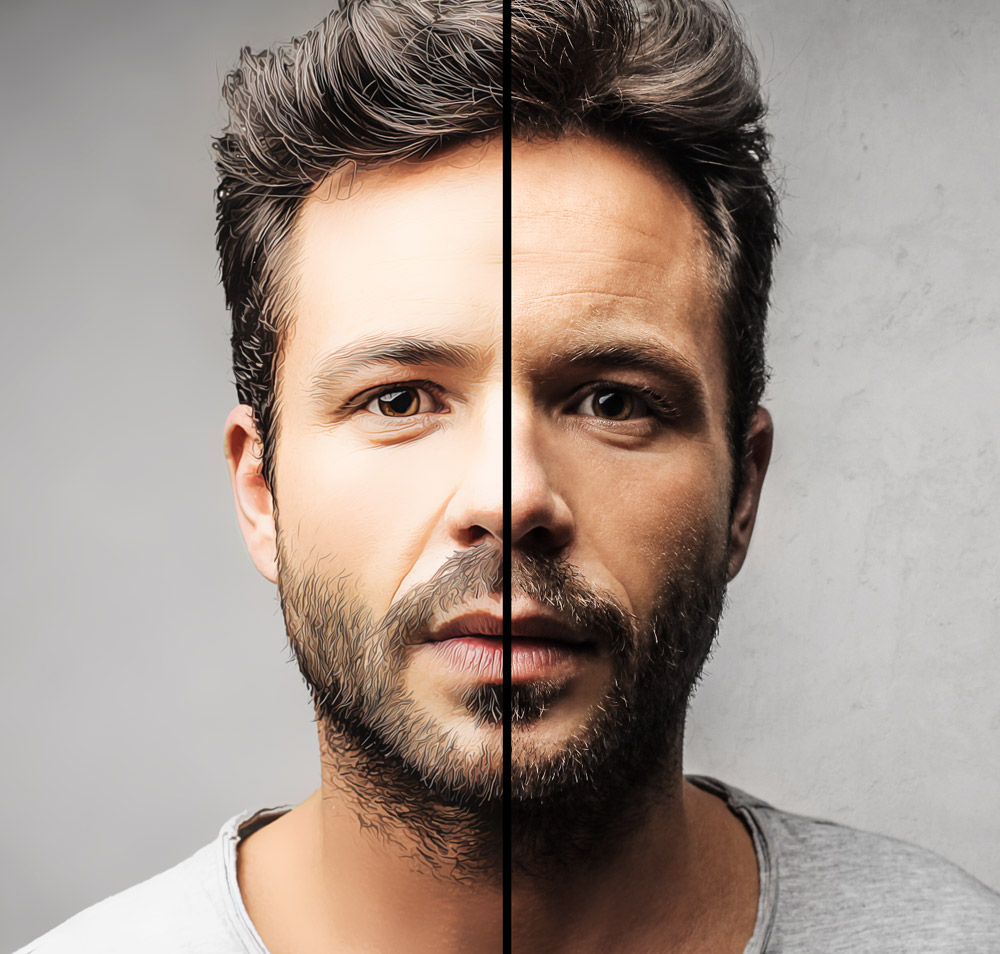
This result looks pretty good as it is. The texturing from the Diffuse filter adds lots of swirly details on the skin which gives the image a traditionally painted effect. However, there’s one little step that further manipulates the image and results in more of a digitally painted look. Select Surface Blur from the Filter > Blur menu and adjust the values to around 50px Radius and 15 Threshold. Fine tune these values so only the large flat areas are affected.

The result is cool effect that mimics digital paintings. The smudged blending of colours and the appearance of fine brush strokes really help achieve a realistic painted look.
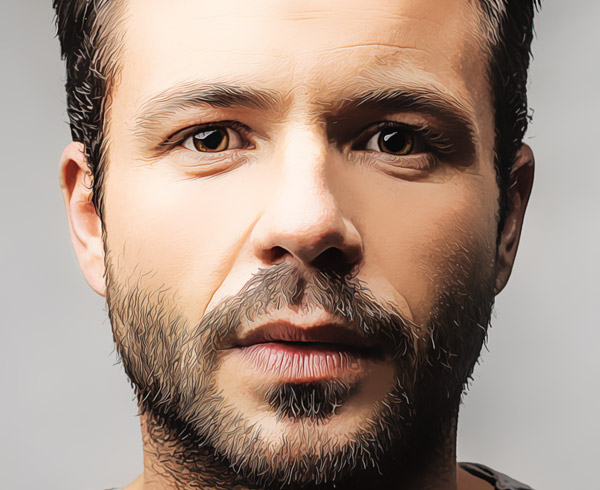
The effect really comes the life the closer you get. From afar the fine details can blend to look like a normal photograph, but up close you see what looks like hundreds of individual brush strokes.

Wow! Looks really realistic! I once got such in image that seemed to be painting – it’s really hard to guess that it was a photo, if you don’t know the technic
I totally agree Victoria! You sometimes can’t tell at all.
Waow, very nice tutorial. Thanks mate for sharing with us :)
That’s no problem xhzad!
I’ve got to say, that portraits looks very detailed and crisp from the beginning!
You can get some good quality pictures from Shutterstock that’s for sure!
Well done! :D
Thank you Exel, Always helps to have a few Photoshop tricks to hand :)
Really impressive and great technique, thanks for that.
That’s no problem David, Really pleased you liked it.
This is so cool! Can’t wait to play around with this. Always love your tutorials!
Thanks Chloe, I hope it all goes well when you have a go.
Great! Is there anyway you can make the brush strokes slightly thicker or more abstracty?
hey Em, I’d recommend having a play with the filters, I think it’s great to change settings to see all the different outcomes . Maybe start with the sharpen filter see how it turns out with your image :)
Thank You for this tutorial. The little details are awesome.
I agree Andy, the details can sometimes make an image.
Great tutorial, thanks mate. ;)
Really happy you enjoyed it Miguel :)
Wow! This is fantastic!
Thanks Michelle! Hope you’ll find it useful.
Awesome!! :D Thanks !!
My pleasure Gonz.
Hey! Thank you very much for this tutorial – I always wondered how this look works! :)
Mystery solved! Thanks for the appreciation Ann :)
Very cool! I had a job recently where I had to make 8 photographs look like oil paintings. Your tutorial would definitely come in handy and saved me a lot of time. I more or less used the SMUDGE tool with some painterly brushes. It was tedious but got the desired result. If I was to do it again I’d go through your steps and then smudge out sections to give it more of a brushed look. Here’s a link to one of my finished pieces: http://bit.ly/144Jkh9
Your finish piece looks fab B-rock! Time and effort well spent I’d say :)
Hope this tutorial will help make things a LITTLE easier if there’s a next time.
Brilliant tutorial, as always – thanks for sharing this.
Cheers Paul, glad you like the post :D
LIKE!
Loving the enthusiasm Hugo! Thanks!
Fantastic … Now I sign up for RSS
Thanks Akino! I appreciate it :D
Wow . This is great . The power of Photoshop is that you can achive great results in simple way .
I didn`t think it is so easy .
It’s all about finding the simple tricks, just incase you need to use them :)
Great tutorial Chris. I love your work. Thank you for sharing so much valuable info!
No problem Jim, I’m all for sharing the valuable information :D
One of the best tutorials you’ve done, really love it. Very simple but incredibly effective!
Cheers Rich! I’m delighted you love it, thanks for the comment.
Dear Chris, thank you for this tutorial. It gives me new inspiration to develop my paint effects. :) At http://imagatic.com/upload/paint.jpg you can have a look at a sample output of your example image of a Van Gogh-like paint effect I am working on.
So pleased you found the tutorial inspirational Zoltan, great work.
I miss the Oil Paint filter, I wish Adobe had not axed it. Topaz Clean is a suitable replacement but of course you have to buy it.
It’s a shame, you just have to keep playing and find extras and tricks to try and get the effect you want :) Thanks for the comment Connor.
Another fantastic and easy-to-follow tutorial, thanks Chris. Looking forward to trying this out as I have some projects in mind where I think this could really look good.
Fantastic! good luck with your projects :)
gr8 idea to convert portraits to digital paint.
Keep going man i love ur techniques. Always waiting for ur tuts.
Thank you for the appreciation Tahir! So happy you like it.
Very usefull, big Thanks to you !
It’s no worries, Thanks for the comment.
♥♥♥♥♥
Cheers Anees, I’m definitely feeling the love.
Awesome.. This really looks very realistic. Very informative and inspiring one. This post can really help to get updated with our photo shop knowledge.
I’m thrilled it helped with getting you updated, really glad you liked it :)
Thank you so much….
It’s my pleasure, thanks for the comment!
Very useful, great tutorial. My kids loved their paintings :-)
Keep the creativity flowing Koen! Happy you found it useful.
Hi Chris, thanks for this great tutorial! Easy to do and with great results! Let me ask you something. I am not getting rid of those seamings completely with the rotations plus the diffuse filters. Do you have any tip?
Thanks again :)
Wow, I didn’t know that that was possible. Thanks! I will try it! Also I wanna tell you that you inspire me since a long time ago. Greetings from Argentina :)
Nice!. This helps a lot. thank you kuya Chris ^_^
No problem, thanks for the comment :)
Wow! Very cool, gotta try this out soon as I get some free time!
Brill! Free time is definitely a luxury :D
What a brilliant technique. I shall need to keep this in mind for upcoming projects. Thanks for sharing, Chris!
Glad you liked the technique Laura, hope it comes in handy!
Waaaaw , it’s really cool man , i’ve tried it!
Thanks, Chris!
I’ll be waiting to ‘ur next tuts :)
Fantastic! That’s lovely to hear :D
Now that’s what I call a perfect start of my day! Love it chris Thank You brother.
Glad to have started your day off perfectly! Thanks for the comment.
wow great tutorial, you helped me adding something really good in my skills, thanks chris
Thank you Sadat, It’s always good learning new skills :)
it’s good tut. I like it. i will try it.
Good good! Hope it goes well.
I’ve tried it, it was a brilliant i love it, THANK YOU
GREAT! So glad you tried it.
Chris, Thanks for another great tutorial! I loved it so much that i created a Photoshop action to make it easier to follow the steps.
Thanks again for all your hard work!
Rick
wow! awesome :D
Forgot to comment earlier but thank you for sharing this… it is similar to something I had already been doing but REALLY like the results this provides also. In fact, I liked it so much, I recorded as an action so I can use it even quicker :) Used Smart Objects/Filters when possible to make it easy to go back and tweak as needed. Thanks again :)
Hey! Chris,
Really awesome creative work, please keep it continue. I like your creative tutorial.
Thank you. Super photo effect!
So Nice. Well done
I’m by no means a beginner in photoshop, but I’ve never thought of this. The result is amazing! Very nice for some creative effect in composites as well. Thanks for sharing!
Is of congratulations for the tutorial, this effect is amazing the result is simply perfect
This effect was very good, you are parabens
thank you so much for this tutorial. it is much better than just to apply paint tool from filter, what i used to do.
Great technique that looks great having tried it on several portrait images. Thanks for the great tutorial!
one ov the best.
That’s fantastic! Thank you!
very nice tutorial !
great effect . thnx to share ! :)
Hi there,
I tried out your technique on an old shot of mine. Works as you say perfect at high resolution. I just wished one could see it even more at smaller displaying sizes.
Check it out: https://www.flickr.com/photos/prozac74/15927914236/
looks like it doesn’t work with black people :(