This post was originally published in 2011
The tips and techniques explained may be outdated.
There’s something about designing for unusual applications such as skateboard decks that really makes the design process much more fun. Maybe it’s the unique canvas size that makes things a little more challenging, or just the cool feeling you get when you see it mocked up as a complete deck. Follow this step by step Illustrator tutorial to create a vector patterned deck design with a minimal colour scheme.
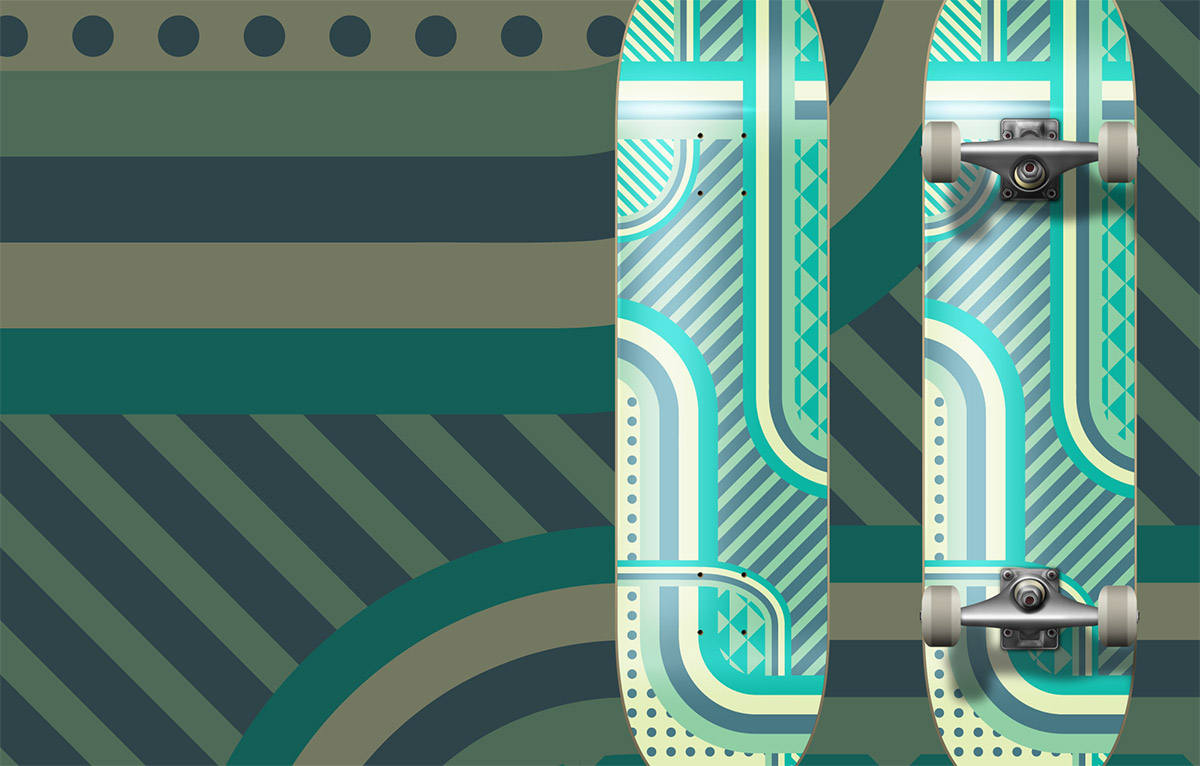
The deck design we’ll be creating is made us of various vector elements to produce a layout with a range of patterns. The minimal colour scheme of blues and greens gives quite a retro feeling and overall makes for a pretty cool skateboard deck artwork.
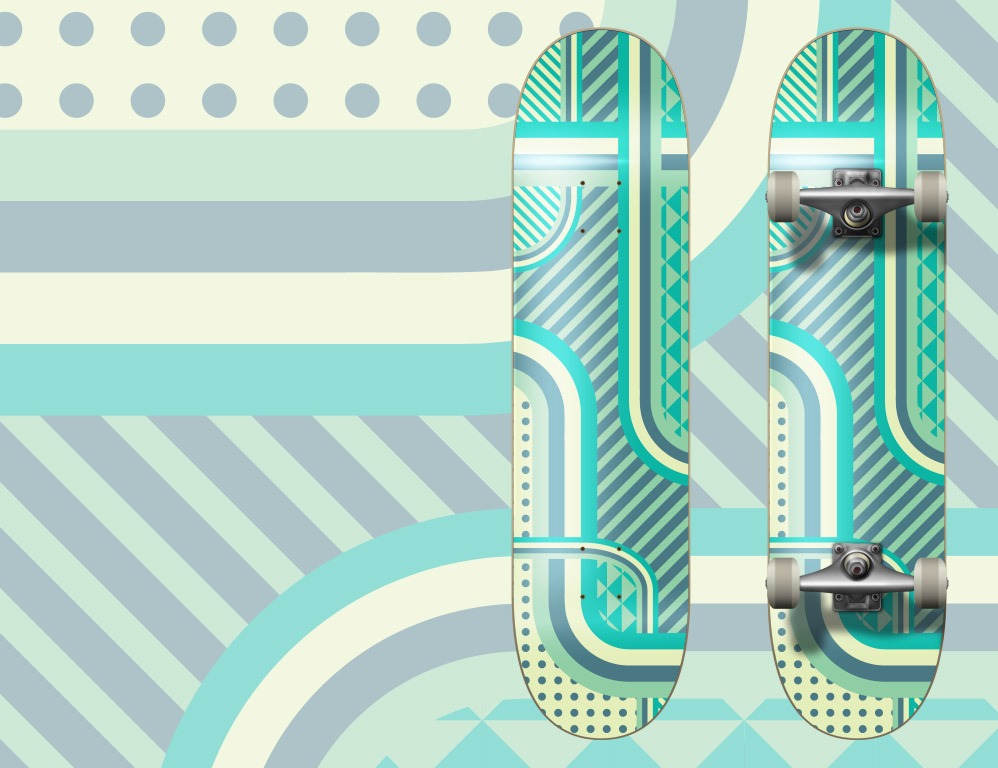
View the vector skateboard deck design
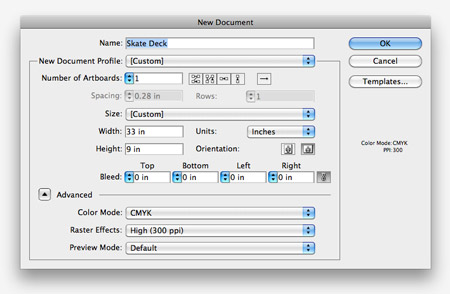
Create a new document in Adobe Illustrator. We’ll need dimensions of around 33x9inches for a typical skateboard deck, but the great thing about vector artwork is we can always scale it to fit any specific sizes later down the line.
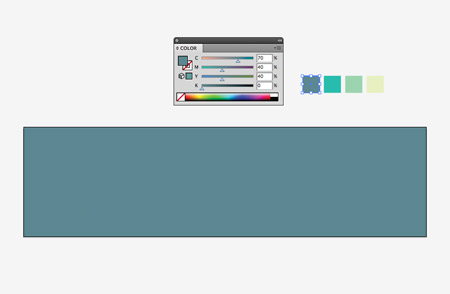
Set out a colour scheme for your deck design. This particular scheme is one I picked out from ColourLovers, named I demand a pancake. Fill the whole artboard with a solid filled rectangle.
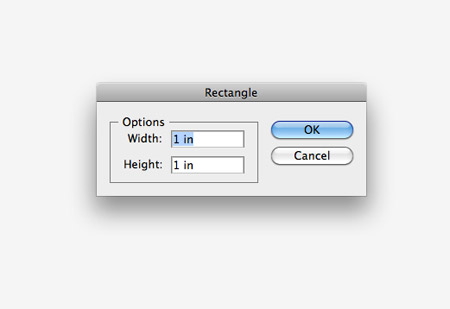
Single click somewhere on the artboard with the rectangle tool active to open up the options box. Create a square at 1x1inches in size.
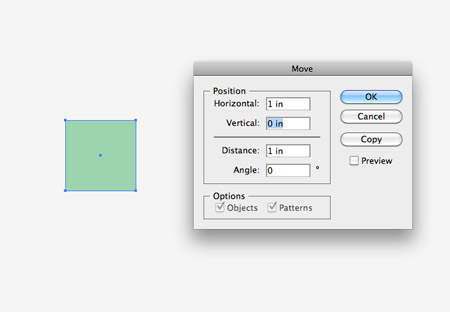
Give the square a fill from the colour palette, then hit the Enter key to bring up the Move options. Enter 1 inch horizontally then click the Copy button.
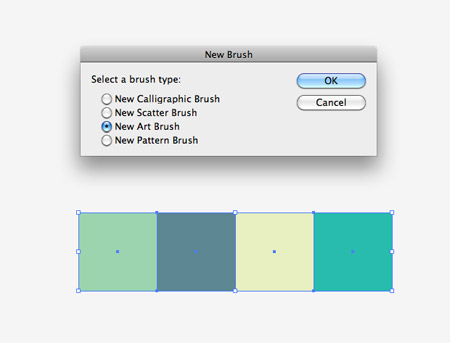
Repeatedly press the CMD+D shortcut to repeat the transformation, then replace the colours of each square to fit the colour scheme. Select all the squares then add them as a ‘new’ Art Brush by clicking the new icon at the bottom of the Brushes palette.
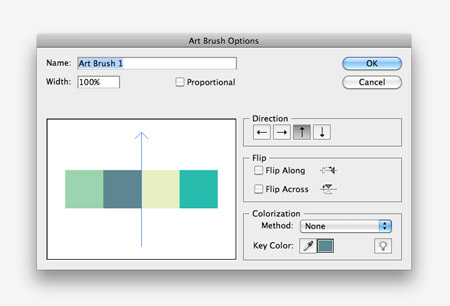
Make sure the direction of the brush is flowing vertically to allow the brush to create a striped effect when added to a path.
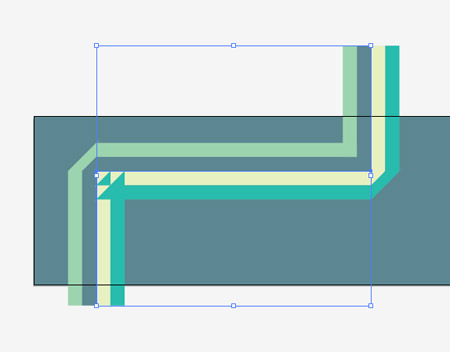
Use the Pen tool to draw a path across the artboard. Hold Shift to keep the lines straight to provide 90 degree angles. The striped brush will glitch at the corners but we’ll fix this next.
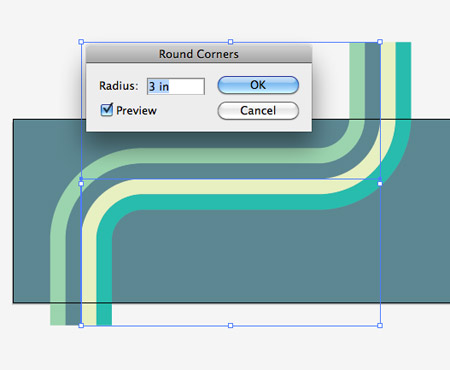
With the path selected go to Effect > Stylize > Round Corners. Adjust the radius until you have nice smooth flowing stripes with no kinks.
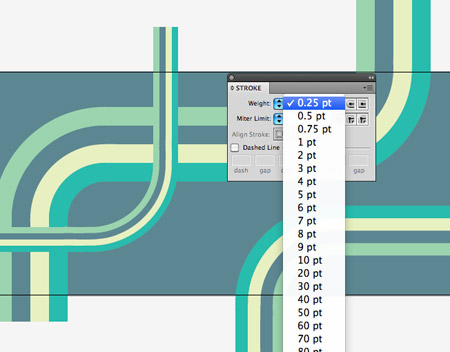
Draw a couple more striped lines across the design, overlapping lines with others. Change the stroke weight to 0.5pt and 0.25pt to create different sizes lines.
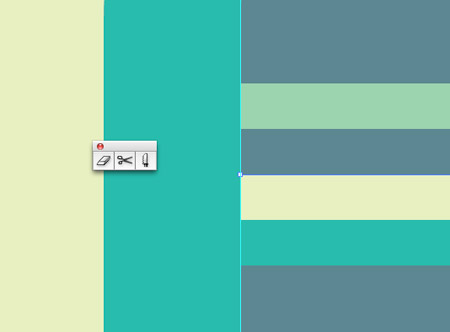
On any path that crosses another in two places, use the scissors tool to split the path and delete out the overlap to give the appearance of two lines weaved over and under the other.
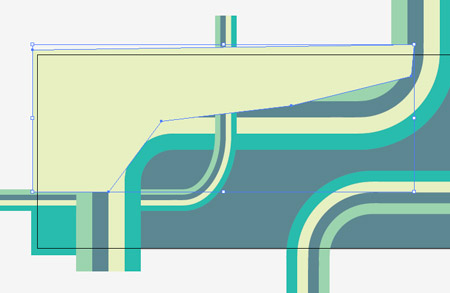
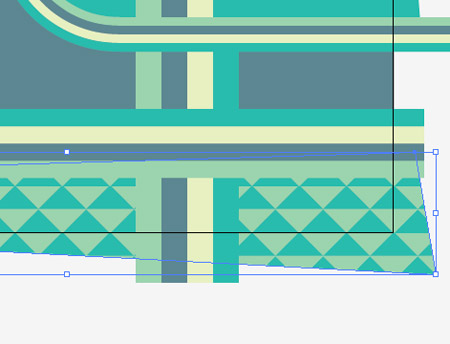
The overall deck design is now split into a number of different regions. Use the Pen tool to roughly outline these regions in different colours. Use the shortcut CMD+Shift+[ to send the fills to the bottom of the stack, then press CMD+] to bring them up a level above the large blue background. The rough outlines will then be hidden by the striped paths.
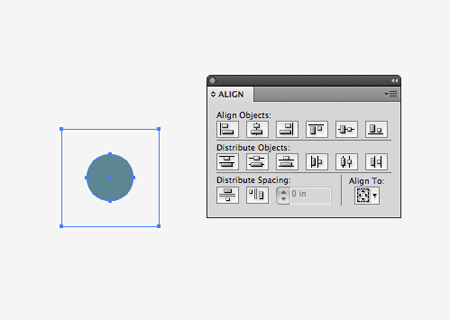
Elsewhere on the artboard draw a blue filled circle, then align a clear square with no stroke or fill centrally using the Align palette. Drag these shapes into the swatches palette.
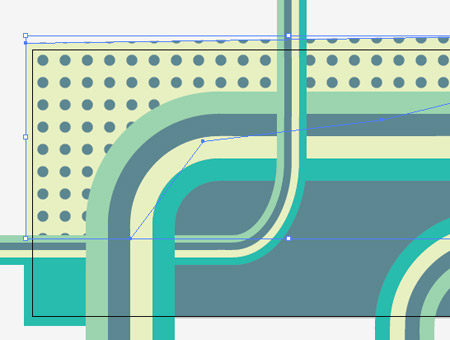
Copy (CMD+C) and paste in front (CMD+F) a duplicate of the yellow region, then replace the fill with the circle/square swatch to create a cool dotted pattern fill.
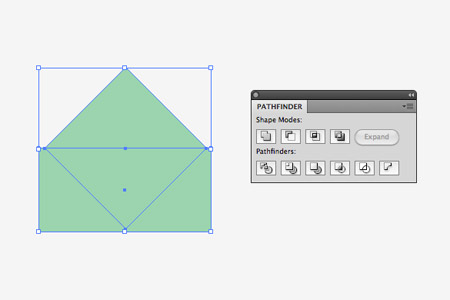
Draw and rotate a square to 45 degrees somewhere on the artboard. Carefully add another rectangle to cover the lower half, then use the Divide option from the Pathfinder palette to split the crossing paths. Ungroup then delete out the excess, leaving two triangle shapes.

Replace the fill colour of the upper triangle, then duplicate copies of the shapes and move them into place to create a tessellating pattern. Use CMD+Y to enter outline mode to carefully align them all.
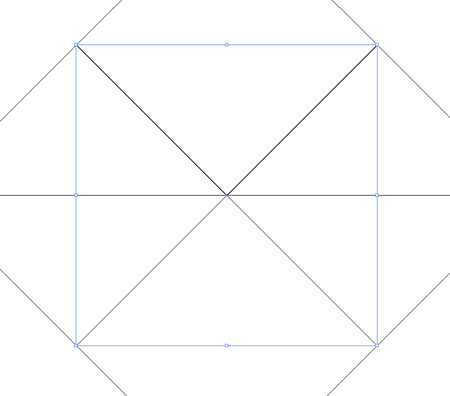
Zoom right in and align a square to the centre of the pattern. Use outline mode to align the corners perfectly to the existing points.
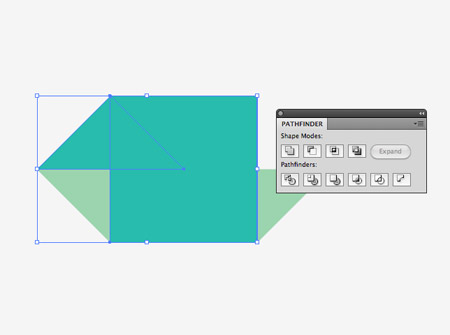
Make a copy of the square, then use it along with the Intersect option from the Pathfinder palette to clip down each triangle. Press CMD+F to paste in another square for use with the next shape.
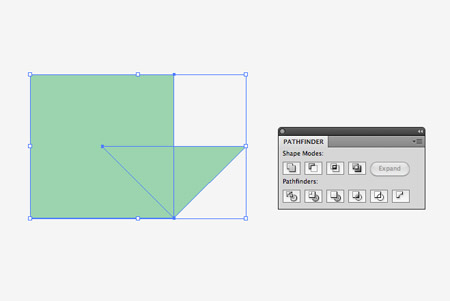
Remember to change the colour of the square when using it on the final two triangles, as the pathfinder tool converts the clipped shape to the colour of the shape that is being used as a tool.
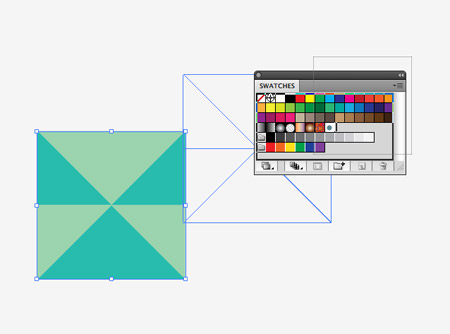
Drag this series of shapes into the swatches palette to create a new pattern swatch.
Add this swatch fill to one of the regions of the design to create a cool retro style tessellating pattern.
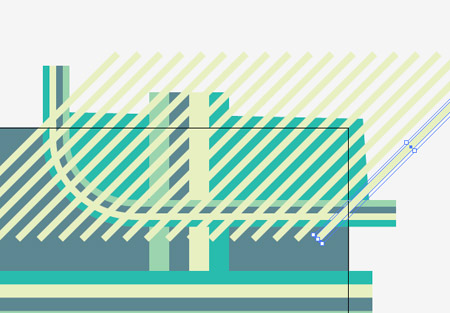
For one of the other regions, draw a long thin rectangle and rotate it to 45 degrees. Hold ALT and Shift while dragging out a duplicate, then hit CMD+D repeatedly to create a series of lines.
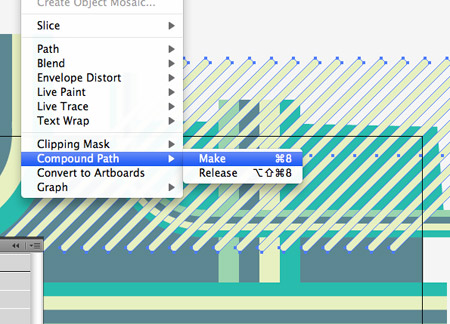
Select all the lines and create a Compound Path by going to Object > Compound Path > Make, or hitting CMD+8.
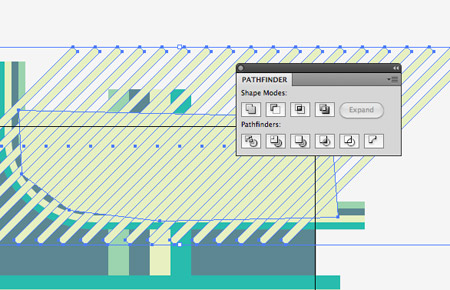
Make a copy of the fill for this region and send it to the top (CMD+Shift+]). Select both items and hit the Intersect option from the Pathfinder palette to clip the lines to size.
Draw another series of diagonal lines, this time in the opposite direction and flowing across the whole design. Use the deck background rectangle as a tool this time to clip down the rectangles. Press CMD+[ to send them below the other objects to sit above the background.

Our abstract design of various pattern files is just about complete. Now let’s tidy up the document and mock up the design as a skateboard deck.
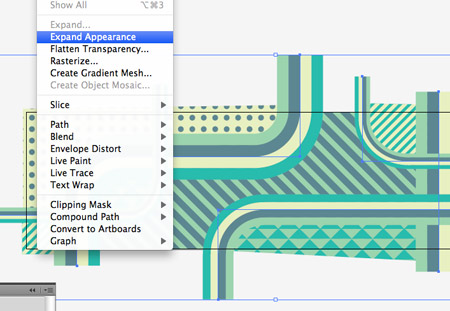
Select the series of striped paths and go to Object > Expand Appearance to convert them to solid shapes.
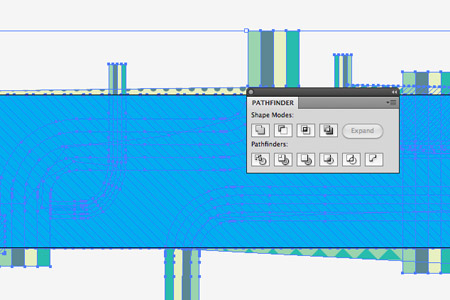
Group all the elements of the design together then draw a temporary shapes matching the size of the artboard. Select this along with the design and hit the Crop button from the Pathfinder palette.
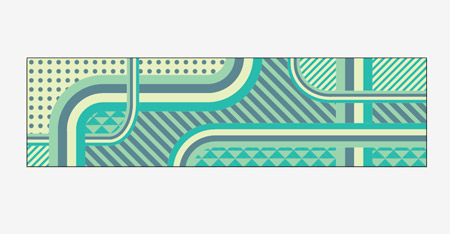
The design elements are now neatly trimmed to the edges of the artboard and the design itself is ready to be exported as an EPS, PDF, TIFF or even PNG file.
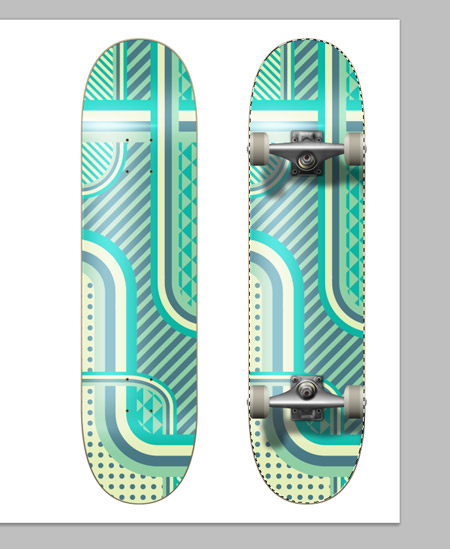
To gain a preview of how our design will look, we can use the cool skateboard deck template from Nunosk8. Paste a copy of the design into the Photoshop document and trim it to size.
Our abstract, patterned and pretty retro looking design looks super cool when mocked up on the skateboard deck template. The limited colour palette of blues and greens helps balance the design by making sure no particular area stands out more than another.

Very well explained and great final result!
I love all the skate board designs! Awesome design!
First of all, very nice tutorial.. keep up.. But where can I print my own Decks? Is there any good service you could suggest me (/us)?
http://www.boardpusher.com
We can screen print directly onto skate boards or onto vinyl. Email your details and we can give you a price.
i love your tutorials Chris:)
Love the triangle diamond vectors on the side.
great tutorial!! thanks
Always good tutorials! I’m learning to use Illustrator with this blog!
Awesome design! I really enjoy this step by step tutorial, thanks for sharing Chris :D
One more time, great tutorial ! Many thanks
I really like how you write tutorials! Also I love the subjects you cover and share the experience.
It’s so hard to find quality tutorials like this – I’m not usually one to comment on blog posts, but i figured I had to let you know to keep up the good work. Thanks so much for sharing, looking forward to more!
-Stephanie
Photoshop Template Designer
博文写的不错,我会经常光顾。
路过踩一踩,表示我来过
支持你的博客http://www.blog.spoongraphics.co.uk/
也谢谢您的回访http://ebhk.zhwjyy.com/?wyy8ev9b
I like your tutorials and the experience,very good.
ooh I gotta try out the round corner effect on brushes… it always frustrated me when I have to manually create the corners…
Cool pattern!
Sweet design. Great color choice!
ry656
I followed your instructions precisely, and here is my result:
http://szaboka.hu/Skateboard_1_Web.jpg
You are the Best, Chris! Keep it up!
feel free to post about rollerblading too. i mean, not to diss on skateboarding, but it’s been done over and over again.
don’t be afraid to try something new. for instance, check out Create Originals Frames (teh ones holding le skate and le wheels together), which allows you to create your custom design, print it, and attach it to the frame.
widen your vision a bit.
Thanks! Keep Posting!
Twitter had a tweet on bulk t-shirts, and lead me here. There are a variety of ways you can go if you want to make custom T-shirts. There’s digital printers, plot cutters, and even custom transfers, but screen printing is the best way to produce a lot of T-shirts at a very low cost per unit.