
This post was originally published in 2007
The tips and techniques explained may be outdated.
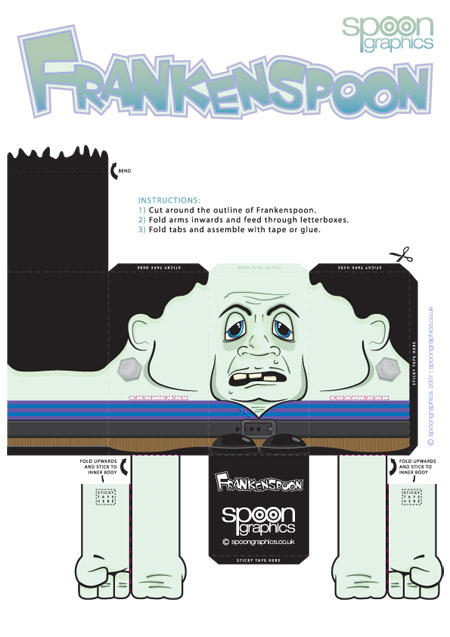
Last week I introduced Frankenspoon, a downloadable flat pack toy inspired by the likes of the Readymech characters by Fwis. In this post I’ll be going back through the stages of his creation, starting with an idea floating around in my brain, to a rough pencil sketch, to drawing up in Adobe Illustrator and finally bringing to life in three dimensions!

I’ll not go into the step by step details of every tool use (I would be here until next year!), but rather outline the stages of Frankenspoon’s creation which can be implemented into creating your own flat pack toy.
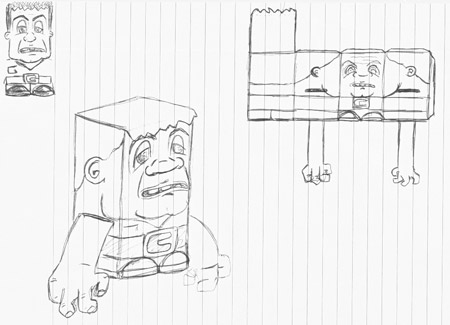
Get started by developing a character, or modify one of your existing characters into a rough three dimensional sketch. Bear in mind at this stage the character will need to be split up into the front, sides and top portions so keeping your ideas simple will make things easier in the long run.
With your ideas on your desired outcome complete, start working on how the three dimensional object will de-construct into a flat net, and where the folds will need placing in order for the character to be assembled. It sometimes helps here to create some mock-up cubes out of paper and draw on the rough outlines of your character, then flatten the model to use as a base for the digital reproduction.
With Halloween coming up soon I just had to create some kind of monster for my toy, I started a couple of sketches which soon developed into Frankenspoon!
The next stage is to plan out the illustration of your character in more detail. Here, I spent a little more time sketching out the facial feature of Frankenspoon, which was scanned in to use as a guide.
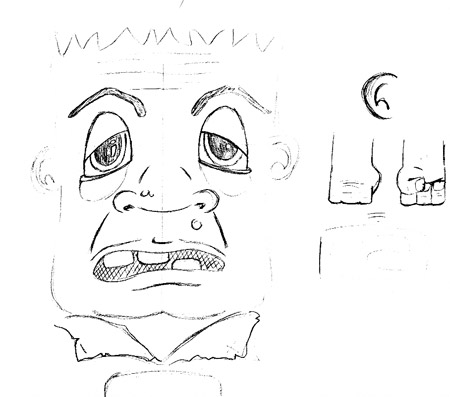
With your sketches scanned, place your character profile onto a layer in Adobe Illustrator and reduce the transparency. Use the Pen Tool to trace the pencil lines, and in some cases make complete shapes such as the mouth.
To give more impact to your illustration, create a brush to produce the effect of a pen’s varying thicknesses in its stroke. Do this by drawing a circle (hold shift), then with the Direct Selection Tool drag an outermost point horizontally (hold shift again) away from the circle. In the Brushes window click the ‘New Brush’ icon, choose ‘New Art Brush’ from the list, change the colorization to Tints in the next window and click OK
.
Flip the shape horizontally and set this as a new brush, now you have the choice of ‘fat to thin’ or ‘thin to fat’ strokes. Apply these brushes to the lines you create with the pen tool and adjust the stroke weights to suit.
If, like Frankenspoon your character is symmetrical, remember you only have to only draw up half of his face then copy and flip these shapes horizontally to draw up the other half.
Continue using this technique to draw up the whole front panel of your design, use a box as a guide to keep your drawing within the overall dimensions.
Begin introducing life into your character by creating blocks of base colours, then build up on these with smaller shapes of darker and lighter tones to simulate the highlights and shadows and thus adding depth to the illustration. Remember to Keep these blocks of colour underneath your main sketch lines by altering the stacking order (CTRL/CMD + ] and CTRL/CMD + [). For more information on this technique take a look at my previous Pirate Tutorial.
On Frankenspoon, I also change the colour of some of the detailing lines to blend in with the overall colour scheme, and to allow the more definitive lines to stand out in black.
Frankenspoon’s Corduroy trousers are created by placing down a block of dark brown base colour. Then the strips of light brown are added by drawing a vertical line with a thin stroke, this is then duplicated and moved horizontally to the opposite side of the brown block, finally with both lines selected the Blend Tool (Object > Blend > Blend Options / Object > Blend > Make) is used to fill in the additional stripes.
With the front panel complete, it’s time to move onto the sides and back of the net. Duplicate your guide box and move into position across the artboard (Use your Maths head to work out the X and Y positions or Hit ENTER, then type the width of your panel into the horizontal box to butt it up next to the previous panel)
Continue tracing your sketches and adding features to the side and back of the net. Some parts can be extended to flow smoothly around the body of the character such as his shirt and belt.
Paying close attention to your original plan, work out where to add the top and bottom panels for your net. Remember to ensure you make the width of the side panels the same as the height of the top and bottom so that they match up when folded together.
In my case, I also added an additional strip of hair to the top panel which overhangs the front panel when the model is assembled.
Next up, draw up the arms of the character and colour with the same techniques as previously. To create an arm with graphics on both sides, use the same outline for front and rear then butt them together to enable them to fold over against a straight edge.
As you can see from my version, my plan for the folding of the arms meant I had to rearrange the position of the bottom flap. Measurements were taken to allow the arms to fold inwards, then back out of the side of the character through cut-out slots. A much simpler design could include totally separate arms that are glued on afterwards.
Add flaps to the net to allow for its construction. These flaps will need positioning between any two sides that will come into contact when the model is folded to allow gluing or sticking.
The flaps are created by drawing a basic rectangle, then using the Direct Selection Tool select two corner points from a long edge. Go to Object > Transform > Scale and enter 80% to create an Isosceles Trapezoid. Tapering in the outer edges will help prevent interference between the tabs when folded together. Fill these Trapezoids with a matching colour to the artwork to blend them in.
Distinguish your folds and cuts using your own personal key, for example a fold may be a dotted green line while a cut is a solid magenta line. Using the Scissors tool is helpful here to split up the stroked shapes into individual lines.
Keep your strokes thin and subtle enough not to ruin the overall design, but enough for the end user to see how to assemble the model.
Add your final notes and instructions to your net to ensure any numpty will manage to construct it, bear in mind your design should be simple enough not to need a complete instruction manual to go with it!
Finally, position your net into an A4 or Letter sized sheet to allow anyone with a standard desktop printer to download and make your model. Add any additional branding to the left over areas of the page, such as the name of your character, your logo, name and web address

Truly amazing! I love your tutorials and from this day on I’m your RSS subscriber.
FrakenSpoon is awesome, great work..
i love u blogy
omg!:D i like it very much …im gonna try it as soon as i can!
thx
ohm :D very nice working.
i will try another ones.
thanks again.
What a clever idea and finally a flat pack item that anyone can assemble! :o)
so creative.
i’ll do better work from this tutorial.
Thanks a lot
great hmm
i am working on a suit for a popular person i ahve to get it done it 6 days what do i do
Love it!
amazing tutorial!!! i want one!!!!
thanks!
Wow, truly inspiring. Because of this work you have inspired me to make my own cat. Not nearly as good, but you are the master. Thank you for the tutorial. And I am so happy I found this blog. Great stuff…keep it up!
http://i61.photobucket.com/albums/h68/Spenn13/misc/finished_directions11x8.jpg
it’s amazing!
this is so helpful and completely inspiring as a marketing tool. we are going to use the template for a dance.
thank you so much, i will let you know if it works!
heeeyy thatZ a kool website ok bye