This post was originally published in 2009
The tips and techniques explained may be outdated.
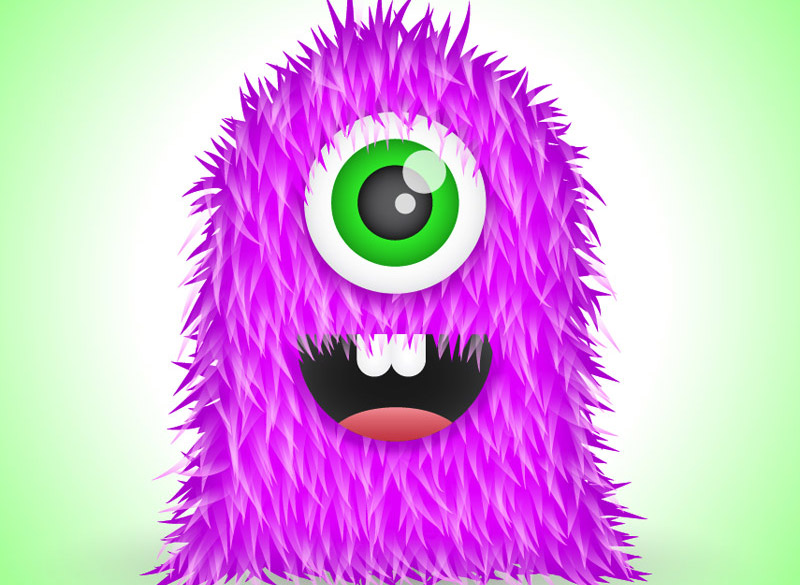
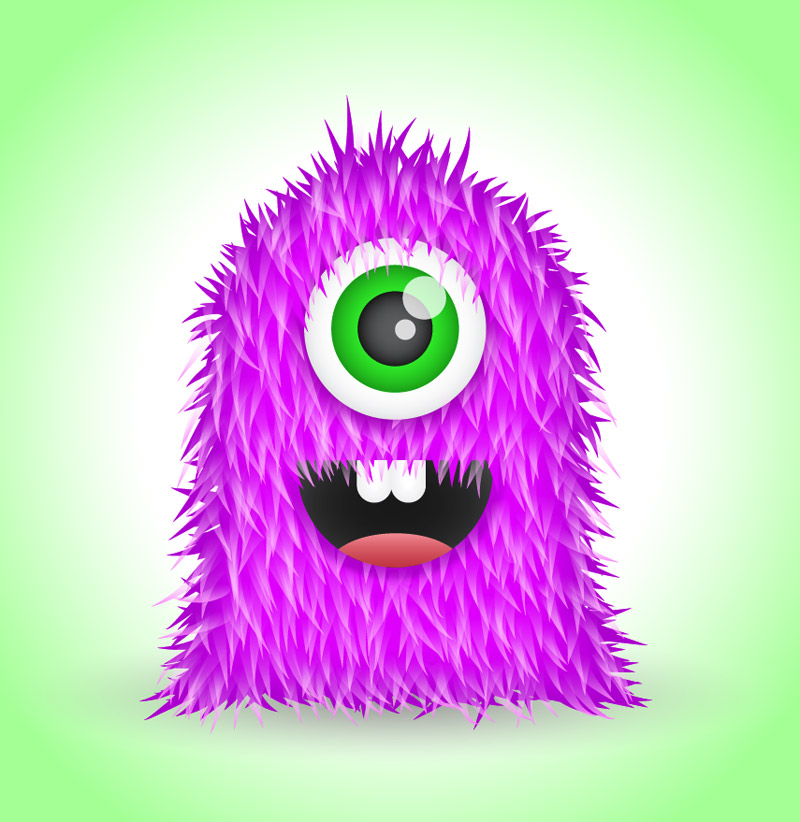
Follow these steps in Adobe Illustrator to create your very own super cute fuzzy monster character. We’ll be working with the basic shapes to start, then use a variety of gradients to add depth. We can then finish it off with some detailed fur effects to really lift the design from the screen.

Start work on the eyeball, draw a perfect circle on the artboard. Hold Shift to keep things in shape. Add a simple radial gradient spanning from grey to white. Adjust the gradient sliders so that the grey creeps in slightly from the edges of the circle.
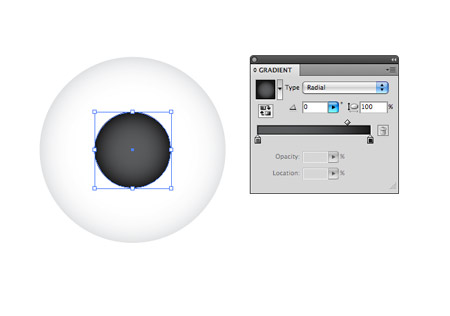
Copy (CMD+C) and paste (CMD+F) the circle, scale down while holding Shift and Alt, then swap the gradient out for a couple of darker greys to form a pupil.

Repeat the process, but this time scale down the circle into position as the iris. Choose a nice bright colour for the eye, such as green. Switch the gradient to a dark and light tone of your chosen colour.
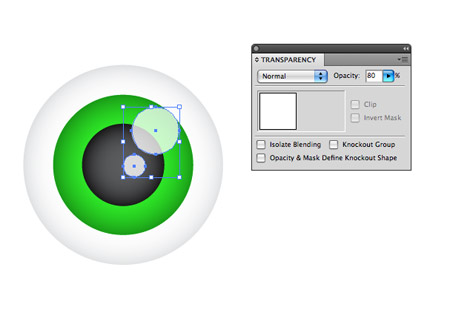
Draw a couple of specular highlights in the form of circles. Drop the opacity down to 80% to allow the underlying elements to show through.
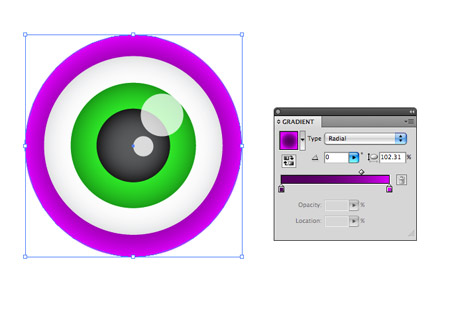
Paste in one more circle, this time scale it up, and add a gradient from dark to light purple. The outer colour will blend into the main body, which will also be filled with this purple swatch.
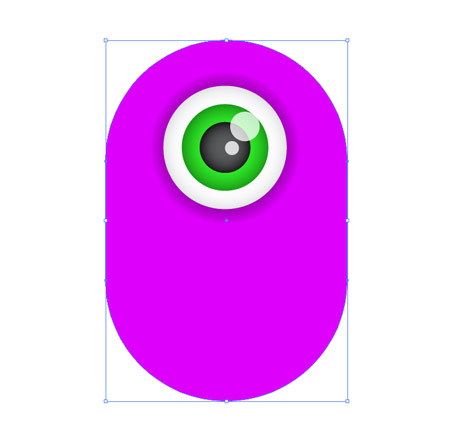
Draw a huge rounded rectangle onto the artboard to form the basic body shape. Alter the curvature of the corners by using the cursor keys while dragging. Align everything up centrally down the vertical axis.
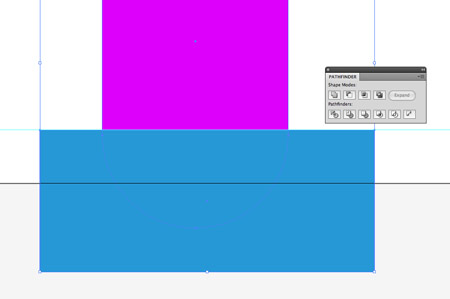
Draw a temporary shape that covers the bottom curve of the rounded rectangle. Use the Subtract from Shape Area option in the Pathfinder window to chop out the excess. To extend this flat edge, drag it downwards while holding Shift with the Direct Selection Tool.
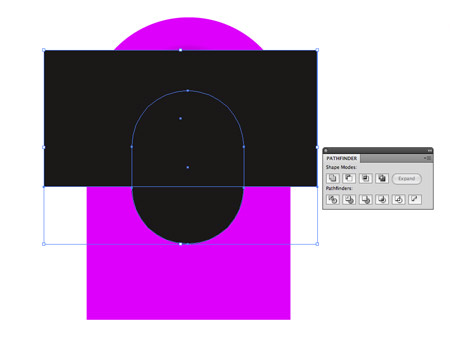
Draw another rounded rectangle, this time to form the smiling mouth. Use another temporary tool and the Pathfinder palette to chop out the unwanted area, leaving a flat top edge.
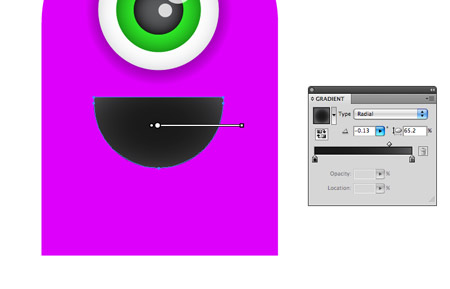
Fill the mouth area with a radial gradient, fading it from grey to black adds a nice touch of depth, which would otherwise be a flat black colour.
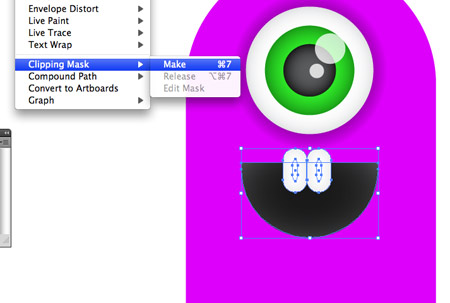
Draw a couple of goofy teeth using the rounded rectangle tool. Copy the mouth shape, send it to the front (CMD+Shift+]), then use it as a Clipping Mask to hide and crop the teeth into place.
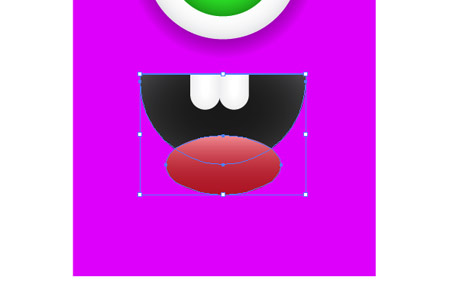
Draw a red oval to form a cheeky tongue, filled with a pink to red gradient. Use another Clipping Mask to hide the unwanted overlap.
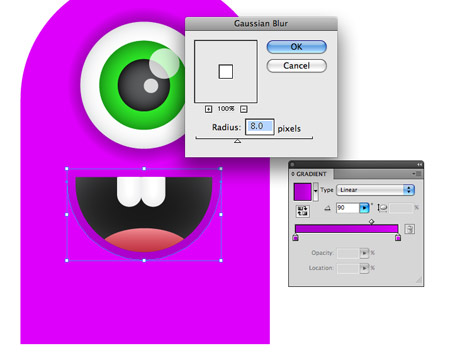
Select the mouth shape, then go to Object > Path > Offset Path. Fill the new object with a purple gradient, then add a Gaussian Blur of around 8px to remove any hard edges.
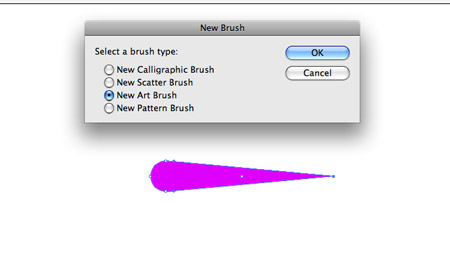
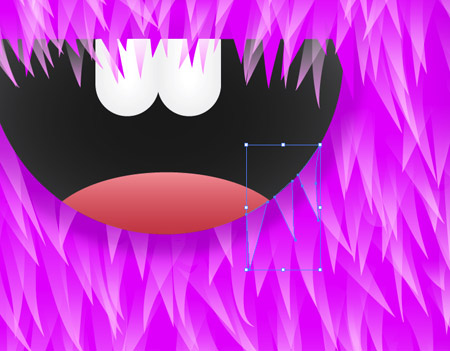
Elsewhere in the document, draw a small circle. Use the Direct Selection Tool to drag the right hand point outwards. Remove the Bezier curves using the Convert Anchor tool under the Pen tool options, then click the New Brush Icon. In the options, choose New Art Brush, and change the color to Tints.
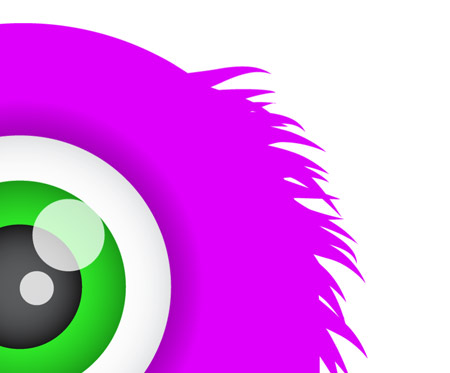
Now the fun part! Using the Brush tool, draw each piece of hair spanning from the body outwards. Here’s where that Graphics Tablet really comes in handy, but it’s still achievable with a mouse.
In no time the harsh outline will be invisible through the wealth of fur. Add a little extra to specific areas to flesh out the desired body shape.
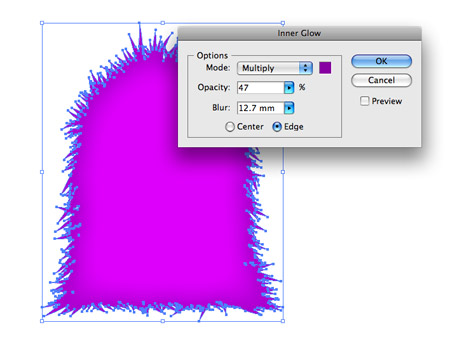
Select one of the hairs, then go to Select > Same > Stroke Color. Head over to Object > Expand Appearance, then add the main body to the selection by Shift+clicking. Choose the Add to Shape Area option from the Pathfinder window to blend it all together. Add an Inner Glow from the Effects menu to add depth to the graphic, choose a darker purple and adjust the blur to control the amount of glow that appears.
Duplicate the brush graphic, then change its colour to something garish, the colour itself doesn’t matter, but it’ll be used to identify them later. Continue drawing a bunch more hairs throughout the internal body area of the monster.
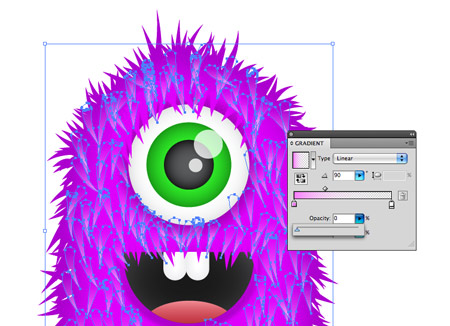
Select just one of the blue hairs, then go to Select > Same > Stroke Color. Expand the Appearance then swap out the blue fill with a gradient that flows from a light pink to zero opacity. (Transparent gradients in CS4 is really required here, otherwise use pink to black and set the blending mode to Screen).
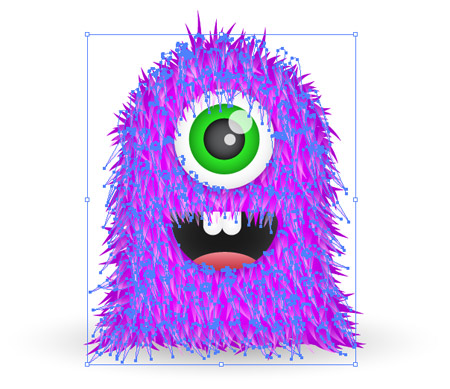
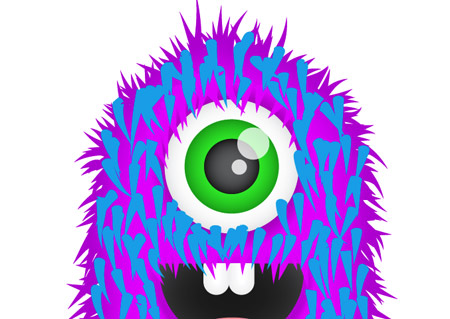
Repeat the process to fill out the monster with even more fur, the more layers, the cuter and cuddlier it becomes!
After plenty of mouse clicking or pen tapping the monster will be completely covered in thick fur.
Zoom in and tidy up any messy hairs, including any that overlap the mouth area. Copy and paste the mouth graphic, position on top and use the Pathfinder tool to crop down the hairs to size.
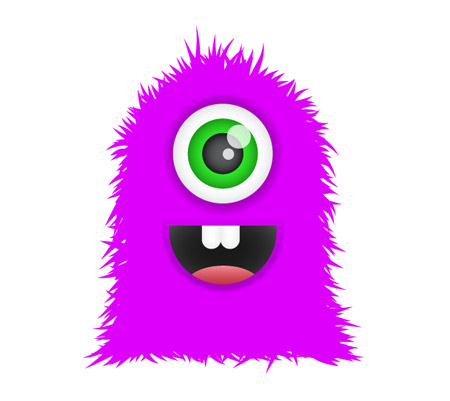
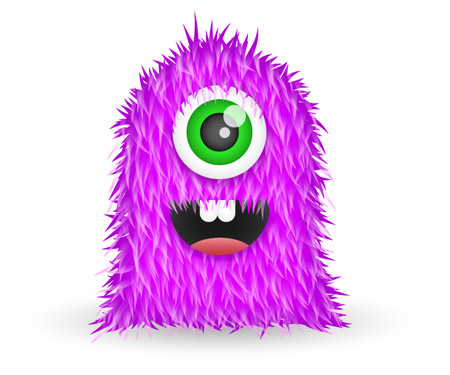
A simple vibrant background renders the monster illustration complete! The subtle gradients and little touches of transparency really help add depth to the design and allow it to pop from the screen.
Saw your preview on Twitter already – nice job! Those “hairs” really add some serious detail to the cute monster. Well done!
I really love (and who doesn’t?) these kind of “cute monsters”, might be an idea to make more of these / turn them in an icon pack ;) !
As always brilliant tutorial!Im definitely gonna be giving this a try, really fun project to do.
Cool. A lesson could be to create icons in the style of Grange or watercolor icons?
There are many images on the internet, but there is no lesson to create them.
P. S. I know English bad, sorry for the mistakes.
Cool and informative guidelines :)
Great post and great tips!
Excellent.
This is awesome, some great tips in there. I never really got used to gradients in AI, perhaps I just need to play with them a bit more.
Dugg & Tweeted
Oh I forgot to mention, the best thing on there was creating the brush! :O
Very cute little monster. Great skills for creating a mascot. Love visiting sites that have their own little cute mascot. They add a bit of fun and personality to the anonymous world of the internet. I have seen your grand selection of mascots in your portfolio btw…great range of styles too. Gonna have to think up my own now :)
Awesome tutorial as ever Chris :D
What a clever way to make fur in illustrator, thanks for sharing these techniques!
muy buena ilustracion hey visiten mi blog el cafe cibernetico…. tal ves encuentren simpaticas mis ilustraciones xD
muy buena pagina n_n
Awesome Tut!
Great tutorial, thanks
so off the hook! great work realize amazed as everything you do here.thanks for sharing.keep the good work.
Nice work, it is the attention to detail with the hair which really makes this work. I would love to have a go at this when I get some time.
Looking forward to more fluffy monsters.
i will showcase this post in my list
this tutor is very2 god from me as newbie in illustrator
thanks for share
Hi Chirs, thanks for sharing your tutorial are helpfully.
Considerer myself fans of you…Nice work
bye and have a nice, sunny day
oooo… what a furry tutorial. Thanks!
This little guy looks like he walked off of the set of the Muppet Show. Very nice design.
I love how simple you make it look lol
Love this, some cool tips, monsters are the best sort of friends.
And there was me just thinking “I wonder how I can create a cute furry monster?” :) Great tut!
Great simple approach to a quality interesting texture.
Thanks :)
Dude! You are a freak! much love man. your work is awesome keep posting!
Really liked this one, had a go myself, great way to spend a lunchtime haha.
Is there a way to multiply the hair to the body shape as easy as the way you did it in illustrator but in photoshop without having to select each hair and manually place it and duplicate it which is the way i do it but it takes for ever.
Thanks,
nice one !!!
Wow that rocks, I’m just starting with vector but was struggling with doing the hair, this tutorial has really helped
thanks
I’m trying to do this in Adobe Photoshop, but I don’t know how alter the corners of the rounded rectangle to match the picture in the tutorial. Please help!
you have to create a shape in photoshop.. a circle of course.. then use the little black arrow I think its at the bottom of the tools pallet and then you can select the points on the circle just like in illustrator.. then right click and make selection and make a new layer and color it whatever color you want… now you got a hair :D
Hi Chris
Thanks to share. It’s time for me to open more illustrator
You just restored my faith in Illustrator. Nice. I’ve been doing plenty of things in Photoshop lately, even those that could have been done easily in Illustrator. After reading your post, I feel like dabbling in some serious vector creativity again.
thanks for sharing, learned some seriously awesome things about illustrator while following this :D
Thanks this design is very good..,
nice job, very thanks�,
Cool Info, practical.. lol,
nice job, very thanks�,
Great work �. Thanks for your ideas.,
Good One!,
what gives you that idea?,
Great post, well written!,
Great work �. Thanks for your ideas.,
Thank you for this tutorial, it’s amazing & I’ve just finished creating my own fuzzy monster !
I never thought it could be that easy, I realy appreciate the way you explain yourself & make the whole process a lot simple.
Keep it up !!! =)