
One of the most important Photoshop skills you need as a Designer is the ability to clip out images of various detail using masks or selections. Whether you’re creating designs for print, web or just fancy artwork it’s inevitable that you will be faced with the task of removing a subject from its background in a photograph. This post describes the various basic and advanced techniques you should have in your arsenal, which will allow you to tackle any masking situation that comes your way.
“Novelty” Selection Techniques
To begin, let’s take a look at what I call the “novelty” selection tools and techniques that are available in Photoshop. Despite every new edition of Photoshop touting these features as the hottest addition to the app they’re often seen as pretty amateurish in the industry. Saying that all these basic techniques do have their place, but only if your image has definite edges and plenty of contrast between the pixels you want to keep and those you don’t.
Magic Wand

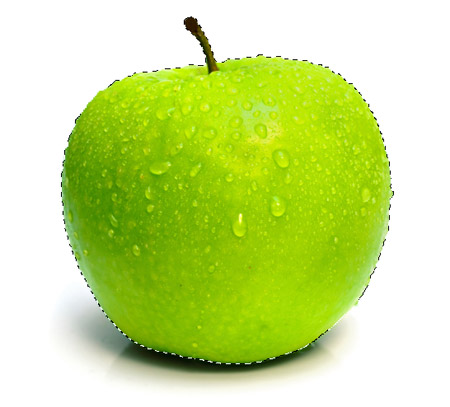
Nothing screams amateur more than the good old Magic Wand tool. Simply click your wand on the area of an image you want selecting and Photoshop will magically outline it for you ready for editing. The Magic Wand can be handy for those super clean, high resolution photos isolated on white but for anything else the results aren’t up to scratch.
Quick Selection Tool
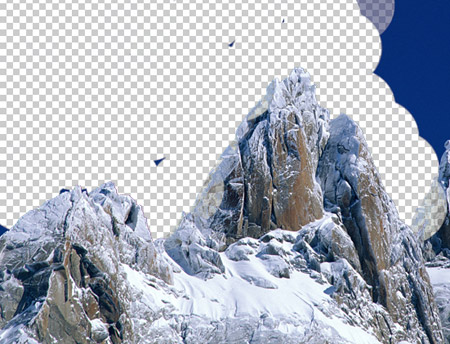
The next step up from the Magic Wand is the Quick Selection Tool. Instead of allowing Photoshop to do all the calculations, with the Quick Selection Tool you at least give it an idea of the area you want selecting. Results can be more desirable than the Magic Wand, but as the name suggests it’s still only a quick and dirty method.
Lasso Tool/Magnetic Lasso Tool

Although the Lasso Tool is an extremely useful tool in some design workflows it’s not great for clipping out images. It’s easy to use and does the job, which is probably why it’s the most commonly used tool, but its main drawback is its inability to produce smooth curves, as well as being uneditable.
Eraser/Background Eraser/Magic Eraser tool
Another “amateurish” tool in the Photoshop arsenal is the Eraser tool and its reincarnations in recent versions. It’s seen as amateurish because it’s usually the first method Photoshop newcomers employ when removing the background from an image, but it soon teaches you that destructive Photoshop techniques always end in tears.
Advanced masking techniques
If you want to be prepared for any Photoshop clipping challenge that comes your way you’ll need to arm yourself with some advanced techniques. Not every photograph is nicely isolated on a white background, but these three techniques (or a combination of two) will allow you to clip out any image imaginable.
The Pen Tool
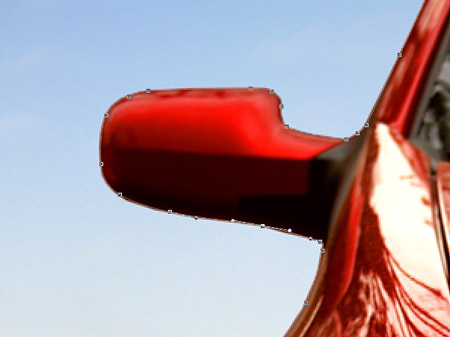
The mysterious Pen Tool is often avoided by Photoshop newcomers, but it’s definitely one of the most important tools you should aim to master. The basic principle is the same as the Lasso Tool, manually draw around your subject to make a selection. The Pen Tool’s advantage over the Lasso tool is its ability to create smooth, flowing curves that are editable and can be saved. With the Lasso tool once you’ve made your selection you’re stuck with it, whereas the Pen Tool can be edited/manipulated and saved within the image file for use at a later date.
Select the Pen tool and begin outlining your subject. There’s two methods you could use, the click and drag approach where you pull out bezier handles with each click, or the backtracking technique where you draw a straight path between two points then add in a third point and drag the handles into place.
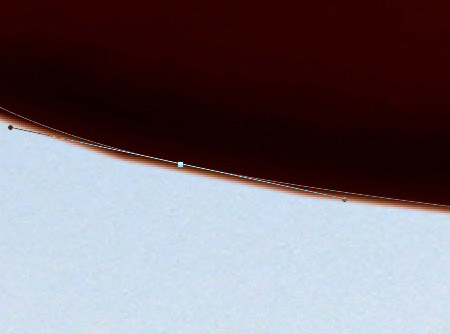
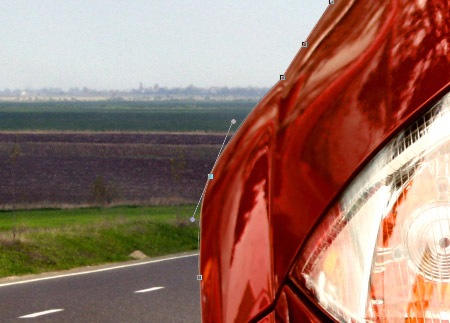
When outlining with the Pen tool stay within your subject by 1-2px to make sure none of the background leaks into the selection.
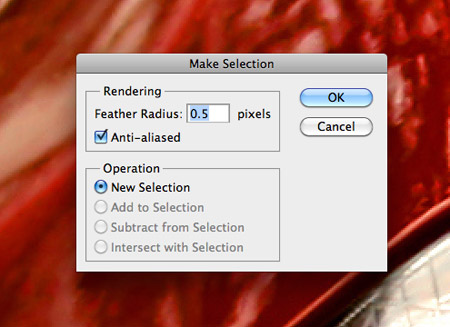
Once the path is complete, right click and Make Selection. Alter the Feather Radius to avoid unnatural harsh edges, 0.5-1px is usually a good rule of thumb. Rename the Work Path in the Paths palette to save the path as part of the image so it can be reused later.
Useful for: Clipping out solid objects such as product shots. Masking subjects that don’t have good contract against their background.
Layer Mask

The Layer Mask is the Photoshop Guru’s alternative to the Eraser tool. The Eraser tool is a destructive technique, whereas a Layer Mask can be easily corrected or removed altogether. The great thing about Layer Masks is all of Photoshop’s usual tools can be used to create your mask, so marquee selections, brushes and gradients could all help make the perfect mask. The basic principle behind Layer Masks is black is see through and white is solid, so whatever area of your mask is black will effectively be erased from the image, unless you want it back, in which case you would just paint it white instead.
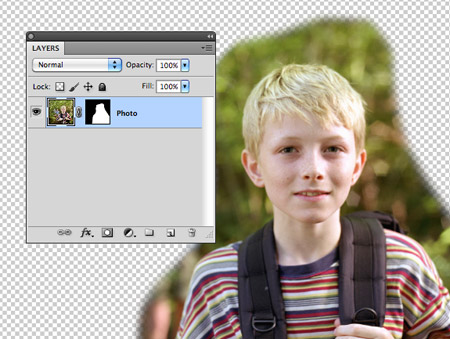
Click the Add Layer Mask icon at the bottom of the Layers palette to add a mask. A common technique is to use the brush tool to paint out the background of an image just as you would with the eraser tool.
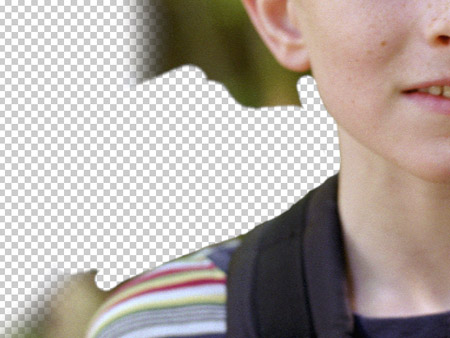
Using brushes, particularly with a pen tablet means you can make natural selections with the help of pen pressure and the softness of your brush tip.
Useful for: Intricate images that would be too tedious to trace with the Pen Tool. Masking images with soft or fuzzy edges.
Channels

The Channels technique can be a lifesaver, but it tends to only work in certain scenarios. If you have an intricate image that retains good contrast the Channels method is the perfect solution. The idea is that you chose either the red, green or blue channel depending on which has the best contrast and you use it to adjust the image tone with the Levels or Curves tools in order to create an easy selection. If you ever work on studio photos of models, the Channels approach will be your best friend for clipping out hair and clothing.
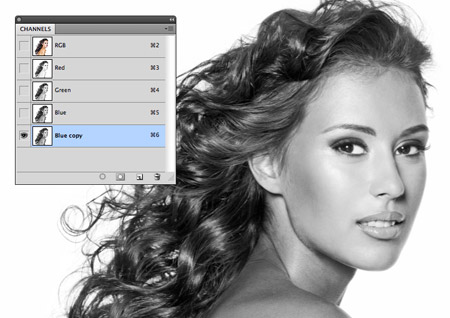
Switch to the Channels palette and toggle between the red, green and blue layers to find the image with the most contrast. Drag your chosen channel into the “New Channel” icon to create a copy.
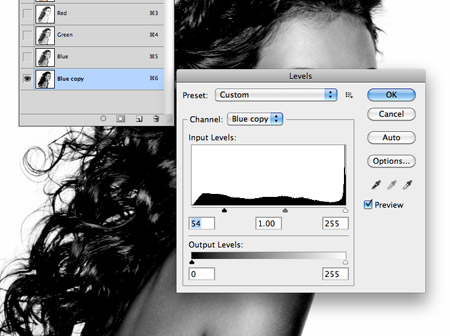
Use the Levels and Curves adjustment tools to boost the contrast to make the areas you want to keep black and the areas you want to ditch white. Be careful not to go too far otherwise you’ll end up with dirty edges.
Use the burn tool to paint over any outstanding details or highlights that need adding to the mask. As you can see, the channels method picks up on even the finest of hairs, making it a much better choice than a Magic Wand, Pen Tool or Layer Mask selection.
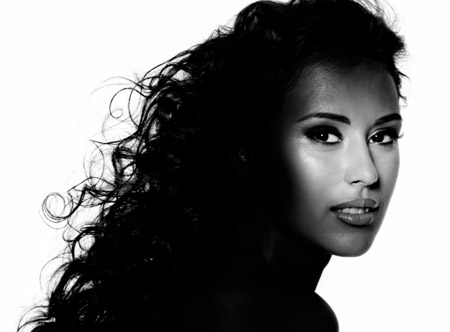
Useful for: Images with good contrast between the subject and background. Perfect for clipping out hair.

I have used the pen tool from the beginning of my photoshop use, so my boss taught me right! Looking forward to trying the channels technique. Great post!
Nice techniques thanks for sharing this Chris
This is a really helpful post especially for those starting out with Photoshop. Beginners tend to ask a lot of questions about cutting out or masking images.haha! Great post! :)
Another point about “layer” masks that isn’t obvious by their name is that they can be applied to groups too – very useful for constraining lots of complex layers with their own masks already.
Thanks for the tips. I’m already very good with the pen tool, but I never considered the channels technique before. I’m always open to learning new techniques like this, and you’re constantly giving me something new to work on. Thanks!
I have tried a variety of these techniques before. I’m not completely satisfied with any of them. As a Yearbook Designer and Editor, I’m constantly deleting backgrounds. I must delete 500+ backgrounds a year or more.
Channels didn’t work for me and the Pen Tool always causes me problems. We use a lasso and Layer Mask combo. It’s easier for the students to master the lasso tool, so I have them use that. I prefer the layer mask, but it’s a little bit more tricky and takes time to be precise.
Maybe you have some suggestions about the pen tool? I don’t like using it because I inevitably get little bumps and divots in my curve. It’s never as smooth as I want it, and so I don’t use it.
Don’t you ever find that accidentally double clicking with the Lasso tool ruins your selection? That was always my main problem.
As for the Pen tool, try using my 3 click method mentioned in the post (explained in more detail here: Two Simple Techniques To Help You Master the Pen Tool – http://is.gd/cttvWx). Most people click and drag each point, but unless you convert the anchor point before continuing into a tight corner that’s when it can get out of control.
Yes, I’ve double clicked many-a-time. I can usually salvage it, especially if I’ve made it over the person’s head (the lines don’t cross).
As for the Pen Tool. I have converted the anchor points, and that’s usually what causes me problems because the line doesn’t flow anymore. I will read the article and try out the 3 click method. Thanks for your input!
Very nice article! Good tips for sure and I like the site! Has a nice new home on my bookmark bar. :)
Always good to find quality resource sites for design and development since there are so many out there.
No mention of refine edge? Quick selection / Magic wand tool with refine edge can have some decent results.
Decent insight into different techniques though.
I know Kyran, no one uses the old extract tool anymore since it was dropped out of CS4 and reincorporated into CS5 as refine edge. IMHO I suspect its because they don’t understand how it works now that the UI changed…
Hi Chris, love your weekly emails, so inspiring. I would love to use the Channels palette but cannot figure out how to save the image as you see it in the layer. Can you help me???
Hi Chris, this was a great post to read, really need to get to grips with channels for selections. Normally I go for the pen tool and layer masking but this is a pain for hair.
Thanks Again
Joe
Awesome, loved the channels technique..
Thanks for the post.
I want to study PS,the articl is helpful to me Tks~~
Wow! Quite helpful!
great tut….. every tool/s mentioned here are have its pros and cons, well, that depends on the picture you are using it into…that’s why the author uses different examples/pics here…thanks a lot chris..keep it up…
Wow nice info shared. We also work as a graphic designing solution in New York
Nice tips for using those selections Chris!
I find myself using quick mask quite a bit too. For those who don’t… just press “Q” on the keyboard and use the brushes to paint the area you want selected. Then press “Q” again to exit the mask and you have your selection… tip: always save your selections, and remember you can “inverse” selections.
This is really good tips for a new users like me for the photoshop. thanks for your help.
Jo
Fantastic post. I find these tips useful everyday! It’s never too late for a refresher though, thanks for sharing =)
Nice and simple tips for beginners. Good one!
This really is a really invaluable post especially for anyone commencing with Photoshop. Newbies tend to ask a countless queries about cutting out or masking images.haha! Great post! :)
As a designer you never, ever use Magic Wand, Lasso Tool/Magnetic Lasso Tool, Quick Selection. As you mentioned they just scream amateur. But you’d be surprised how many brochures/posters/print ads i’ve seen with tell-tale signs of the lasso tool or magic wand.
Hi there Chris,
Great tips, I’ve never used the ‘Channels’ technique for masking before, very useful to know. Something that took me about an hour to create a path around with the pen tool took about 20 seconds to mask out just as well with channels.
Many thanks mate,
Gareth
That last channels method is incredible. I’ve been using photoshop for years & I’ve always been afraid of the daunting channels palette, but the minute it took me to read that tut will probably save me much pain & tears in the future.
HI, I want to recommend http://www.elcoplanet.com to all of you who are hosting your pages or you are doing reseller web hosting business, I have been using acvilla.net ixwebhosting.com etc. with years and all they have expencive prices and lot of limitations,www.elcoplanet.com offers lowest prices and high class performances of hosting Reseller Hosting, Master Reseller Hsoting, Alpha Master Reseller Hosting and Their special product Super Alpha Master Reseller Hosting
Thanks for the tips! I personally use a combination of the paths tool, and the eraser, and almost always use a mask. I think I’ve been scarred by too many experiences of being unable to bring back what I erased!
Nice info. I never really use the eraser tool and my best one is the mask. I do use channels but maybe not as often as I should. Thanks for the techniques :)