How To Create a Cute Vector Mushroom Character

Follow this step by step Illustrator tutorial to create a cute vector mushroom character with a Japanese kawaii influence. We’ll create the basic structure using Illustrator’s basic shapes, add variation in the linework to define the character then finish it all off with some vibrant colour fills.
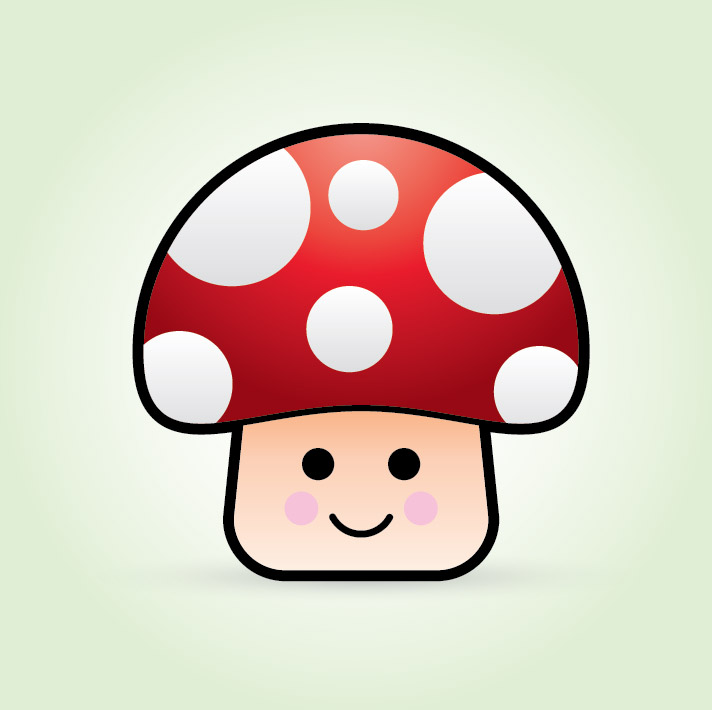
The character we’ll be making is a little mushroom with that typical super cute Japanese style. The simple shapes and soft round edges all add to the attraction and help make the character loveable. There’s essentially three steps: The creation of the basic character structure; The variation in strokes to define the character’s outline; Then the addition of colour fills to bring the character to life.
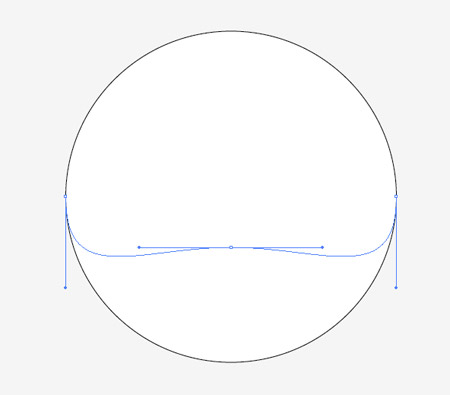
Draw a circle on the artboard while holding Shift. Use the Direction Selection tool to drag the uppermost point vertically to deform the lower edge.
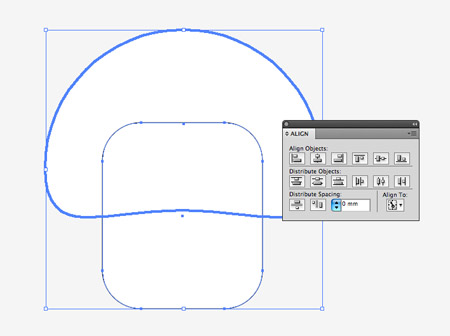
Draw a Rounded Rectangle to represent the stalk of the mushroom, then Shift-click the mushroom head into the selection. Give the mushroom head a second click to make it the key object, then centre them both up along the Y-axis.
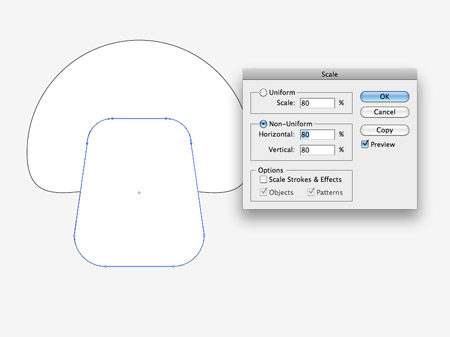
Use the Direct Selection tool to select all the uppermost points of the rounded rectangle then go to Object > Transform > Scale. Enter 80% in the options window.
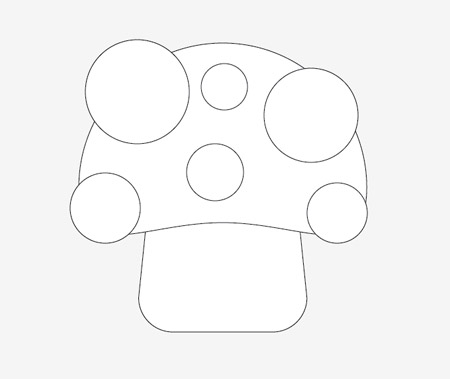
Draw a bunch of randomly sized circles over the mushroom head to create a series of spots. Make sure some of the circles overlap the edges so they’ll appear to wrap around the shape.
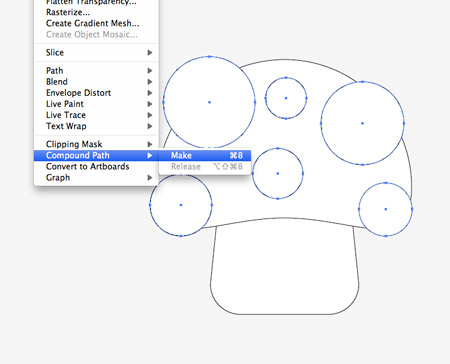
Select all the circles and create a Compound Path by heading to Object > Compound Path > Make, or pressing CMD+8.
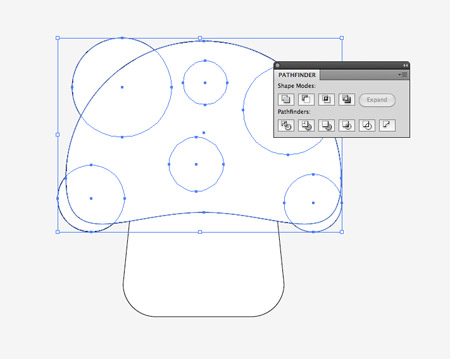
Copy (CMD+C) and Paste in Front (CMD+F) a duplicate of the mushroom head. Press CMD+Shift+] to make sure it’s at the top of the stack, then with both the compound path and this duplicate selected, hit the Intersect option from the Pathfinder palette.
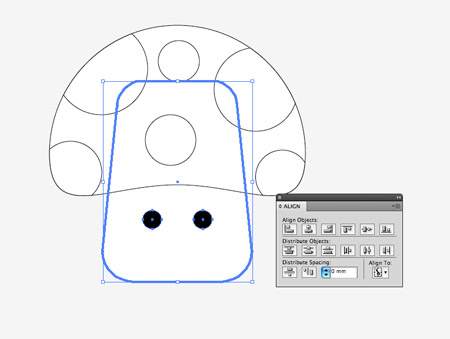
Draw a black filled circle as an eye, then hold Shift and Alt to drag a duplicate. Group the two eyes then align them centrally to the main body. Make sure the body is activated as the key object so it doesn’t move out of place.
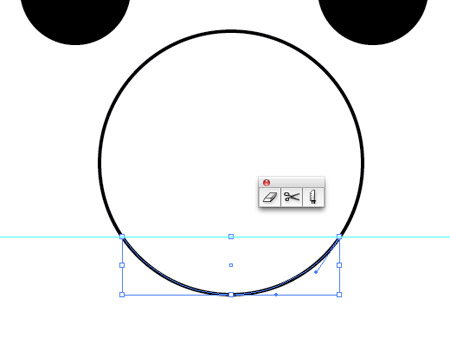
Draw a circle with a black stroke then drag a guide to cut across the lower portion. Split the path according to the guide using the Scissors tool then delete out the upper section.
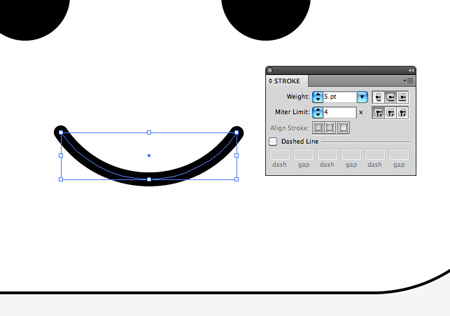
Bump up the stroke to around 5pt and select the Round Cap option to create a cute little smile.
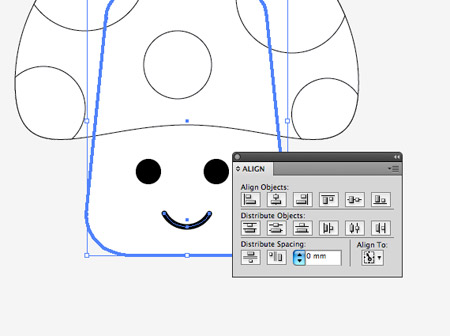
Align the smile to the main body using the Align palette, remember to give the body shape an extra click to select it as the key object.
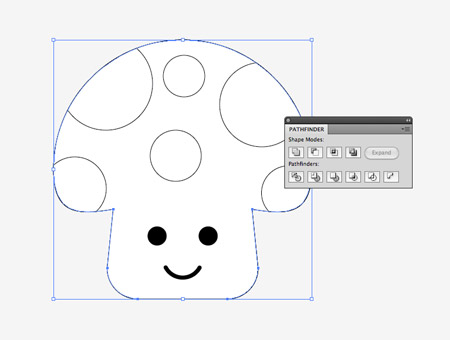
Duplicate the main body and head shapes (CMD+C / CMD+F) and merge them together with the Pathfinder palette.
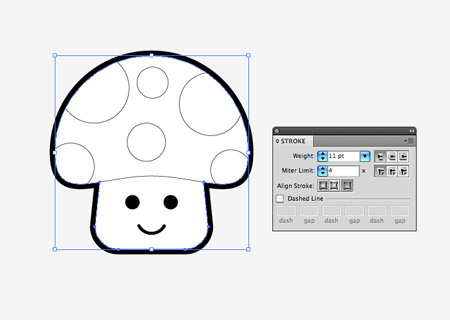
Increase the stroke of this main outline to around 11pt and select the Align to Outside option from the Stroke palette.
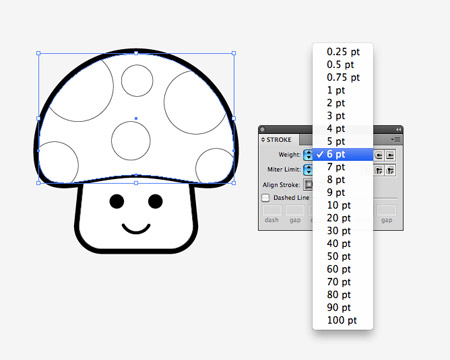
Adjust the stroke of the original head shape to around 6pt, aligning it to the outside.

Add some simple colour fills to the original character shapes, such as red for the head and light flesh colour for the stalk/body. Don’t forget a couple of pink circles as rosy cheeks.
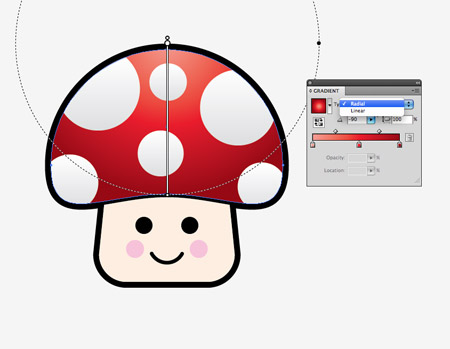
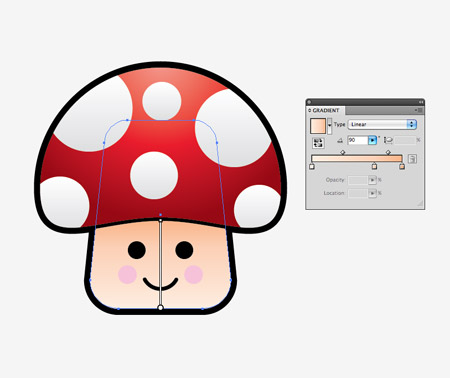
Use these basic colour fills as foundations for a more complex gradient. Create two more gradient handles, one lighter and one darker then alter the gradient to flow over the mushroom head.
Create another gradient for the mushroom stalk/body and alter the gradient to flow vertically with the darkest colour towards the top to act as a shadow.
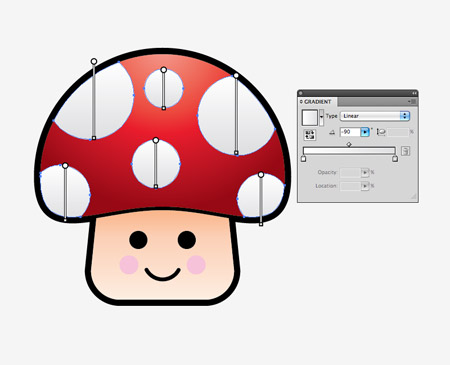
A very soft grey to white gradient can be added to the spots to give them a touch of depth as opposed to the otherwise flat white fills.

Finish off the character with a nice background. Create a radial fill from white to a subtle pastel green inside a rectangle.

Add a grey to transparent radial gradient fill to a circle, squash it down then position it underneath the character to create a shadow.
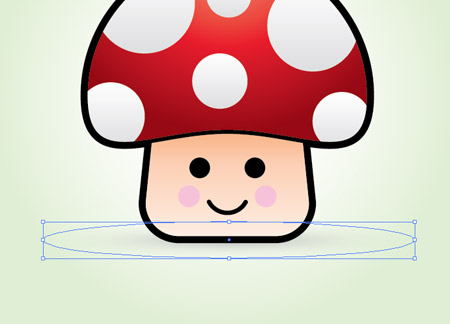
Use the CMD+Shift+[ shortcut to send the shadow to the back, then press CMD+] to bring it up one level above the background rectangle.
That leaves our cute little Japanese inspired vector mushroom character complete. The overall structure of the character is made from basic round shapes to give it that friendly appearance. The varied linework helps define the outlines and the colour fills bring it to life with gradients to add depth and definition.

Nice. Learned a few new techniques in here. Chris, can you someday do a tut on drawiing cute baby characters. That would be nice. Thanks a lot for your awesome tuts. They help a lot.
This is great, it is like a revamp of the super mario mushroom design! lovely, I learn a fair bit here !!! :)
Lovely, Just Lovely!!! Great Design!
this maybe too hard for me. could you do video tutorial?
this maybe too hard for me. could you do video tutorial?please
Really nice bro! Simplistic beauty! :) Chris do you have you done any videoed presentation of your websites to your clients or anything of that sort?
Haha it’s actually pretty cute! I may adapt it a bit to look like me with hair instead of a mushroom and stuff! Thanks for this!
Very cute thanks for putting this one up :)
this is really good chris… simple yet imformative… very detailed step… love it!
这写的很好,必须要顶一下,继续加油
I simply love it when you post these little characters. They’re so easy to create, and perfect for beginners in Illustrator, like myself. Thanks :)
Just wanted to say thanks Chris for these great tutorials. Much better reading as text/images – I find that watching video tutorials is 90% stuff you know already when you really to find the 10% you didn’t know – much easier to find when it’s written down.
nice tutorial,,,i check it out its very simple and amazing,,,thanks for sharing
Lovely. I’d like to thank you for these incredibly informative and helpful tutorials. I’m going to go and work on this Japanese shroom tut!
w
Jorden is so flattering. But nice design Chris.
very impressive tutorial. Remembers me at Mario Cart in 90s… Toad was definitly the best character
hi, nice simple tutorial suitable for beginner like me.
Very cute mushroom character mushroom. Thanks for tutorial. Very helpful for me. I would try to create a wenger backpack. Nice job buddy.
so cute! :) x
Perhaps, you are aware of the saying that imitation is the sincerest form of flattery. But when it comes to manufacturing false Rolex watch, the imitators are more likely veered on greed rather than flattery. Many times, fake Rolex copies are very amateurish and it would not even require jeweler’s proficient ability in order to spot a false one. These fake kinds are imprinted with stupidly spelled words, sharp edges, extra point within the logo’s crown, and other obvious flaws seen on the bracelet and bezels. The weight is as well unusually light for a 14K or 18K gold watch .
No. certainly not up to the standards I expect from you.
That’s why all my stuff looked so bad, I never used lighting. Everything looks so much better now thx. O_O
Nice tutorial. Got confused for a second when you said to merge the face and body, whether you wanted to unite, or use merge. Also should mention about removing stroke from other stalk or make it outside as well.
Otherwise, easy to follow 99% for beginners.
Check out my take on it:
http://dawudfreed.deviantart.com/art/Mushroom-253575810