This post was originally published in 2010
The tips and techniques explained may be outdated.
With Christmas being just around the corner I thought it would be fitting to create a festive themed tutorial. Follow this step by step process to design a cute little vector reindeer character. We’ll begin by creating the basic structure of the character with basic shapes, then build up the details with gradients and effects.

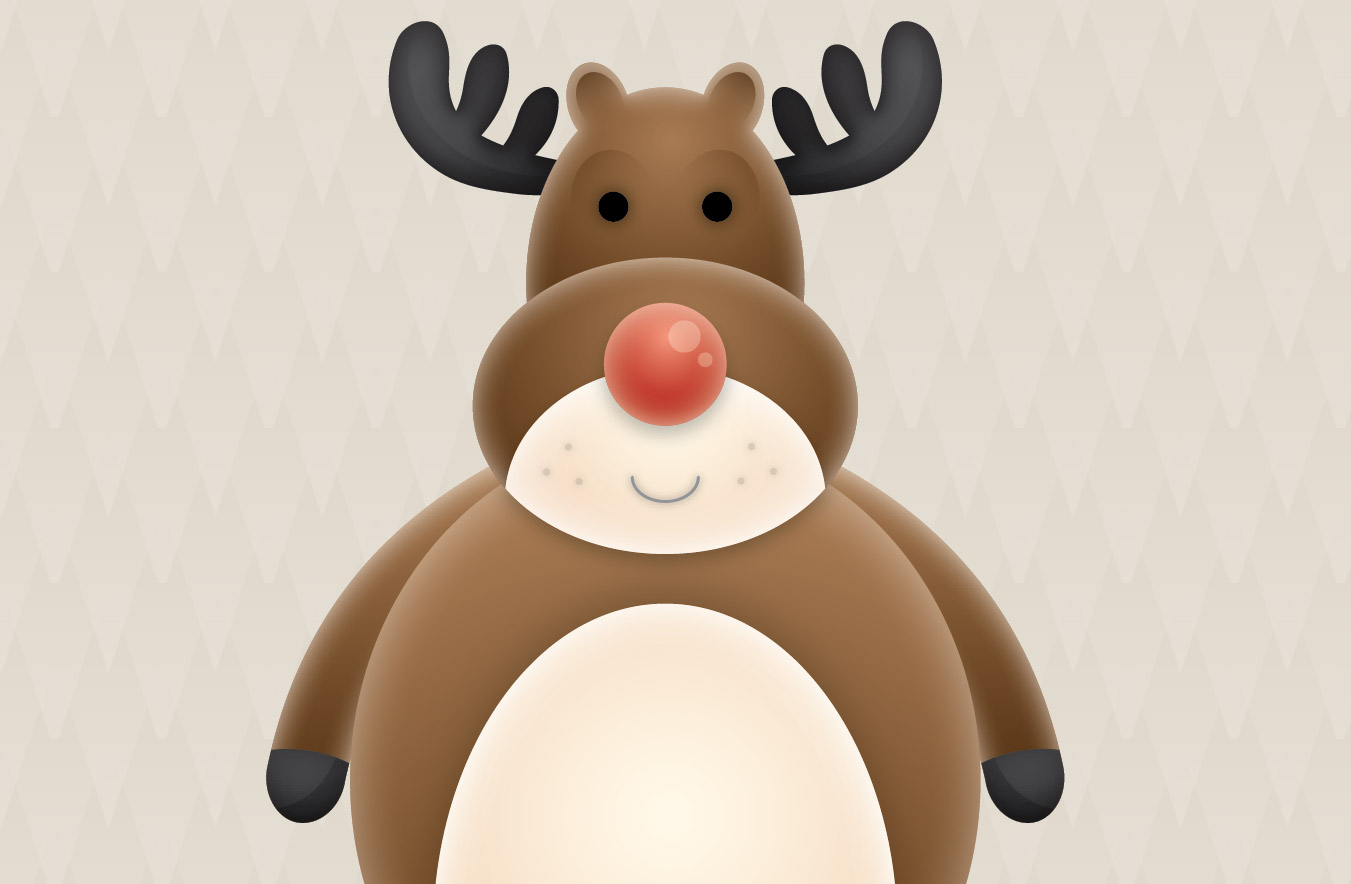
Here’s the final character we’ll be creating. The simple and rounded shapes really help add to its cuteness while and his general chubbiness and the fact that he stands on two legs helps build upon the quirky and stylised style of design.
View the cute reindeer character design
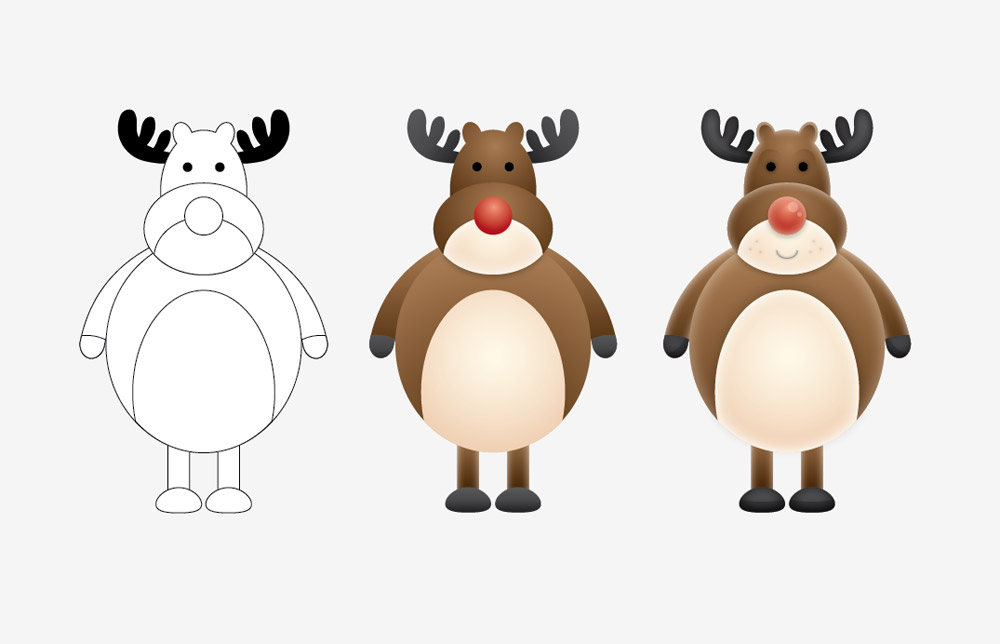
There’s three basic stages to the design process. Firstly the core outlines are created to form the basic structure of the character, once the character is built out of a range of complete shapes each of these shapes can then be given a colour fill. The design really comes to life in the third step, where shading and effects add depth and dimension.
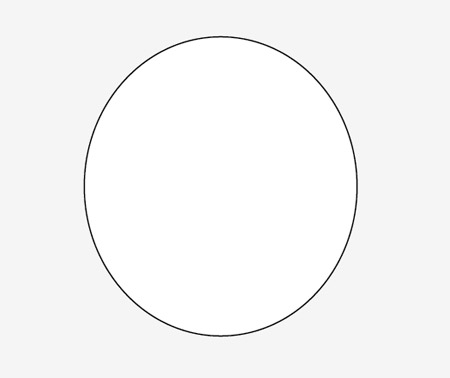
Open up Adobe Illustrator and draw an ellipse on the artboard as the main body of the reindeer. Leave the default white fill and black stroke for now.
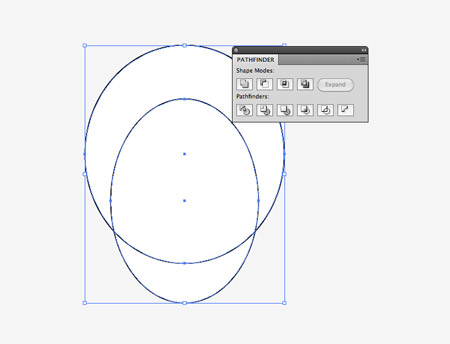
Draw a slightly thinner ellipse overlapping the body to represent a patch of belly fur. Copy (CMD+C) and Paste in Front (CMD+F) a duplicate of the body shape and send it to the top of the stack using the shortcut CMD+Shift+]. Select the duplicate body shape along with the previously created ellipse and use the Intersect option from the Pathfinder tool to trim away the excess.
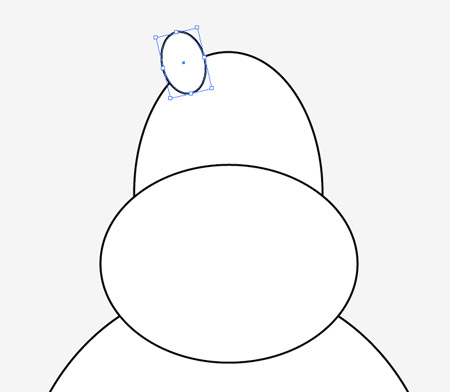
Continue adding some smaller ellipses in various orientations to build up a head and muzzle. Begin adding a smaller ellipse as a little ear, rotated slightly.
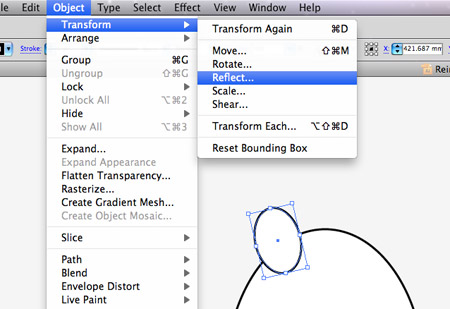
Copy (CMD+C) and Paste in Front (CMD+F) a duplicate of the ear, then go to Object > Transform > Reflect to mirror the ear.
Select the two ears along with the ellipse that makes up the head and blend them together using the Merge option from the Pathfinder tool.
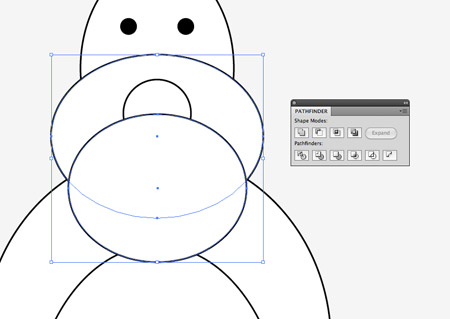
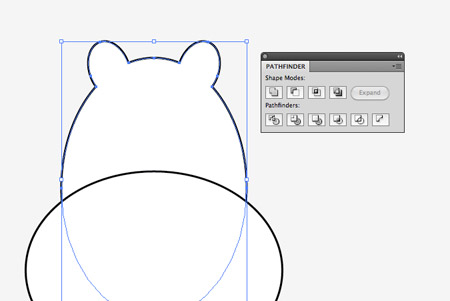
Draw some circles on the head area to represent a couple of eyes and a nose, then add another circle over the lower muzzle area. Make a duplicate of the muzzle piece to use this as a tool with the Pathfinder to trim away the excess so the circle fits within the muzzle area.
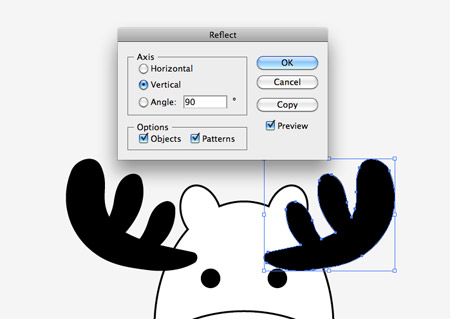
Select the Blob Brush tool and draw the basic shape of an antler. A pen tablet comes in handy here to make the most of pressure sensitivity. Make a duplicate of the antler, go to Object > Transform > Reflect, then group both antlers together. Select the antler group and the head, then click the head once more to make this the key object. Use the Align palette to center up the objects.
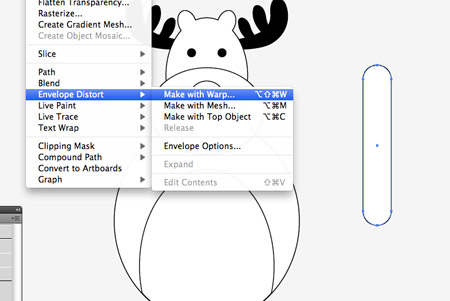
Use the shortcut CMD+Shift+[ to send the antlers to the bottom of the stack, making them sit underneath the head. Elsewhere on the artboard draw a long thin rounded rectangle with maximum corner radius. With this shape selected go to Object > Envelope Distort > Make with Warp.
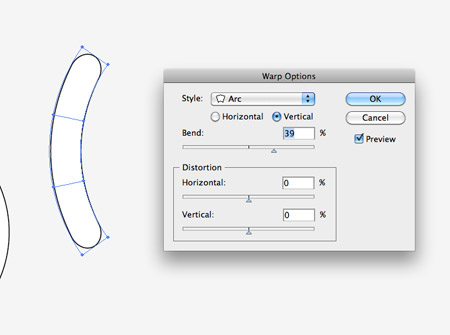
In the Warp Options bend the rectangle by around 40% vertically using the Arc setting. Send this shape to the bottom of the stack (CMD+Shift+[) then position it into place as an arm.
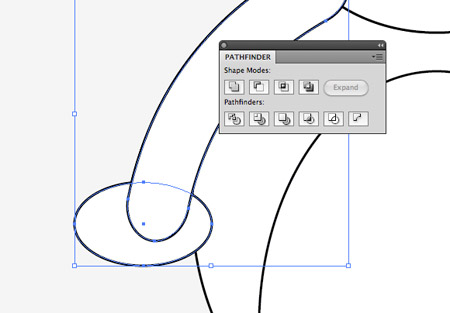
Draw an ellipse over the lower portion paying attention to the line that cuts across the arm. Make a duplicate of the arm and use this with the Pathfinder to intersect the shape.
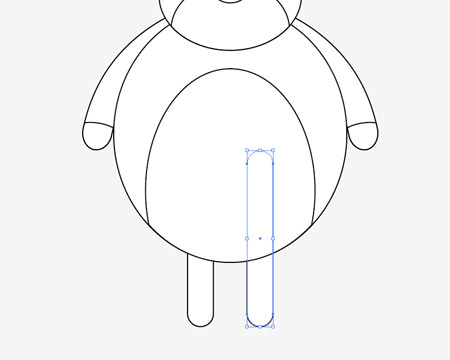
Group the arm and the newly created hoof object, make a copy and reflect them onto the other side of the body. Make another group of both arms so they can be aligned centrally on the body. Grab the Rounded Rectangle tool again to draw a couple of thin legs.
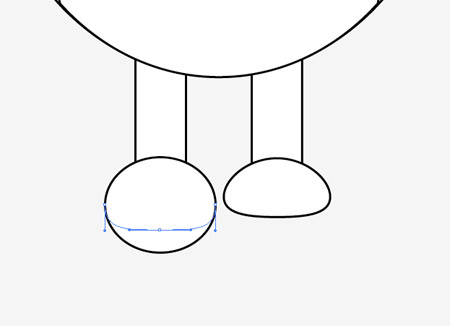
Draw two circles at the bottom of the legs to act as feet, then use the Direct Selection tool to manipulate their shape by dragging the lower most point vertically upwards to squash the lower edge.
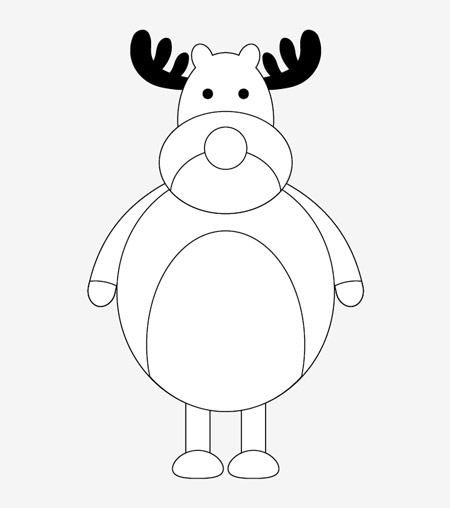
The reindeer character is looking quite plain so far with just a series of basic shapes, but it will soon start to come to life with some colour.
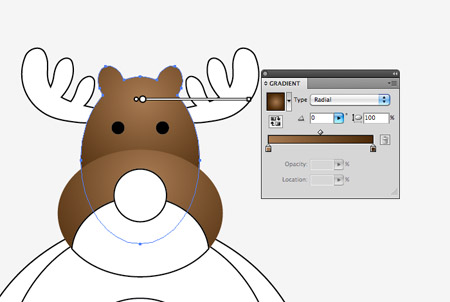
Select each portion of the character individually and swap the black and white fill/stroke combination with a radial gradient. Use the Gradient tool to move the gradient around to create a blend between light and shade. This change of colour is what adds depth and gives the impression of a three dimensional character.
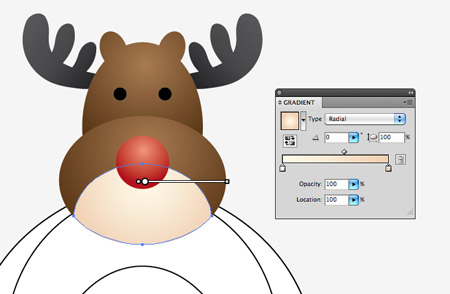
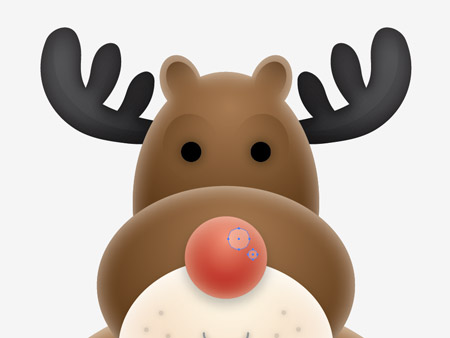
Use lighter beige tones on the muzzle and belly area to contrast against the brown fur, and of course give the reindeer a bright red nose.
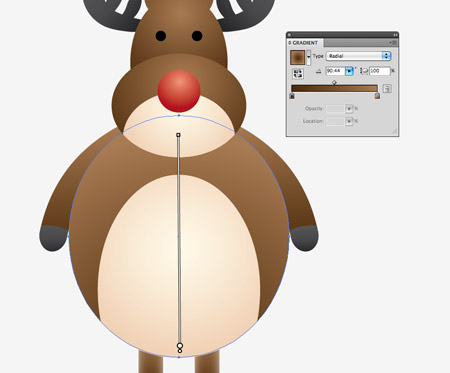
Light sources almost always come from above, so make sure the lighter tone on each gradient is at the top, which gets darker nearer the bottom of the shape.
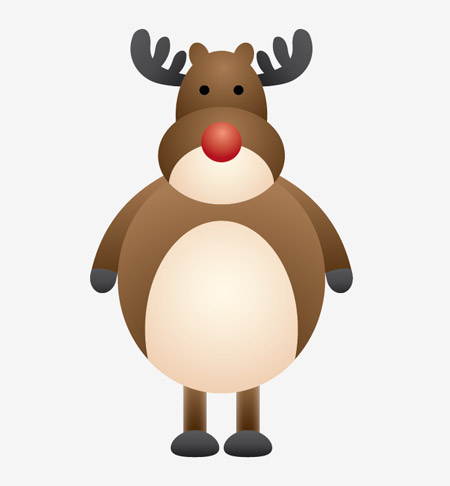
The reindeer character now looks recognisable with the colour fills, but it still looks a little basic. This is where more subtle shading and highlighting effects really bring the character to life.
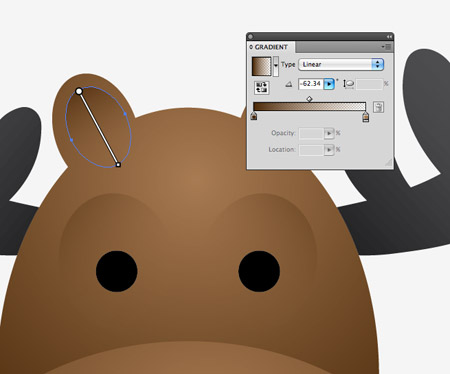
Draw some more ellipses around the eyes and inside the ears. Give these shapes a dark brown gradient that fades to transparency. These shapes give the impression of a kind of inset appearance because the gradient uses the darker colour at the top, which would be a shadow in real life.
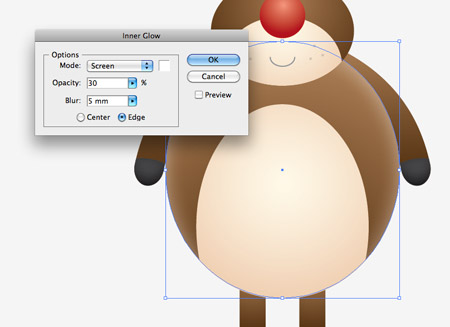
Select the main body shape and go to Effect > Stylize > Inner Glow. Keep the default settings of Screen and white, but change the opacity to 30% and alter the blur to 5mm.
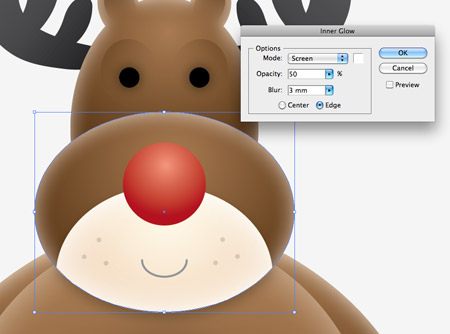
Continue selecting the other brown body shapes and add a similar Inner Glow. On smaller shapes like the head and arms use a smaller amount of blur, around 3mm.
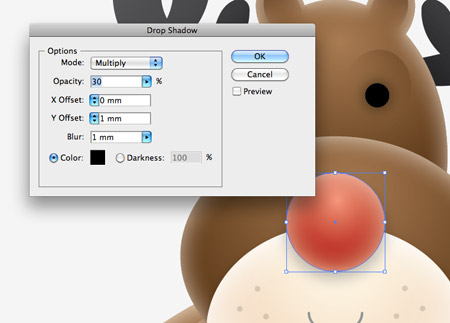
Add the Inner Glow effect to the nose, then also add a soft Drop Shadow to really give it a three dimensional appearance. Set the opacity to 30%, X-offset to zero and the Y-offset and Blur to 1mm.
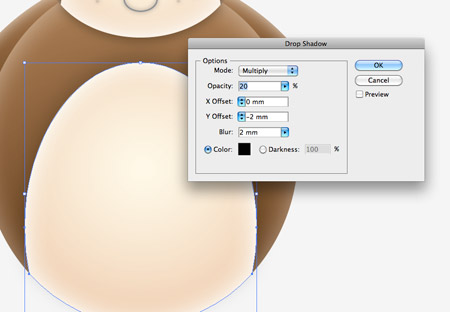
Also give the belly fur a soft Drop Shadow, but this time set the Y-offset to -2mm and increase the blur to 2mm.
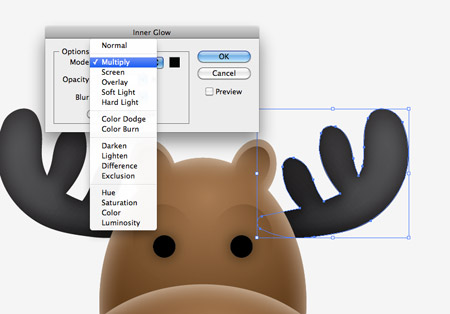
On all grey objects such as the antlers and hooves, an an Inner Glow but instead of using white/Screen, set the options to black/Multiply.
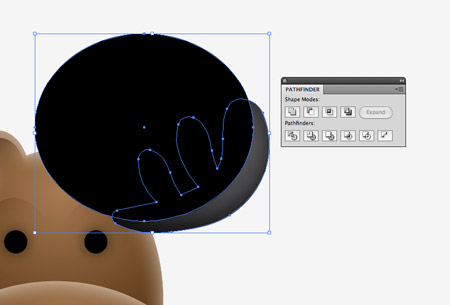
Make a copy of one of the antlers, then draw an ellipse over the shape so the outline flows neatly along the length of the antler. Use the Subtract option from the Pathfinder tool to trim down this shape, then set the fill to black and 20% opacity.
Draw a couple of variously sized circles over the nose to act as specular highlights. Give these circles a white fill and a low opacity of around 20%.
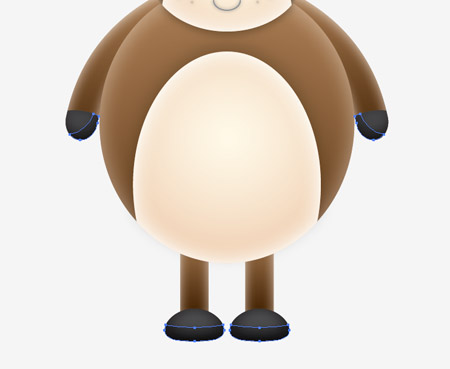
Create more smooth shapes over the hooves and trim each one down to create subtle little shadows on the lower edges.
These last few additions of Inner Glow and shadow effects really transform the design giving it extra depth and dimension. The more shading and impressions of light and shade the more realistic a design will look, even if it’s made from basic shapes like Mr. Reindeer here.
hahaha, love it! so cute!
Awesome quality – can’t wait to give it a go. Thanks Chris.
very good tutorial, as usual !
Simple and pretty. I like it.
yeah, and it’s very easy to follow.. love the cute chubby reindeer…
That’s cool, the inner glow and shadow stuff works really well.
LOL I love the reindeer. In fact your Tutorial’s are extremely helpful i think!. Keep up The amazing art
Looks like Rudolph’s been eating too many carrots!
Actually it’s look so amazing and Cute haha thanks Chris
Sweet…Love the shading Chris, another quality illustration. Mince Pie vector next week?
Nice work.good tutorial :)
What a cute radolph :D
Great shading technique! that’s what i’m looking for. Thanks!
Nice Chris! I’m going to create a whole bunch of these little guys, each one with a unique prop then see if I can get a decent Santa using the same techniques. That should make for an awesome xmas card.
Nice tut Chris, I’ll be giving this a try tonight. :) I need to work more on my cute vector work.
cool tutorial :) thanks
The Best Text Decoration Tutorials on the Web – http://www.cruzine.com/2010/07/30/text-decoration-tutorials/
Great tutorial! Thanks for sharing.
This was fun! I put one on my blog for the holidays! Thank you.
GOOD stuff, this inspired me to make my own lil cute character.
Thanks Chris…..awesome stuff as usual!
This is such a cute and lovely post! :)
A Great tutorial. I’ve always wanted to try my hand at a character style vector.
But, a few thing bugged me while doing this tutorial; you missed a few steps, mostly in the face, about the mouth, freckles, and a few drop shadows. I realize this leaves some of the technique up to the individual user, but it just makes the tut seem incomplete.
thanks.
Very cute… nice tutorial, thanks for sharing
Good Work Dude..
Hi! Thank you very much for this tutorial.
I’m new with Illustrator, and i have a problem.
At the part «Draw an ellipse over the lower portion paying attention to the line that cuts across the arm. Make a duplicate of the arm and use this with the Pathfinder to intersect the shape.» I am getting an error «The filter produced no results. Please select two overlapping paths.» Here is a screenshot: http://twitpic.com/3ecnop
What am I doing wrong?
Than you!
@Ruby Roid: Is it possible you are selecting both the original and copy of the arm layers? That can be causing the issue.
Make sure you are only selecting the arm copy – which should be the layer in front of the oval – and the oval.
Yes, only arm copy and oval.
I don’t know why, but after using «Envelope Distort» Illustrator doesn’t recognize arm as a path…
Oh, I got it!
All I had to do is to select an arm and do «Object → Expand». Then everything went OK.
Sure, I don’t know, is it a right way to solve the problem…
You never tell us when to create the layers and stuff please do!, aside from thats its perfection man!
You provided me with inspiration in making a Christmas card deisgn, thanks.
http://tinypic.com/view.php?pic=2znwi2h&s=7 – “Recession reaches Santa”
really need to get my own hosting =/
You made me inspire to study more about illustrator and indesign! Thank you! God bless you more!
I love this this design and the use of illustrator. This is a style i would love to be able to develope.
That´s so amazing, your tutorial is good, but I am a horibble drawer :D
Great tutorial. I really like the background pattern of the final image, is there a download link?
Thank you all very much! I’m very glad that those of you who tried the recipes enjoyed them
Nice tut Chris & it sounds great. It gives the effective & useful notes with proper & clear illustrations. I really love this work which makes us inspire with the design works done by.
Thanks for share this sweet stuff with informative notes to design a cute vector reindeer character in illustrator. Keep up the good work, Congrats.
I love you tutorial but for some reason I am having trouble with this one. I am only on the arms. I have made them and applied the arch and made the ellipse for the hand part. But illustrator is changing the fill and line color of my arm every time I try to use the pathfinder, so I can’t apply the intersect. Can you help, please?
That was suppose to say, I love your tutorial. :)
hi
This is so so great
Very nice tut!