This post was originally published in 2015
The tips and techniques explained may be outdated.
There’s a couple of methods for creating complex circular patterns in Adobe Illustrator. One technique uses pattern brushes, but it involves designing multiple patterns that seamlessly repeat, which can be a difficult task in itself. Alternatively, you can make use of Illustrator’s symbol feature to create a pseudo kaleidoscope effect where a segment of your design is duplicated around a centre point to form a mirrored effect. Follow my step by step Illustrator tutorial to learn how to create a vector mandala pattern of your own. You’ll be surprised at how quickly you can build extremely detailed circular patterns with this process.
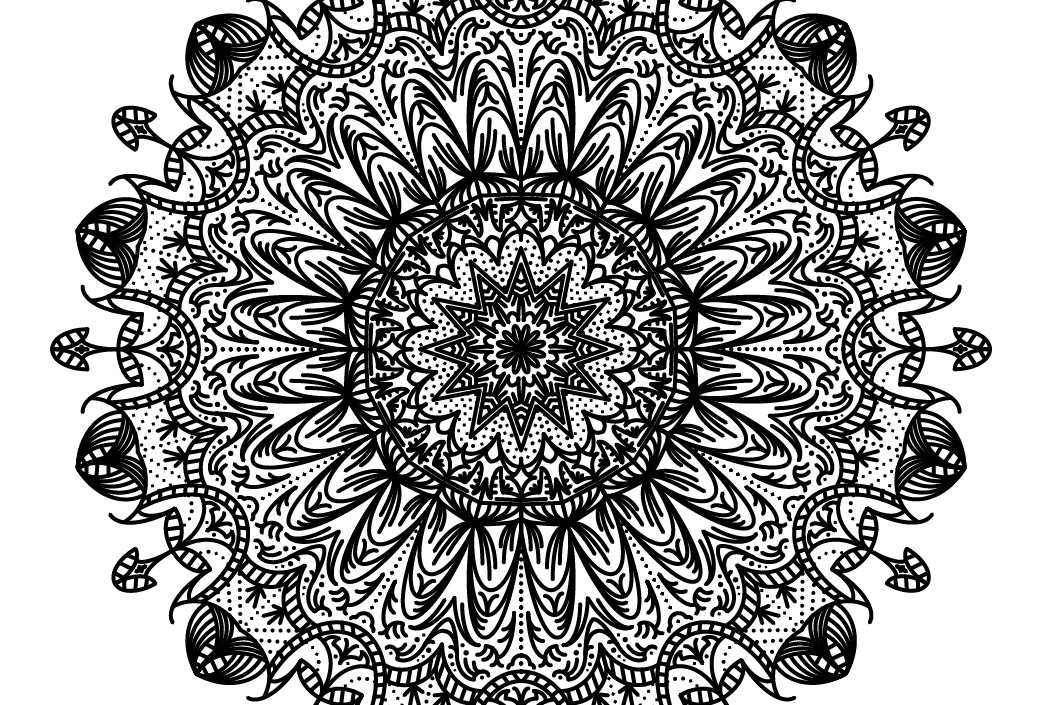
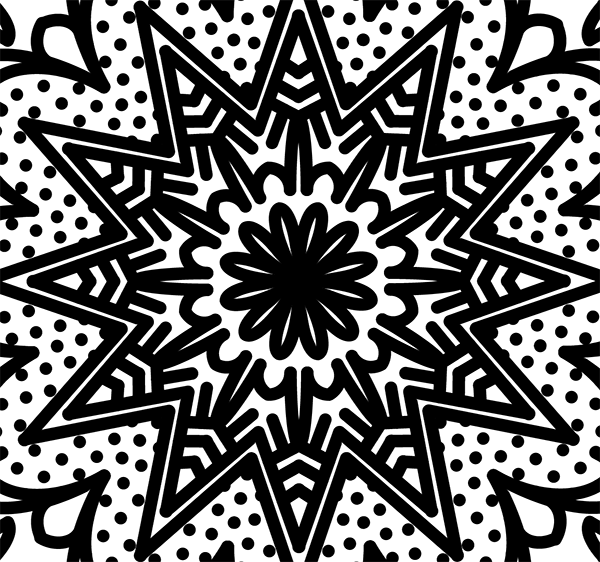
This is the kind of complex mandala pattern we’ll be creating in this tutorial. It looks like it requires a lot of tedious drawing, but it’s actually quite simple thanks to the symbols feature in Adobe Illustrator. With this technique we can draw just a small segment of the design, then Illustrator will automatically construct the complete circular pattern.
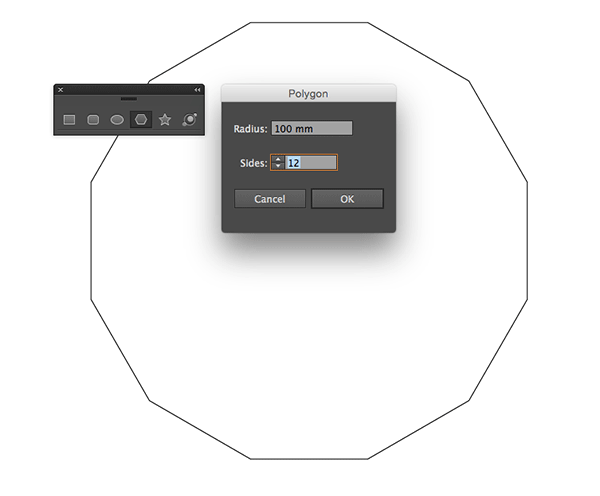
Begin by creating a new document in Adobe Illustrator. Select the Polygon tool and click on the artboard to bring up the shape settings. The more sides your shape has, the more detailed the pattern will be. Enter 12, along with a radius of around 100mm.
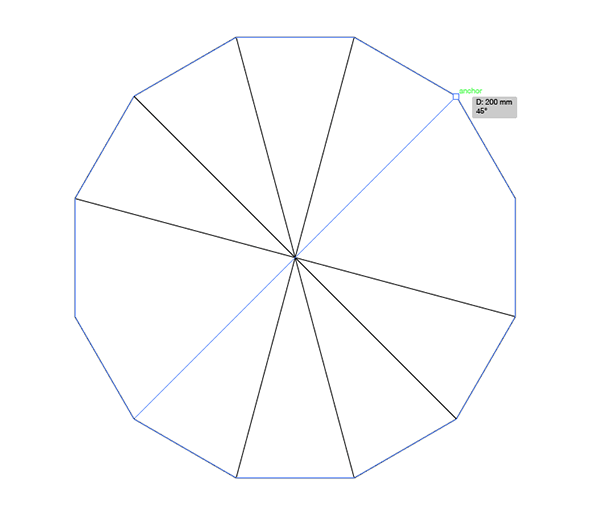
Turn on Smart Guides (CMD+U), then draw lines with the Line tool between each point of the polygon. Use the green Smart Guide tooltips to snap to the corners.
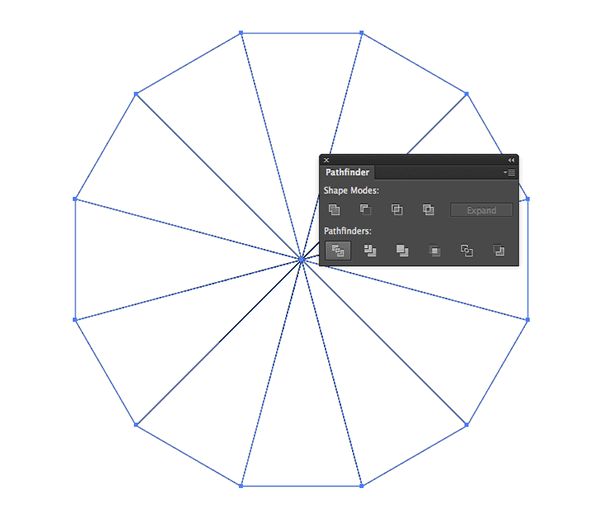
Draw a selection around all the objects, then click the Divide button from the Pathfinder to break the polygon into 12 triangle segments.
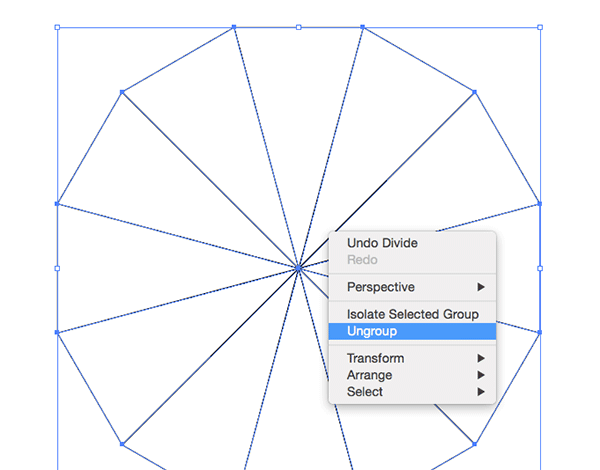
Right click and select Ungroup to break the polygon apart into individual pieces.
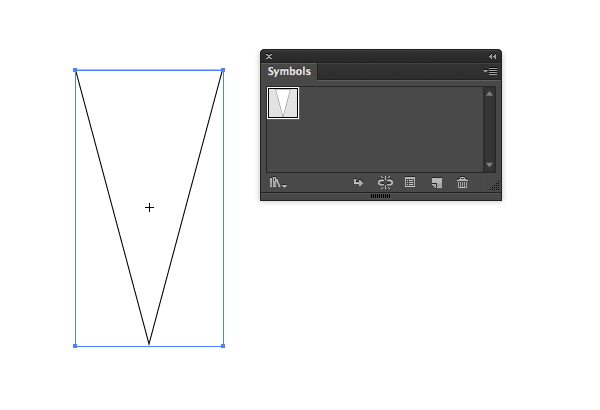
Delete all but one of the triangular segments, then add this graphic to the Symbols panel by clicking the New Symbol button.
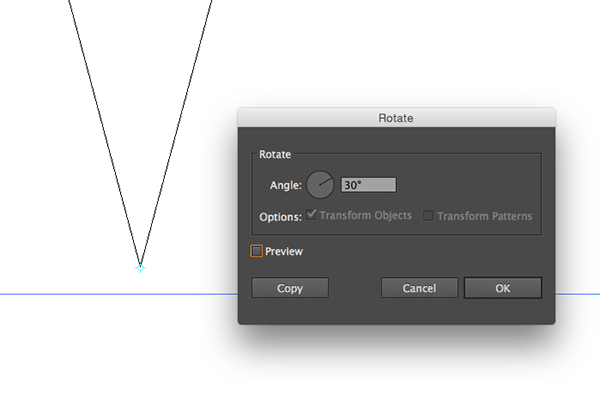
Turn on Outline Mode (View > Outline), then zoom right into the document. Select the Rotate tool and hold ALT while clicking the point of the triangle. Enter 30° in the Rotate window (360° ÷ 12 sides = 30°), followed by the Copy button.

Switch back to Preview Mode (View > Preview), then use the Transform Again shortcut of CMD+D to generate 11 more triangular symbols to complete the polygon shape again.
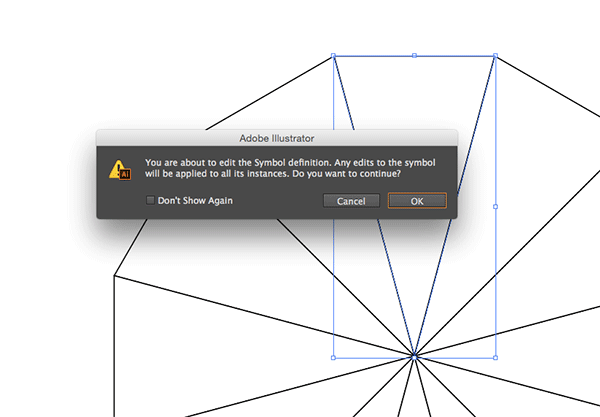
Double click the first triangle to edit the Symbol. The warning message gives an insight into how this technique works. Any edits to a symbol will be applied to all its instances, so all we need to do is create a pattern within this one symbol, then it will be duplicated to form a complete illustration.

Remove the black stroke from the triangular shape then lock it to avoid accidentally moving it out of place. Place a guide down the centre of the shape.
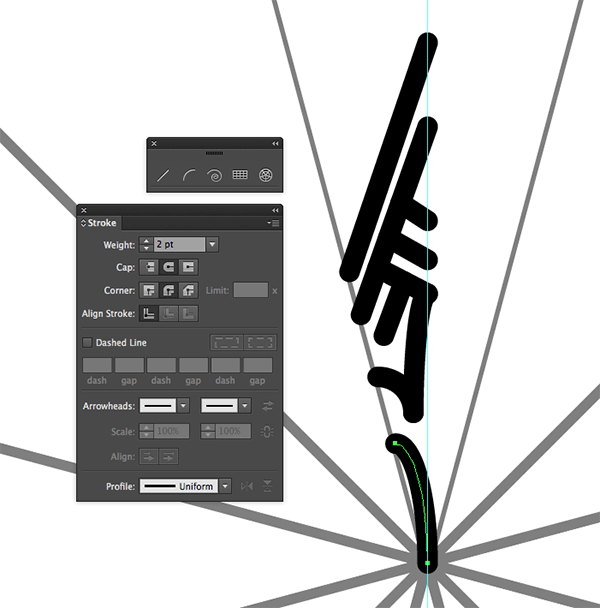
Set up a black 2pt stroke with round cap and round corner styling then use a mixture of the Arc and Line tools to begin drawing a pattern within one half of the symbol area, between the shape outline and the centre guide. Make use of the Smart Guides to snap the points to other existing points, paths and guides.
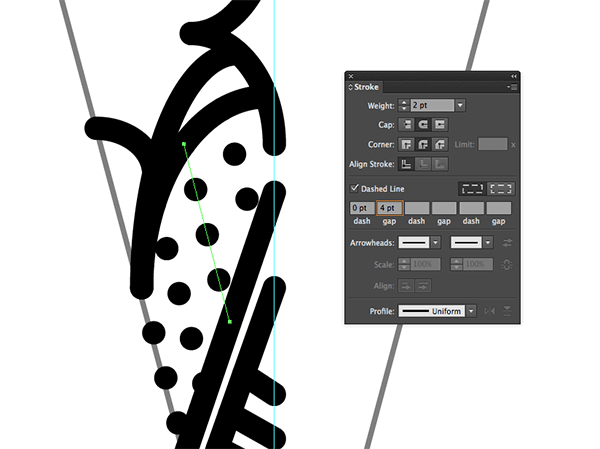
Dotted lines can add some interesting effects to a design. Turn on the Dashed Line option from the Stroke panel, then configure the dash to 0pt and gap to around 4pt.
Press the F key when using the Arc tool to flip the direction. Interesting patterns can be created by extending multiple arcs from a single point. Add some basic circle shapes with the Ellipse tool to fill any gaps.
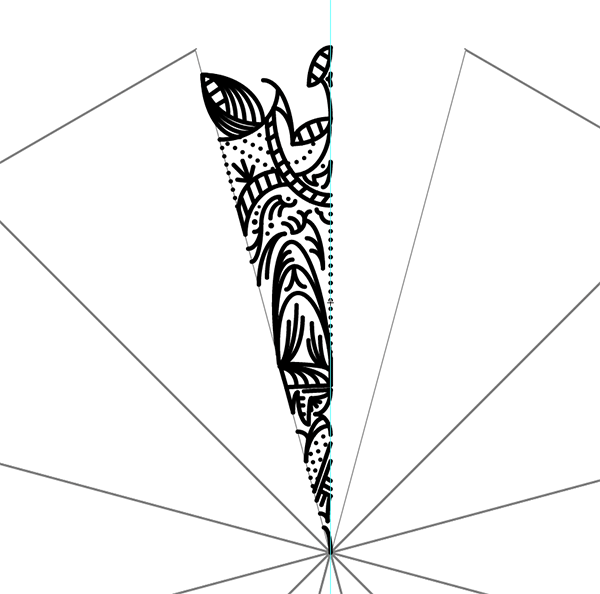
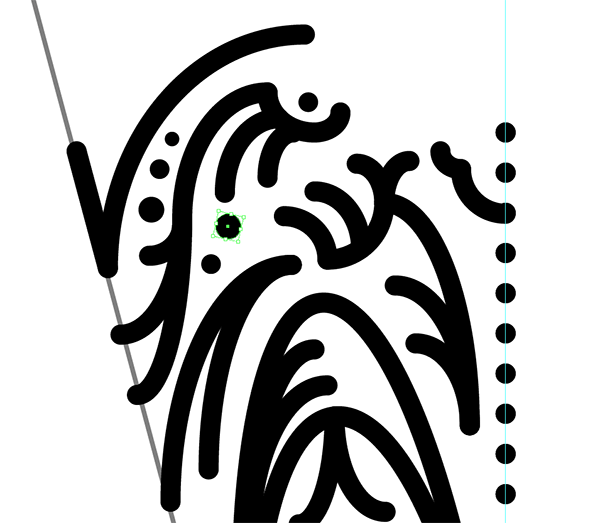
Continue filling one half of the symbol shape with random patterns. Filled shapes and colours could be used to really enhance the design, but just using single weight lines helps achieve an intricate Henna art style.
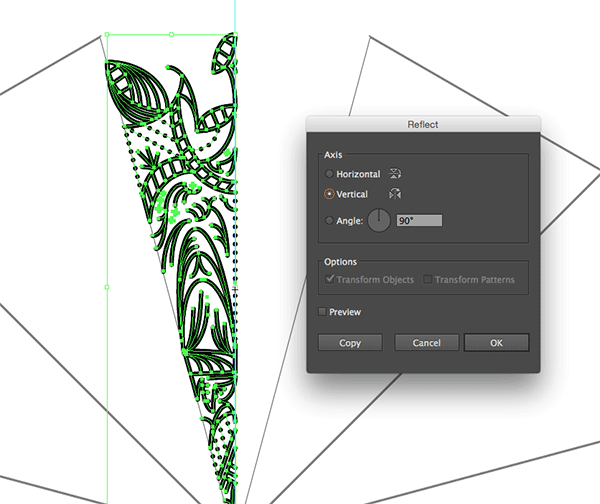
Draw a selection around the paths then Copy (CMD+C) and Paste in Front (CMD+F). Group the shapes together (CMD+G), then go to Object > Transform > Reflect and select the Vertical option.
Zoom right in to the document then drag the duplicate over to fill the other half of the symbol. Make sure they’re perfectly aligned along that centre guide.

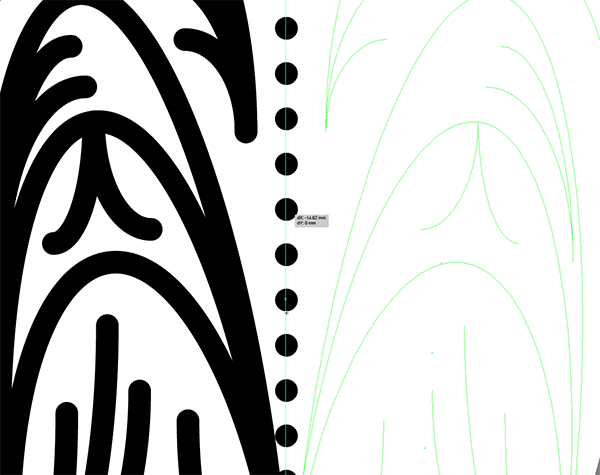
Click the small arrow at the top of the document window to exit out of Symbol Editing Mode. All the other instances of this symbol will be automatically updated to immediately duplicate the pattern around the entire design.
If you need to edit or tweak your design, double click the symbol to head back into editing mode. Delete the duplicate group, then alter the paths and follow the steps to reflect the pattern again before exiting out of editing mode to see the updated result.
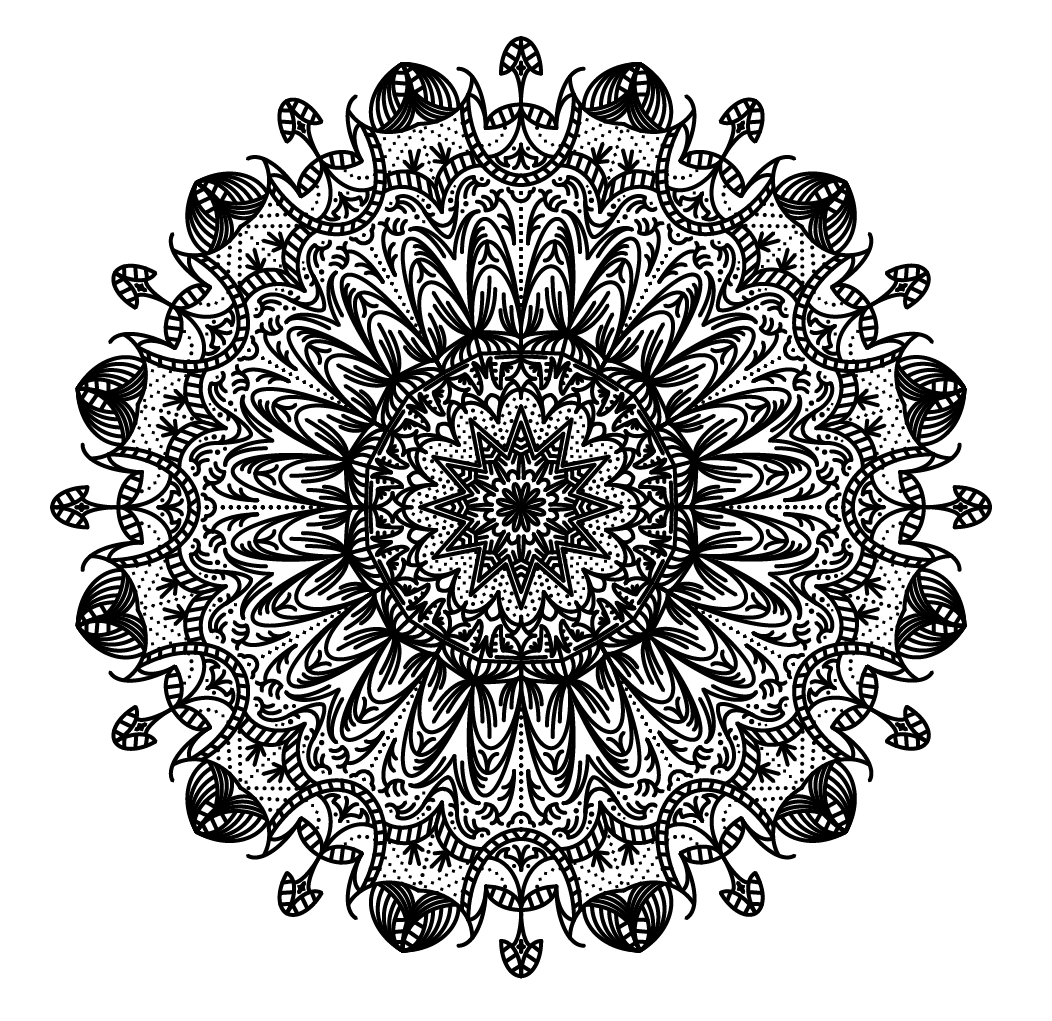
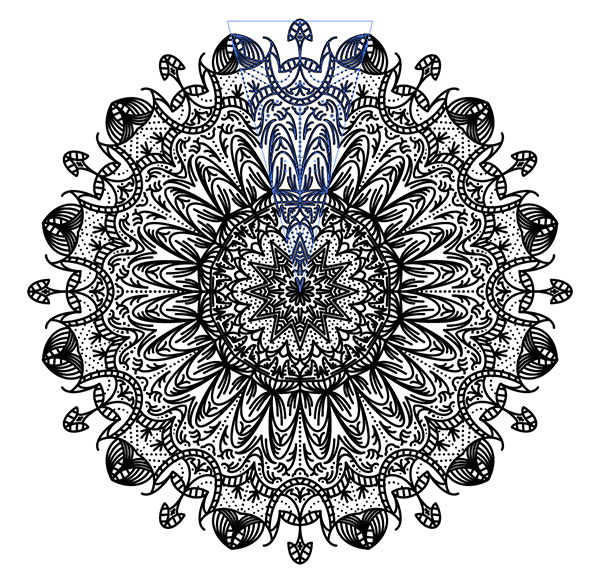
It’s exciting to see how just a few simple lines can combine to form a beautiful pattern. It’s hard to distinguish the original paths when they’re viewed as part of the complete illustration.
The final result is a beautifully complex Henna style mandala pattern that looks like it has taken many tedious hours to draw, but thanks to Illustrator’s symbols feature, we only had to draw a few random lines in a single segment.
Love this design? Get the t-shirt!


It’s little bit a difficult process but love the out come..
That’s great, Chris! I’ve a little problem with the Pathfinder step, but it must be an equivocation from myself. I’ll follow your actualizations more often. Thanks
Hey Fabri
What happens when you use the Pathfinder? Make sure you’re hitting the Divide button (first icon on the second row).
It doesn’t appear to do anything until you Ungroup the objects, then the triangles can be individually selected.
So maaaany Thank u, Chris! really loved the outcome, plus I learned, like always, new fantastic methods and techniques! I’ll wait for the next one ;)
Thanks Michela
I’m glad to hear you enjoyed it!
What a fantastic tutorial! I never knew about the Symbols Panel. Thank you again for teaching me something new (again!). I can’t wait to try this out.
Thanks Vicki! I have to admit I rarely use the Symbols panel but it was the perfect feature for this technique.
Wow. What a killer tutorial!!!
I learned so much from this one. Messed up my first attempt (managed to exit symbol edit mode plus several other errors).
However, perseverance was rewarded and I managed to get it right second time through.
To my shame, I’ve never used the arc or line segment tool (always getting by with the pen) so this alone was worth the price of admission!
Like all the best lessons, it’s the possibilities for further development and experimentation that this technique suggests that are so exciting. My initial experiments with variable width profile lines are producing some great results (brushes less so!). Anyway, that’s the fun of it.
Thanks Chris for a wonderful lesson. I realise that these must take a lot of effort to produce but it’s greatly appreciated.
Cool Tutorial Chris, Loved it. Now to make a full colour version!
That’s cool, Chris! so complex path..thanks for share Chris
Great step by step tutorial. It looks a little complex, but I guess that’s the point in creating a complex pattern. The pattern is beautiful, though! Thanks for sharing with us.
Hey this is really awesome. I really love the articles you share. I just want to ask that if you know how to make word collage? Like there are 15-20 or more words and you adjust them horizontally and vertically to make a great shape for a text? If yes, please write an article or revert on my mail. Thank you in advance. :)
I absolutely love these tutorials. Excellent work and instruction!
Great tutorial, Chris, I can’t wait to try this out tomorrow.
Great tutorial (as always)! Extremly useful and easy to follow. I’m rather new to vector graphics and your blog is my favourite place to find some tips and try out some new techniques. Thanks a lot!
Thanks as always Chris. Great tutorial – always looking for ways to turn simple to complex quickly, and I can imagine applying these methods to a number of creative processes. Will be looking forward to the next one…
Chris Spooner what do you think about CorelDRAW?
Great tutorial! A little trick that might help if you need to go back and edit is to split your triangle down the middle from the get-go.
Take your half triangle and convert that to a symbol, reflect/copy that symbol so you have the full triangle again made up of two symbols. Then continue on with duplicating around 12 times as before.
This helps because then you don’t need to go back and forth between steps if you are making adjustments – it’s already reflected.
This was the first thing I did with my project. Also, if you are interested in taking this design and making it into a wallpaper or something…then you create a new file the size of your desktop wallpaper you want. Then drag and drop your new Mandela into the new art board. It will create a linked image. Then you just line up and tile the image until it fills the artboard. Once you have it all lined up, save that artboard. Any time you make changes in the original mandala file it will make the changes in the wallpaper file.
Thanks for this tutorial! I love the mandalas but was intimidated by what I assumed was hours of intricate work. This simple method made a beautiful mandala out of my rookie Illustrator drawing skills. Thanks again!
I am professionally graphics designer.I love your tutorials.reat tutorial, I found what i was looking for and this is gonna help me a lot.Thanks a lot to the Team and Best of luck for still more to come!!
Thanks for this tutorial!
Thank you for a fantastic tutorial. It helped alot, as usual.
Regards E
I love this tutorial! I had some difficulty getting it to fill out the rest of the triangles and had to do a copy as we did in the beginning with the triangles. I didn’t get the warning message when I double clicked the first triangle so not sure what happened. Will try a new design tomorrow. I’m using CC version.
Awesome Awesome !! oh god I love itttt :)
This is a very interesting tutorial. Illustrator is really a great tool! :)
Awesome one, Easy steps to follow, thank you :)