
This post was originally published in 2014
The tips and techniques explained may be outdated.
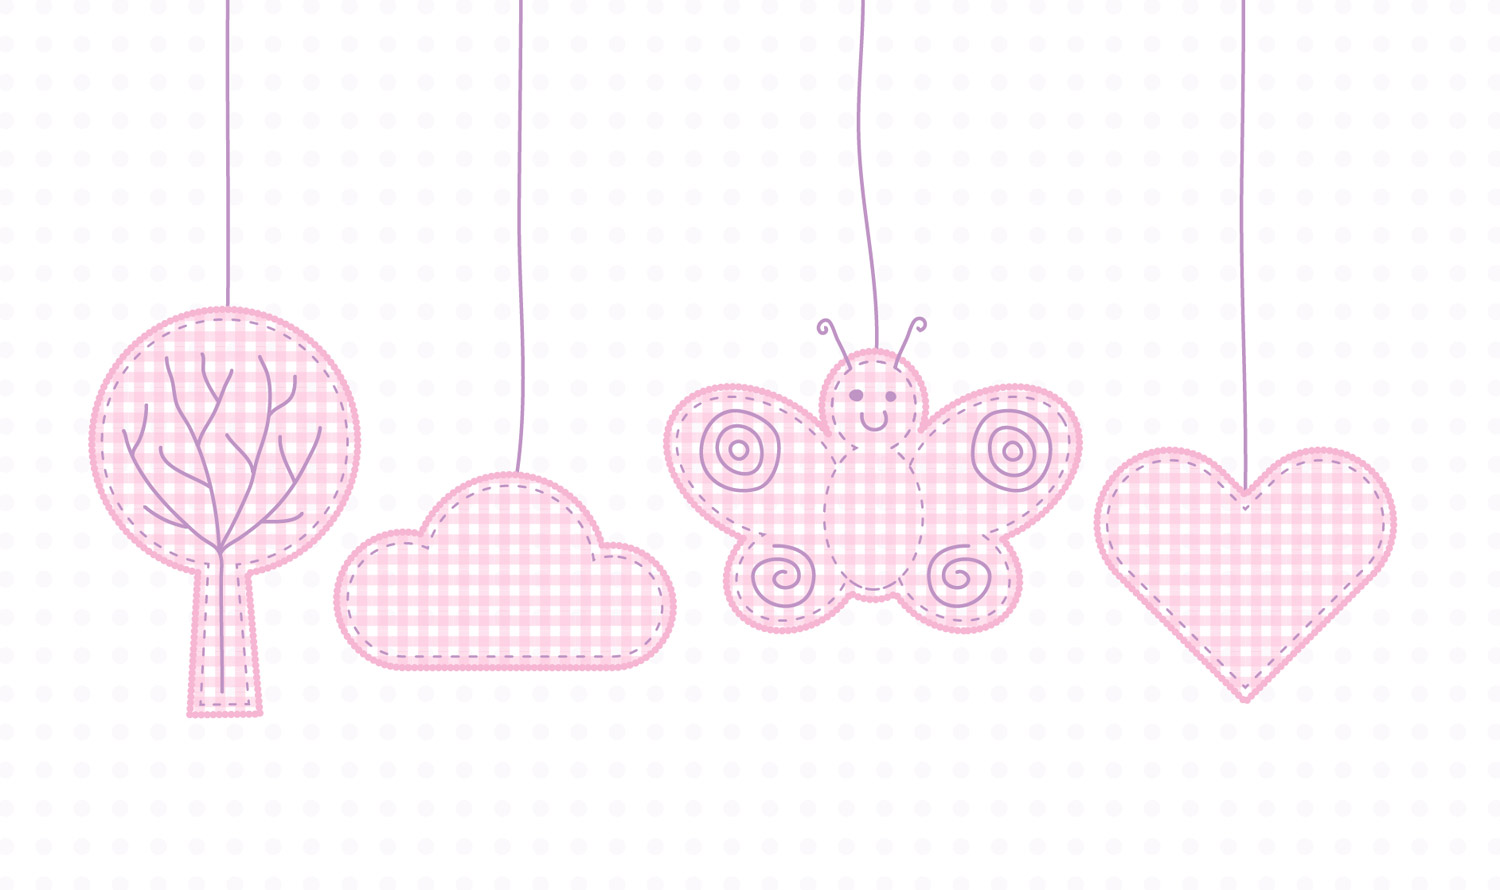
My wife and I are expecting a baby girl in a few months so our house is slowly filling up with everything cute and pink! Seeing the style of art used on the items we’ve collected for the nursery gave me a great idea for a beginner’s Illustrator tutorial, showing how stylish illustrations can be created using basic shapes and patterns. Follow this step by step Illustrator tutorial to create a series of simple vector illustrations, each one employing slightly more advanced techniques to eventually form a complete mobile of objects.
This tutorial will be split into four sections in order to cover the process of creating each one of these mobile toys. We’ll begin with the most simple object, then move on with slightly more advanced techniques each time. Essentially we’ll be using Illustrator’s shape tools, the Pathfinder panel and see how strokes & swatches can be manipulated to produce cool styles in your artwork.
Creating a cloud shape
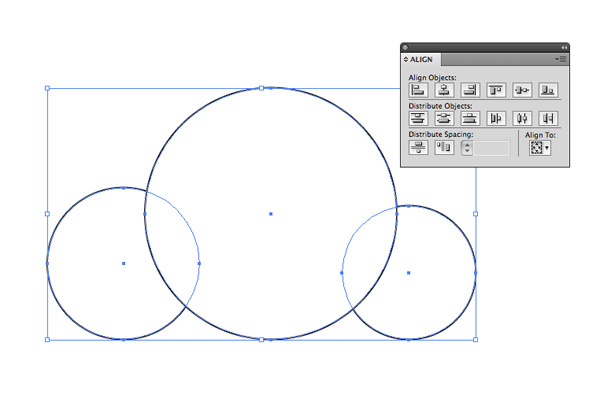
We’ll begin this tutorial with the most simple shape from the overall illustration; the cloud. Begin by drawing three differently sized circles on the artboard. Remember to hold Shift to keep them perfectly circular. Select them all then use the Align panel to line them up along their bottoms.
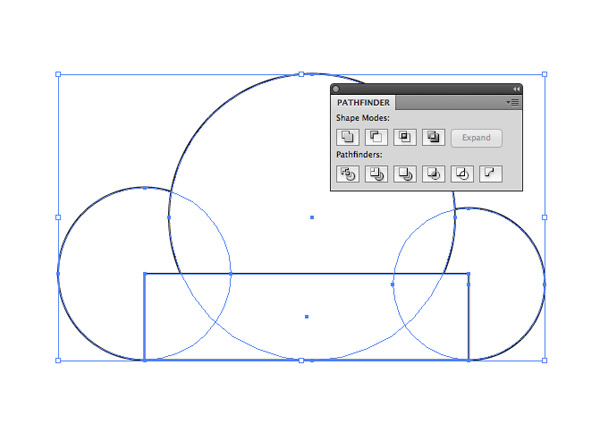
Add a rectangle shape to fill in the gaps to form a straight bottom edge. Don’t extend the rectangle beyond the lowermost points of the circles otherwise you’ll end up with sharp little points sticking out of your cloud. Click the Unite option from the Pathfinder panel to merge all the shapes together.
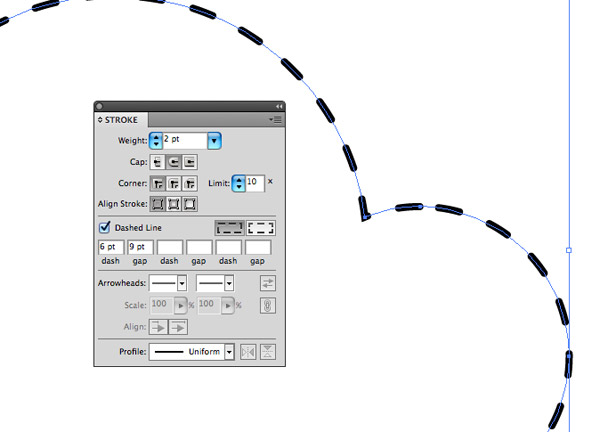
Edit the Stroke of the cloud shape into a stitched effect by selecting the ‘Dashed Line’ option. Edit the stroke weight and dash/gap values to adjust the size and spacing of the stroke lines, then click the ‘Round Cap’ icon to round off the ends.
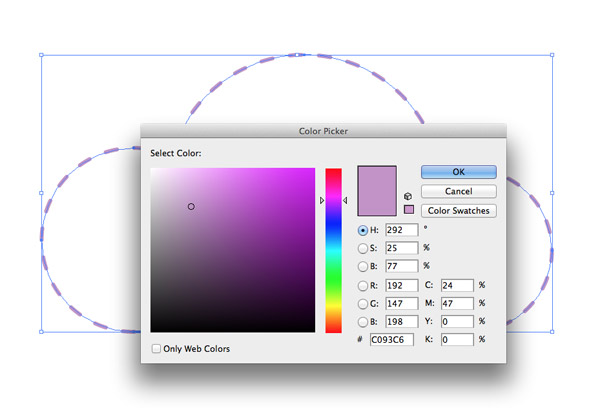
Remove the default white fill from the shape, then double click the stroke colour and choose a nice lilac purple. I’ve chosen #C093C6.
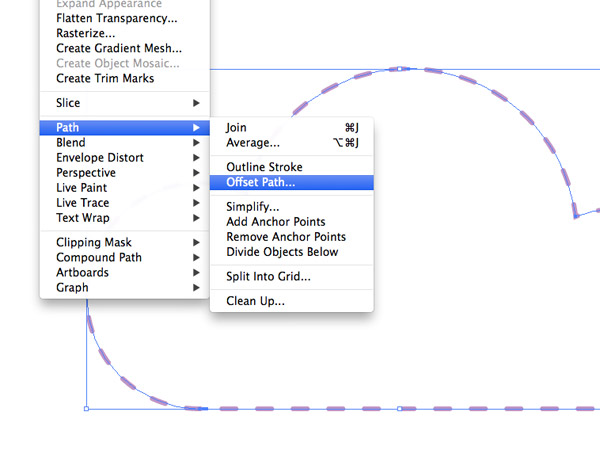
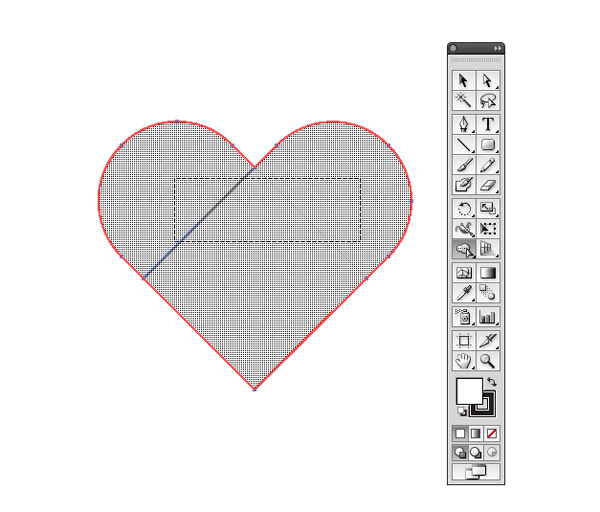
With the cloud shape selected go to Object > Path > Offset Path. Enter 3mm in the options.

Select just the new offset path and alter its stroke by increasing the weight to around 6pt and editing the dash/gap to 0pt & 5pt. This will turn the dashed lines into overlapping circles, which creates a nice pattern effect around the edge of the design.
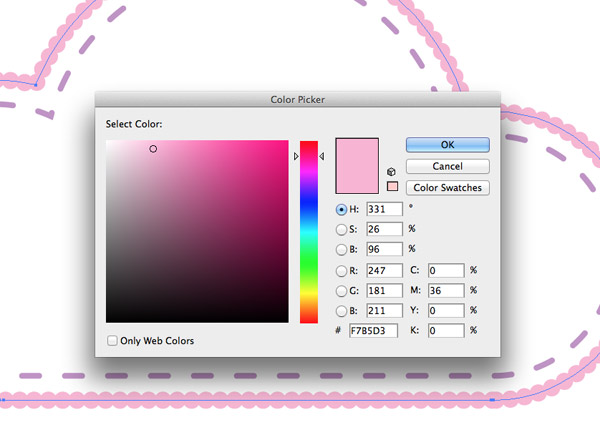
Change the colour of the dotty outline to a complementing baby pink. I’ve chosen the colour #F7B5D3.
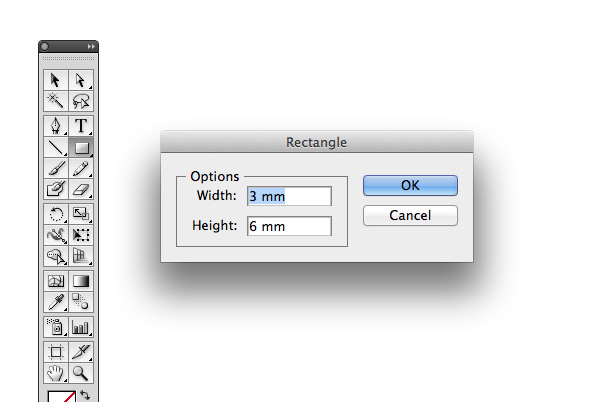
Select the Rectangle tool then make a single click somewhere on the artboard. Enter the dimensions 3x6mm in the options to create a rectangle of these exact dimensions.
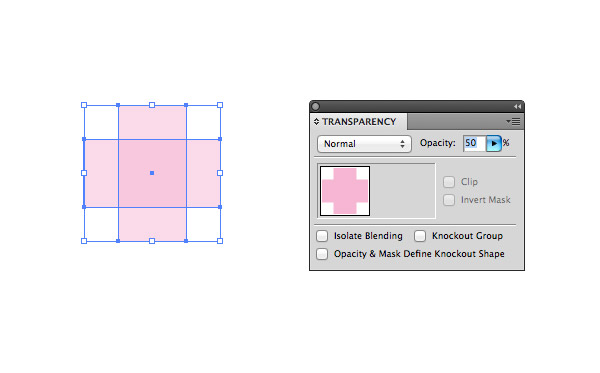
Give this rectangle the same pink fill, then press CMD+C to Copy, then CMD+F to Paste in Front. Rotate the duplicate by 90° to form a cross, then reduce the opacity of both shapes to 50%.
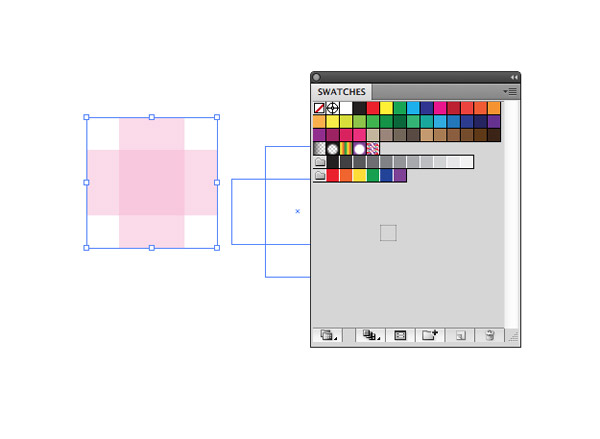
Drag this pair of shapes into the Swatches palette. This will produce a selectable swatch that can be applied as a fill to elements, which in this case will form a basic plaid pattern.

Apply this new swatch as a fill on the offset cloud shape. Make sure it is applied as a fill in order to leave the dotty outline stroke intact.
Creating a heart shape
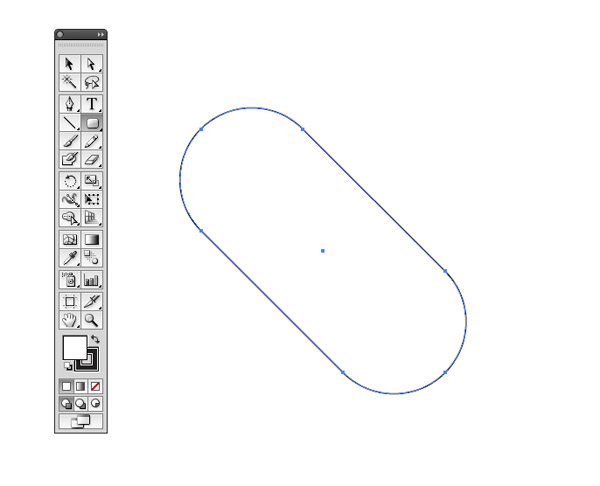
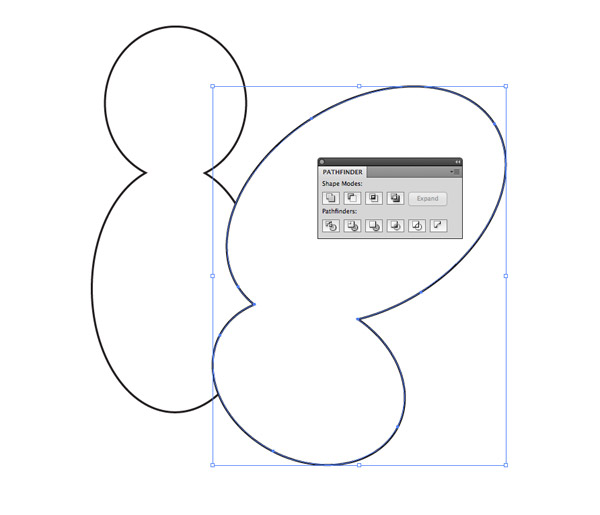
Let’s move on to something a little more complex. Draw a Rounded Rectangle on the artboard, but before releasing the mouse max out the corner radious with the ‘right’ cursor key. Rotate this shape by 45°.
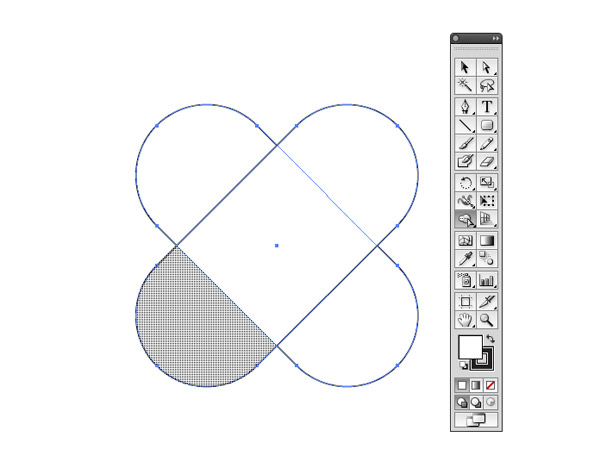
Copy/Paste a duplicate of the shape, then rotate it until it forms a cross shape. The Shape Builder tool is a convenient alternative to the Pathfinder panel, use it to cut away the lower two overlaps while holding the ALT key.
The Shape Builder tool can also blend shapes together just like the Pathfinder. Drag a line across the three segments to merge them into one.
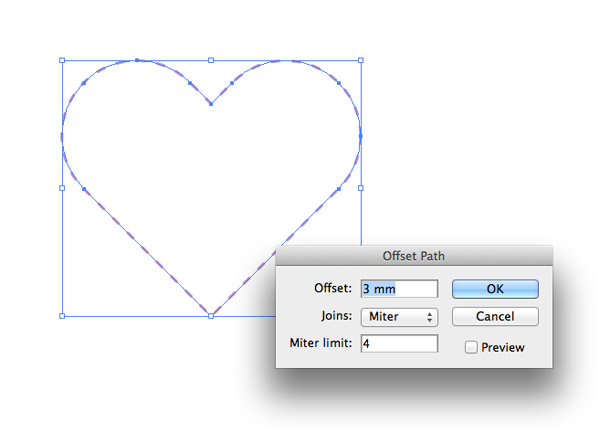
We can now follow the same process to replicate the pink styling, starting with the 3mm offset path.
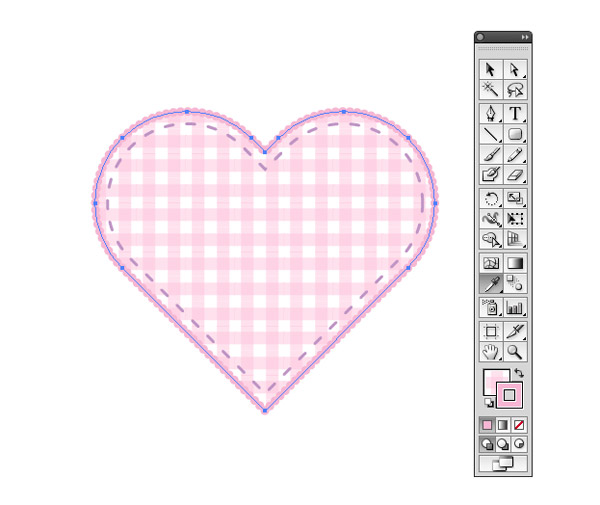
Rather than set up the dotty outline and plaid effect again, the Eyedropper tool will quickly copy the style and apply it to this new shape.
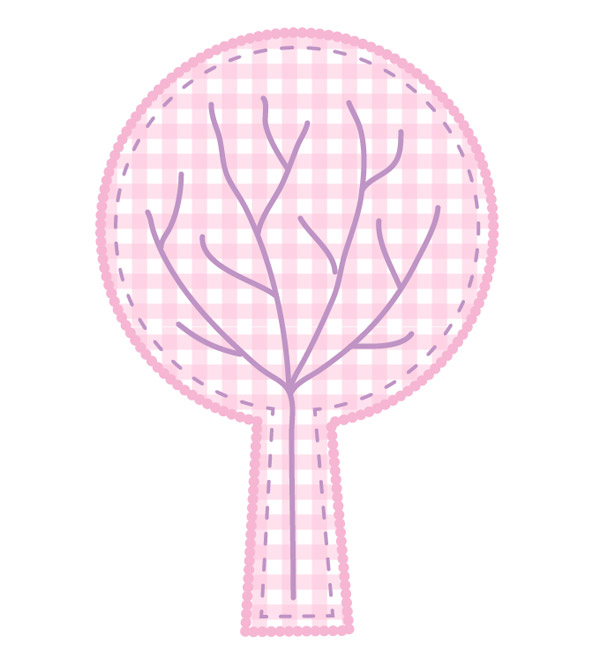
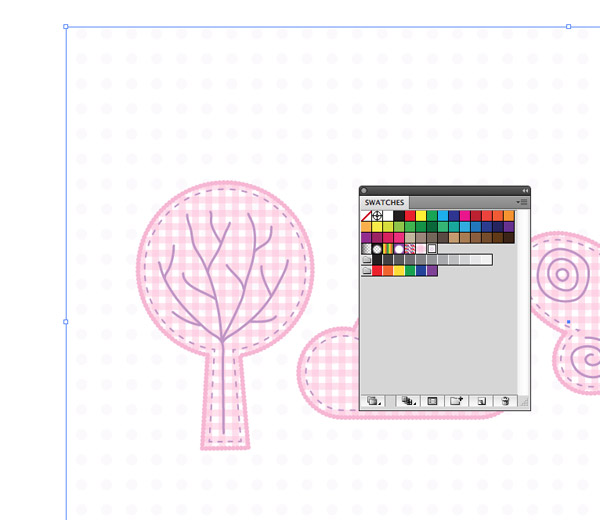
Creating a tree shape
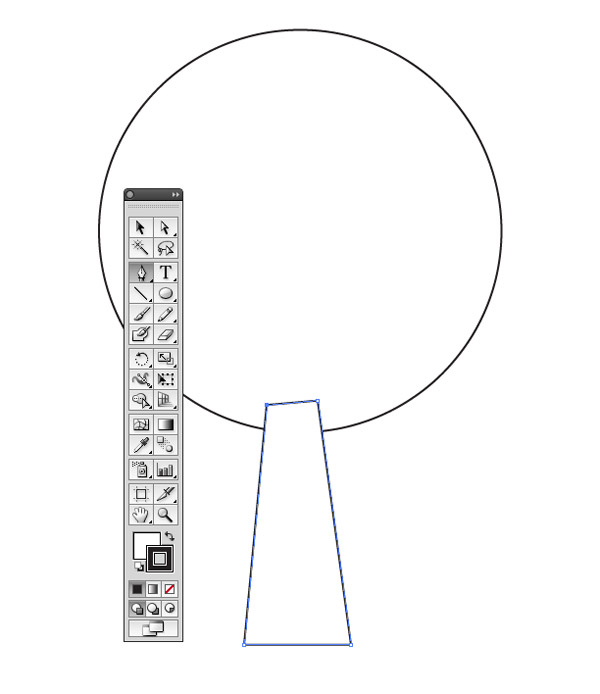
Draw a circle somewhere on the artboard then use the Pen tool to draw a custom shape, which in this case forms the tree trunk.
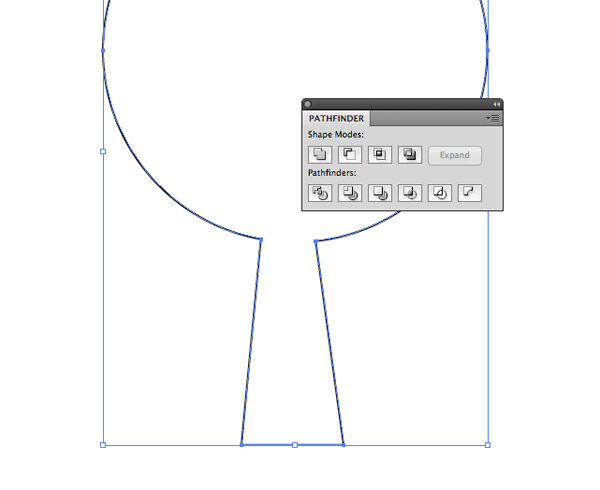
Use the Pathfinder tool (or Shape Builder) to merge these two shapes into one.
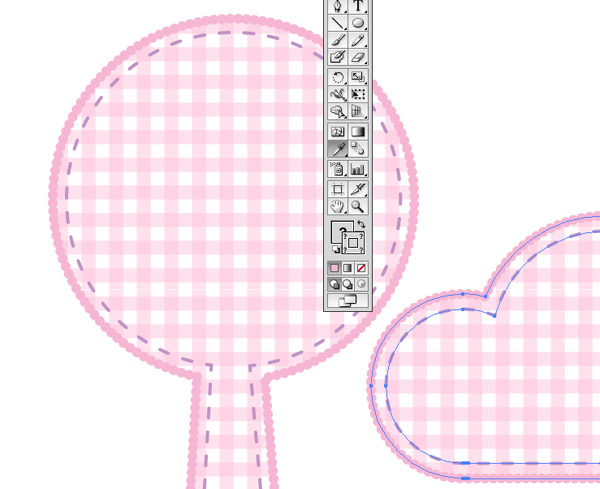
Apply the dashed stroke, repeat the same offset path steps and use the Eyedropper tool to copy the fill/stroke onto this new element.
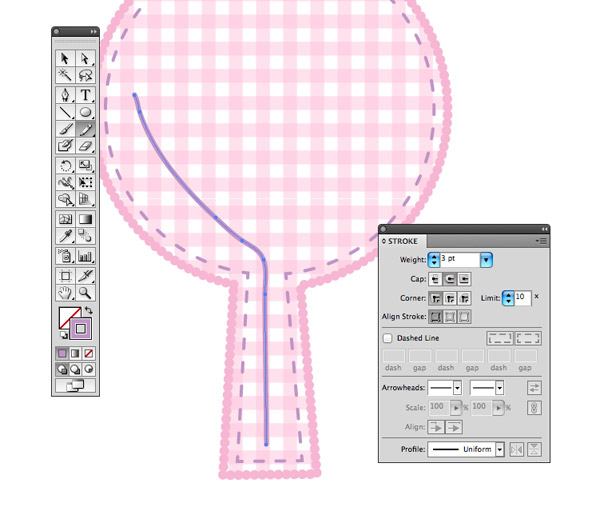
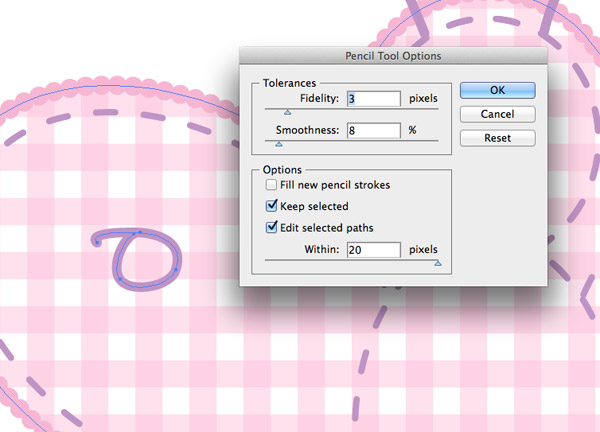
This time we’ll play with the Pencil tool to add some doodling to our illustrations. Set up a stroke as a simple 3pt line, then Shift-Click the lilac dash stroke to load just the colour (rather than the entire dash effect that a normal click would). Draw a line to replicate a simple tree branch.
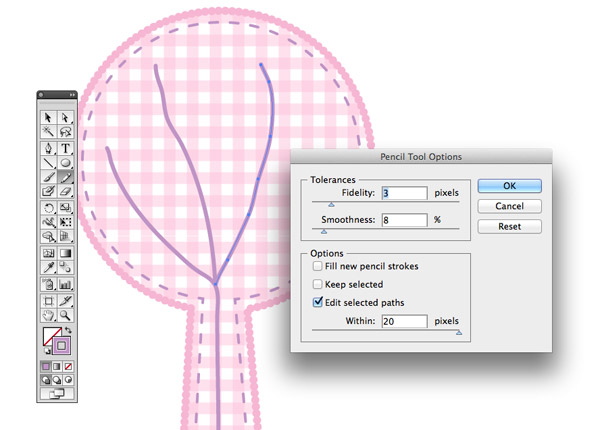
The Pencil tool will re-draw a line that is selected, so double click the Pencil tool icon and make sure ‘Keep selected’ is turned off. Continue drawing tree branches with a rough hand drawn feel.
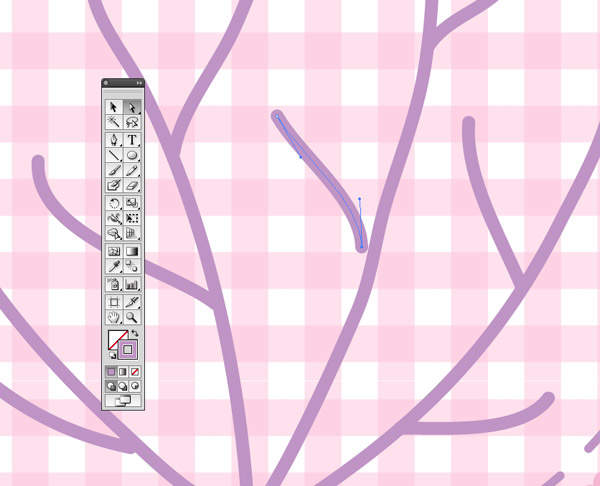
Remember, you can always select a path and re-draw it with the Pencil tool if it went wrong, or you can fine tune points by moving them with the Direct Selection tool.
The addition of the hand drawn doodled elements adds a nice touch to this style of illustration. Let’s take it a step further…
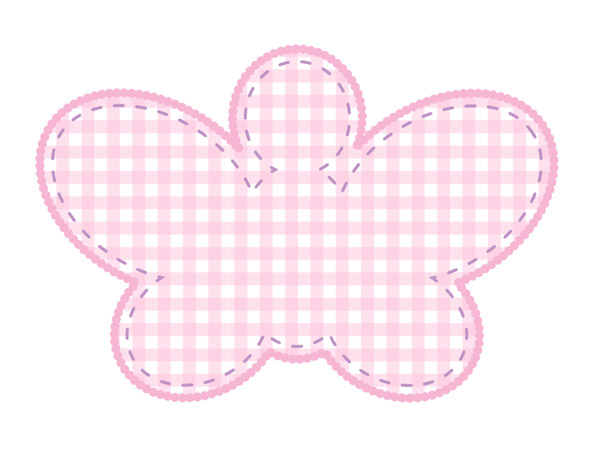
Creating a butterfly shape
Using only the Ellipse tool and Pathfinder panel, draw and blend a series of oval shapes to form the main body and wing of a butterfly.
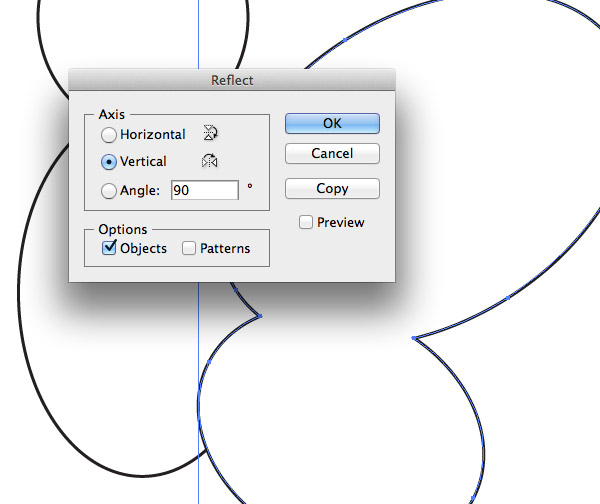
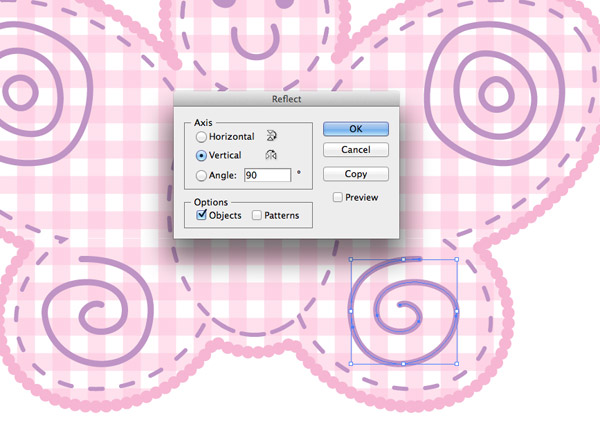
Rather than try and draw a matching wing on the other side, go to Object > Transform > Reflect, choose the Vertical Axis then hit Copy. Then move the new wing into place.
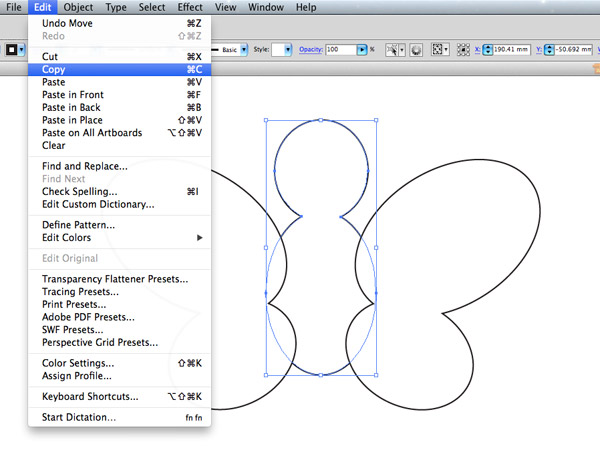
Select the main body shape and Copy it to your computer’s memory. We’ll paste this element back in later.
Unite all the shapes using the Pathfinder or Shape Builder tool, then replicate the art style with the various strokes and fills.
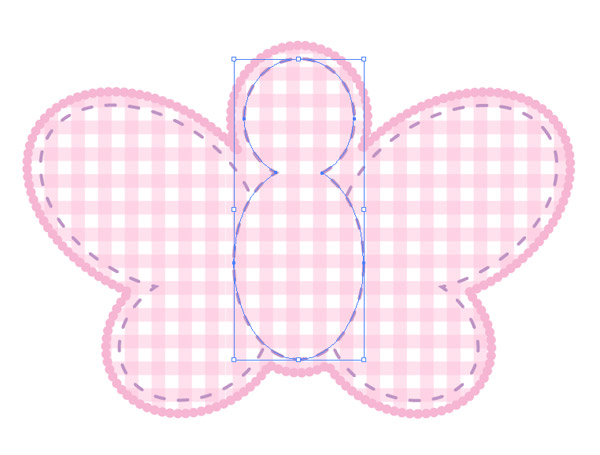
It’s currently difficult to make out the butterfly shape from just the overall outline, so paste in the body that we copied earlier and match the dashed stroke with the Eyedropper tool.

Have some fun doodling a face onto the butterfly!
In order to decorate the wings we can actually make use of the Pencil tool’s ‘Keep selected’ option. The Pencil tool will hardly ever result in a complete circle without correcting the last section of the path, but the ‘Keep selected’ option makes it easy to join the ends together.
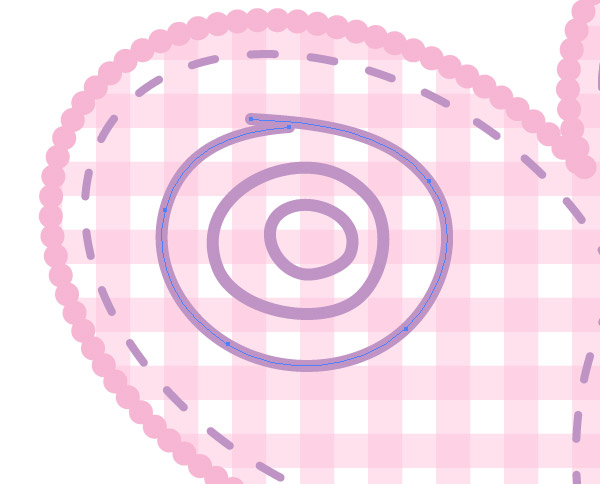
Draw a series of concentric circle with the freehand Pencil. Don’t worry about mistakes, you can easily re-draw portions of the shape to neaten it up.
Use the Object > Transform > Reflect command to copy these wing decorations onto the other side.
Finishing touches
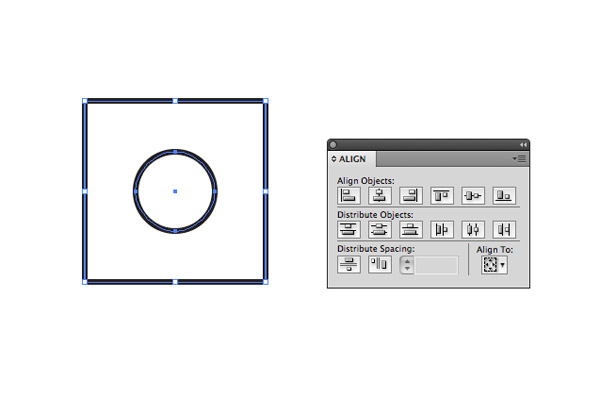
Draw a small circle and square somewhere on the artboard then use the Align panel to line then up along both axis.
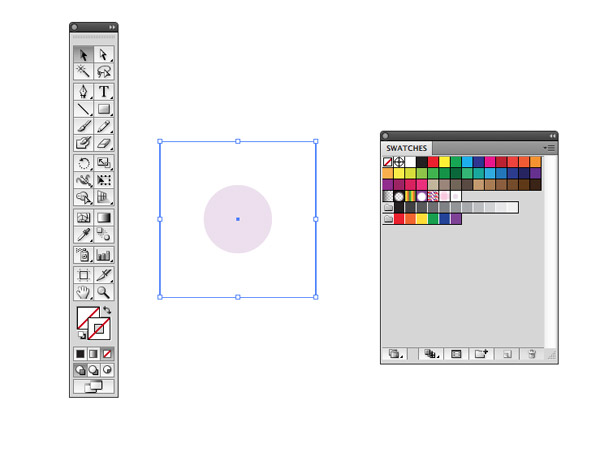
Give the circle a lilac fill with the opacity reduced to around 20%, then clear the fill and stroke from the square so it’s completely invisible. Drag this pair of shapes into the Swatches panel to create a new pattern fill.
Apply the new polka-dot fill to a large rectangle encompassing all the individual illustrations. Use the shortcut CMD+Shift+[ or Right Click and select Arrange > Send to Back to position it underneath the other elements.
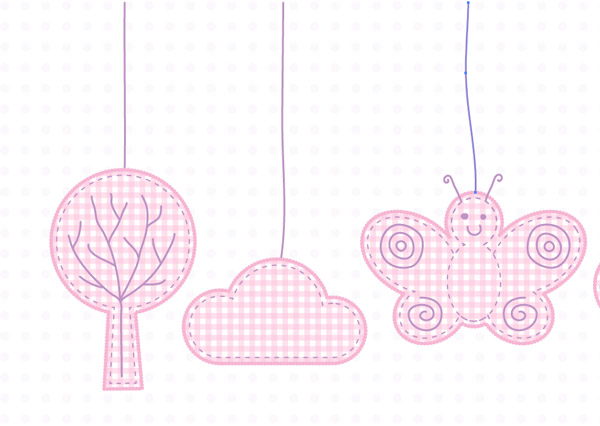
Use the Pencil tool to draw strings from the illustrations to the top of the background rectangle shape.
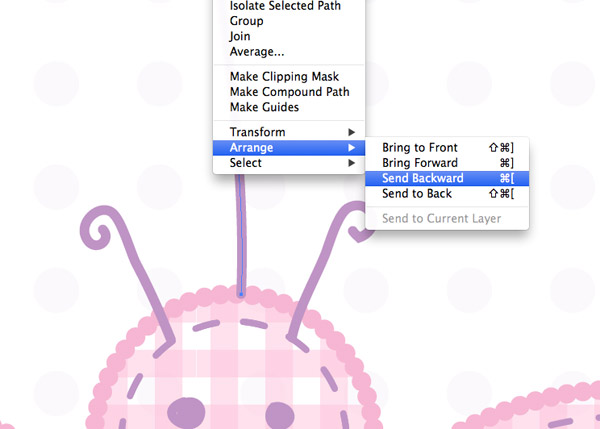
Hide these string lines behind the illustrations by repeatedly pressing the CMD+[ shortcut, or selecting the option from the Arrange menu.
The final illustration features a series of matching shape to form a baby mobile. To achieve this we’ve covered loads of important illustration techniques, from the use of the Pathfinder to build shapes, the manipulation of strokes & swatches to create cool effects and the use of the Pencil tool to add doodled elements to the designs.

Many congratulations, Chris!
Thank you Chris and congratulations! :)
lovely work. Congrats :)
Congratulations!
Great tutorial, some simple steps to producing a good-looking design with character. Still learning to see the world in basic shapes so this helped a lot, thanks!
Congratulations and all the best for your baby daughter :)
Aww how adorable is this? Congratulations guys <3 I wish you both the best!
I love your techniques. Congrats :)
Great work.. Thank you and Congratulations….
Congratulation and thank you.
It is very instructive
Congratulations to you!
I consistently enjoy your tutorials–thank you for sharing your expertise.
Congrats Chris, and thanks for the tutorial.
First of all Congratulation yet another unique tutorial. I am trying i out now!
Great work Chris. :)
My sister is due any day now [will be an Uncle for the first time], so this is a nice wind of inspiration for me!
Very nice turorial and wonderful news Chris ! I’ve been following your blog for some time now and I must say it’s quite awesome .
Keep up the good work !
Heartiest congratulations to you and your wife! I completely loved this pattern and style. You made the tutorial so easy to understand and create such a cute design. Thanks Chris
Congrats to you! I am excited to try and attempt your creative design. Thank you for the simple and clear steps.
Excellent tutorial! thank you for sharing
Thank you sooo much! This is so helpful, I have learned new things and I haven’t even finished the post, but wanted to let you know how much I appreciate your sharing your knowledge, and congratulations for your baby girl!!!
very nice tutorial using basic shapes, i like to make vector characters and illustration using pen tool in combination with basic shapes :)
Hi Chris, Really nice tutorial you make it very easy step by step. Thanks for sharing this tutorial with us.
wow superb tut, thanks for sharing and its very useful for the beginners!
good work
Woow thanks for such great and detailed tutorial. Loved the pink and purple color you used. :)