This post was originally published in 2009
The tips and techniques explained may be outdated.
It can be quite tricky getting the hang of Adobe Illustrator, but if you take a step back and concentrate on the basics there's a range of options for creating great looking images. In this tutorial, we'll take a look at constructing a group of cool vector ninja characters using just the basic shapes and a variety of simple tools, making it a good start for Illustrator beginners.
Watch the video
Subscribe to the Spoon Graphics YouTube Channel
After opening up Adobe Illustrator, create a new document. For a fun project the size of the document doesn't matter, Illustrator has a vast area of artboard beyond the document edges that can be used. I personally use the CMYK color mode out of habit and the ease of managing blacks, but a wider range of colours are available with RGB. The choice should really depend on the final outcome of the project; print or web.
Depending whether your Illustrator software has the default settings, you might want to check the options for the scaling of strokes and effects, this little option could save you a headache layer down the line.
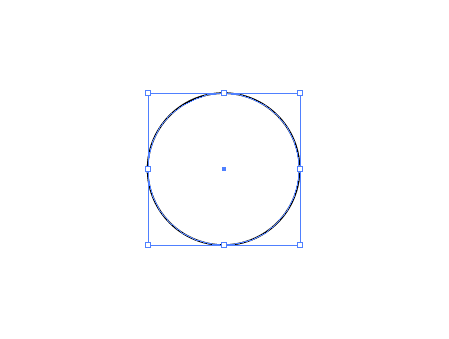
Grab the Circle Tool and draw a shape on the artboard, hold the SHIFT key to create a perfectly equal object. By default this will have a white fill and black stroke.
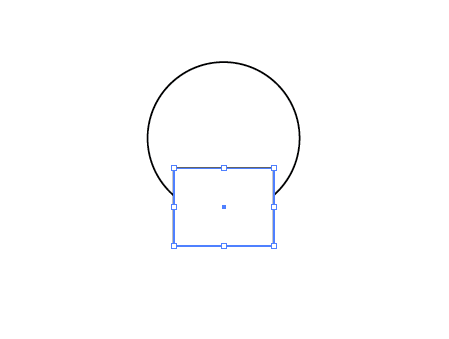
Select the Square Tool and draw another shape on the artboard, position this to overlap the original circle. Use the Align Palette to centre the two shapes horizontally.
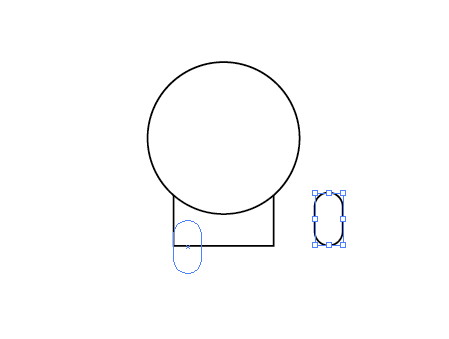
From the same menu, use the Rounded Rectange Tool to draw a small leg. Adjust the roundness of the corners with the keyboard cursor keys until the ends are completely circular.
Zoom in and position the leg exactly in relation to the edge of the square body.
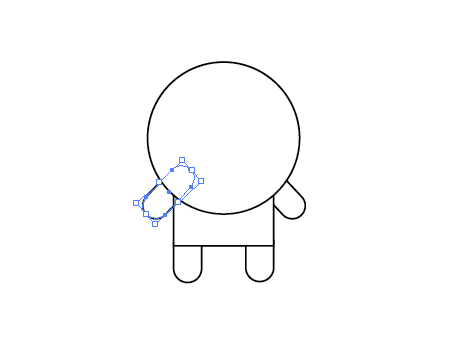
Duplicate the leg and move into position for the remaining limbs, for the arms rotate the shape by 45 degrees. To position the shapes behind the other objects, press the CTRL + [ and CTRL + ] keys repeatedly to adjust the stacking order of the selected objects.
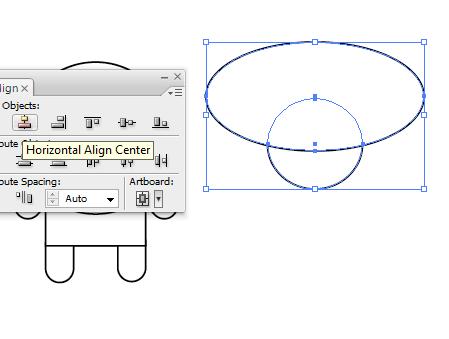
Draw another perfect circle onto the artboard, and beside it a much larger oval. Overlap the two and use the Align Palette to position exactly.
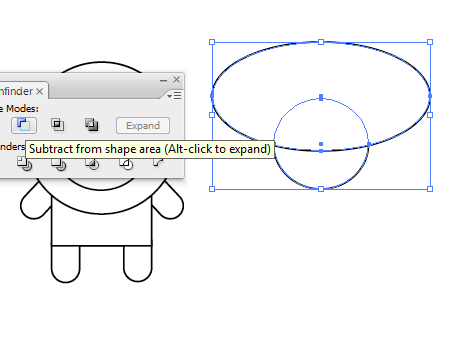
With the two shapes selected, click the Subtract from Shape Area option from the Pathfinder palette. Click the Expand button to refresh the bounding box of the shape.
By using temporary shapes as tools along with the Pathfinder options, a range of custom objects can be created.
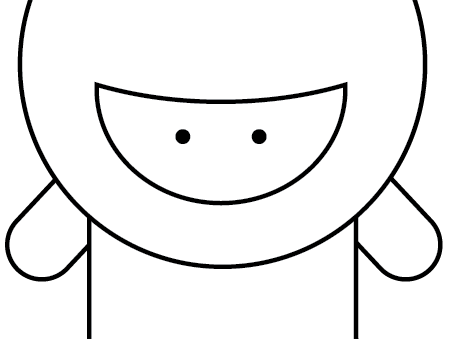
Position this semi-circular shape within the large circle of the character to represent the facial area. Draw in a small circle as an eye, fill this with a black swatch and clear any stroke. Copy and paste in front (CTRL + F), then move horizontally to the side (hold SHIFT to constrain the axis)
Grouping any pairs of objects, such as the eyes and arms will allow them to be centralised with the other objects using the Align Palette without being moved individually.
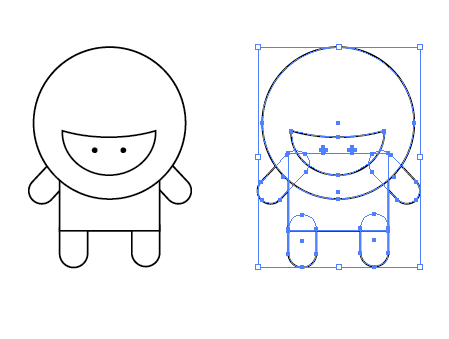
With the complete line-work character laid out and aligned, draw a selection around the complete object and copy and paste a duplicate. Move a copy off to the side as a backup.
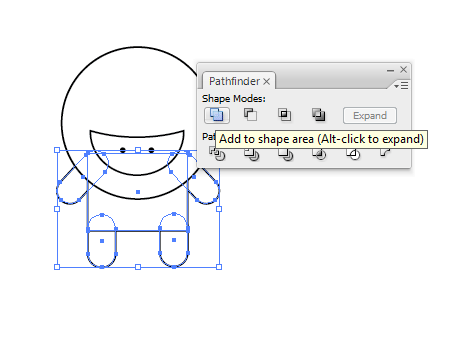
With all the objects that make up the torso and limbs selected, chose the Add to Shape Area option from the Pathfinder tool and Expand to merge the shapes into one.
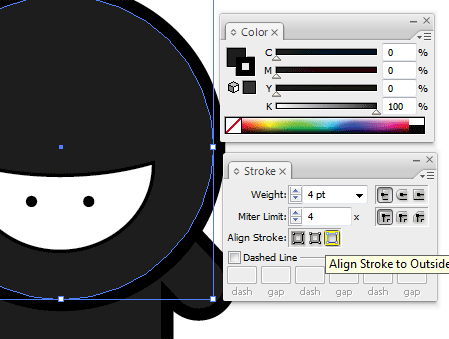
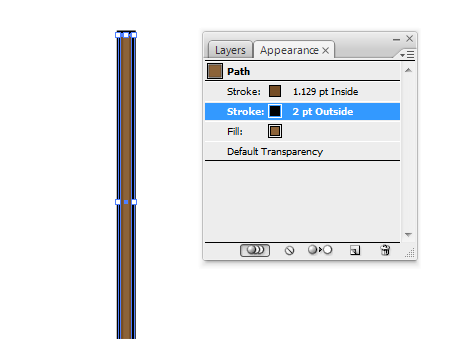
Fill the body elements with a very dark grey (95% black) and add a 4pt stroke aligned to the outside at 100% black.
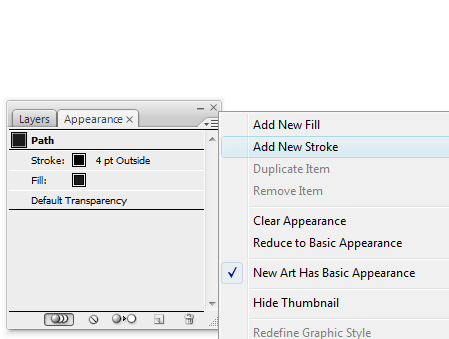
In the Appearance Palette, click the small options arrow and select Add New Stroke.
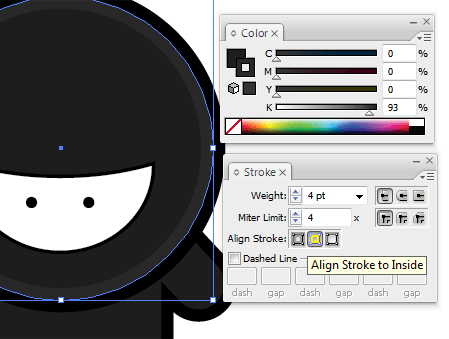
This time, add a 4pt stroke aligned to the inside, with a lighter, 93% black. This multiple use of strokes is a technique I've come to use in my character designs which really helps lift the colours by adding a little depth and variation.
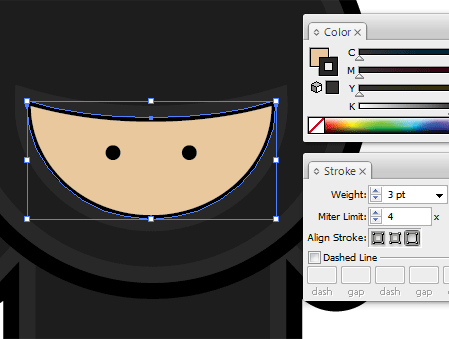
Select the facial area and fill with a pale skin tone, add a slightly thinner stroke at 3pt aligned to the outside using the 93% black.
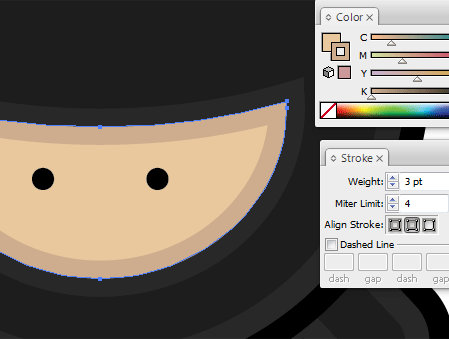
Add a New Stroke through the Appearance Palette and give this line a slightly darker tone, aligned to the inside of the shape.
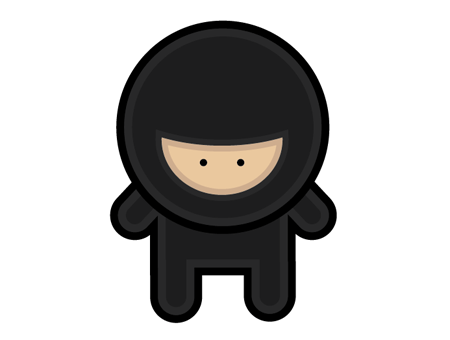
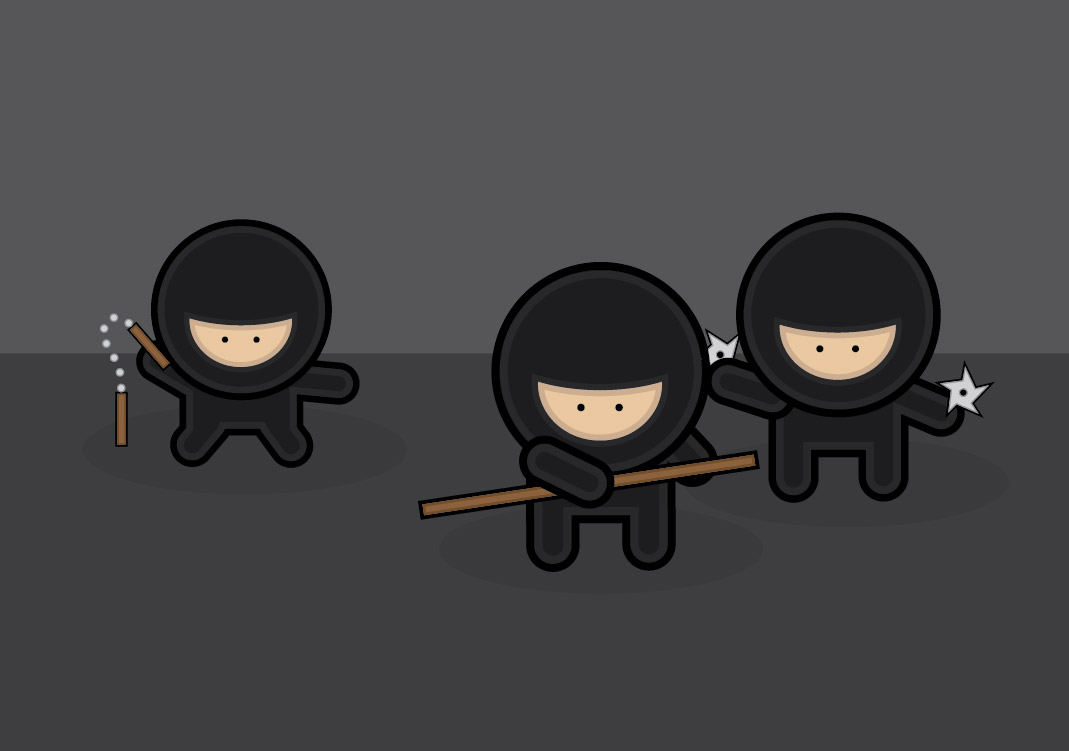
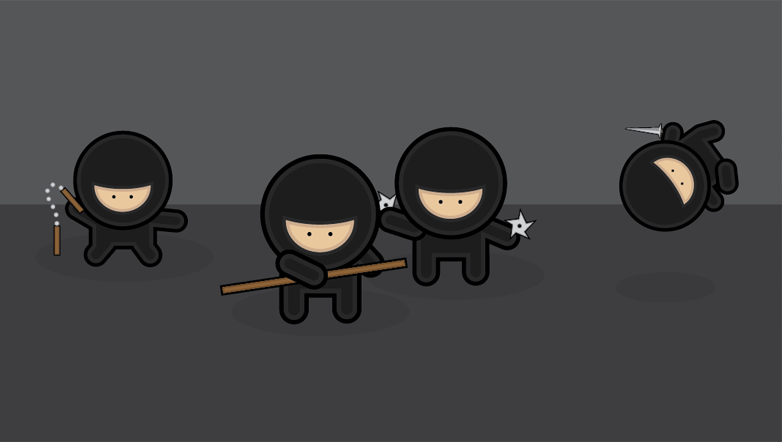
The basic version of the character is complete, ready for some stealthy ninja action.
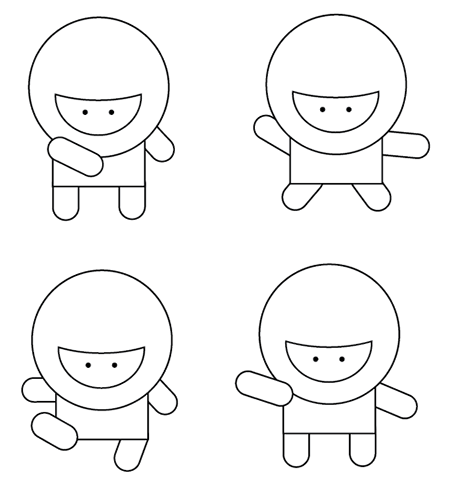
Copy and paste multiple variations of the original line-work character. Adjust and rotate the limbs into a range of scary ninja combat positions, adjust the stacking order of the arms to in front or behind the body to give different effects.
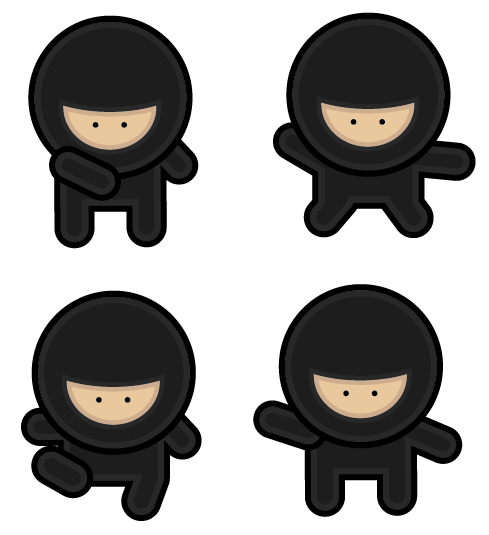
With each individual character, repeat the process of merging shapes and colouring the objects to produce a group of cool ninjas. However, no ninja would be complete without combat accessories…
Create a staff using a long thin rectangle, fill the object with brown while adding a black outline.

Create a pointed object using the Star Tool, using the Direct Selection Tool select each of the points of the path from each arm of the star.

Upon selecting the Rotate Tool, the point of origin will automatically default to the centre of the object. Click and drag to adjust the overall shape of the star.

Draw a solid circle in the centre and fill the death star weapon with a metal like grey. Add a black outline and a secondary inner stroke with a slightly darker grey.
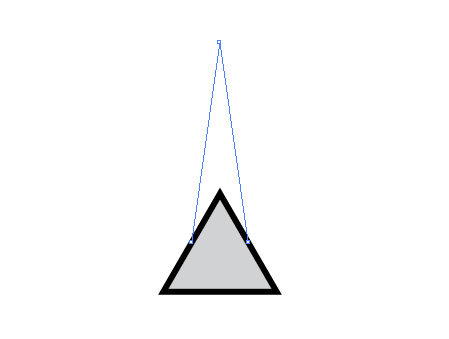
Using the same colour scheme, draw a triangle by dragging a shape with the Star Tool and pressing the downwards cursor key to reduce the number of points. Grab the upper most point with the Direct Selection Tool and drag vertically.
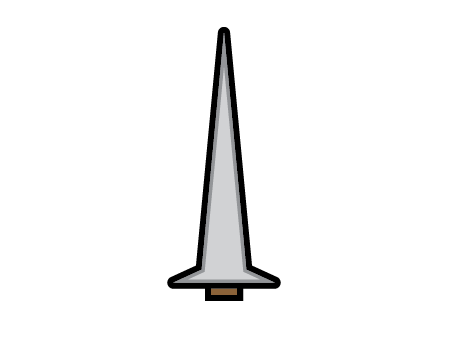
Select and drag the middle two points to squash the lower half into a sword like shape. Finalise this with a small brown rectangle, remember the majority of the handle would be concealed by the hand so only a small section is required.
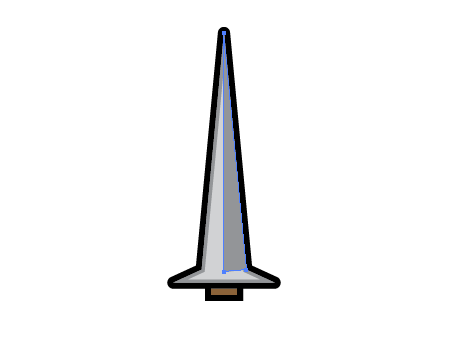
Use the Pen Tool to neatly draw in a three sided shape to represent the chamfered finish of the sword blade.
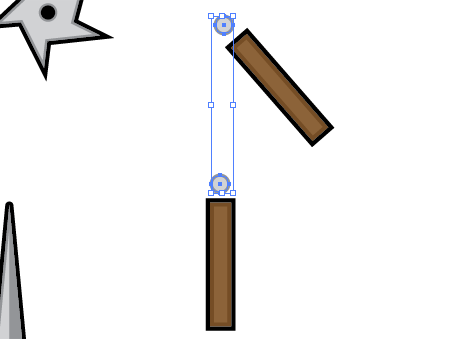
Create two Nunchuk handles and the beginning and end points of the adjoining chain. With both chain elements selected head to Object > Blend > Make
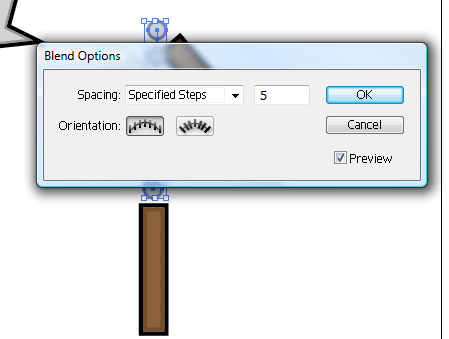
Go back to Object > Blend > Blend Options, enter 5 under the Specified Steps option to alter the type of blend to give a line of individual items.
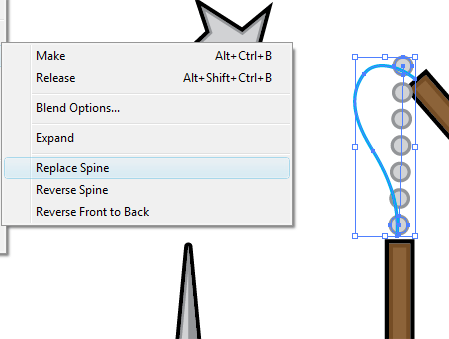
Use the Pen or Pencil tool to draw a temporary line to symbolise the desired route of the Nunchuk chain, with this and the blend selected, go to Object > Blend > Replace Spine.
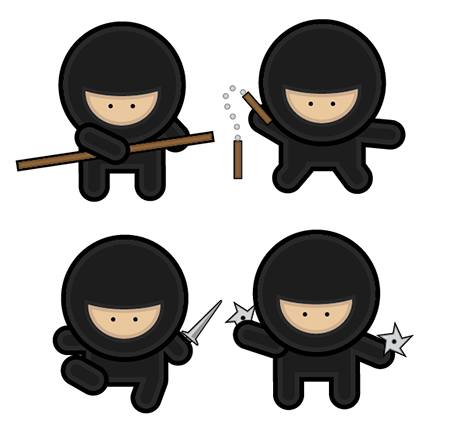
Group each individual weapon and move into place on the various characters, completing the group making them ready for action!
Using basic vector shapes, a stylish and fun image can be created using just the basic functions of Adobe Illustrator.

Fantastic! You make it look so simple!
nice, fun tutorial
one suggestion though. The throwing star ninja’s right arm looks funny because it doesn’t join the body like the nunchuk ninja’s arm does.
This is the greatest tutorial ever; I am going to try it out tomorrow.
Thank you !
I’m sure I will enjoy it so much !
VERY GOOD!!!!!
I love this tutorial :D
THANKS A LOT!!!! XD
nice tutorial ,it look very hard but u make it simple .thanx for ur efferts
nice!
fantastic tutorial, you finally got me to have a go at drawing a vector character! now onwards to comic greatness haha
Brilliant stuff, I love these wee guys.
lov it :)
One of my goals for 2009 was to get more experience with Adobe Illustrator. Tutorials like these really help to achieve that goal: You make it look so simple and the outcome is really GREAT!
Keep up the great work Chris, we love you :) .
Nice Tutorial, these little guys are great, time for me to kick the dust off illustrator and get to work.
Ninjas!!! Need I say anymore?
this is such a great tutorial…. thanks for all the posts you do. i have learned quite a bit just in the few months that i have found this site… it is my regular go to when i want to try something new…. Thanks!!!
Great Tut! They look great! Easy & funny!
Great tut. Thanks!
I love these little guys! Another great tutorial. I might bring them into Flash and twirl those nunchucks a bit.
They’re really cute!!! Thank you for sharing this tutorial!
nice tut =D
by the way, the “killing star” is called a shuriken ;D
Fantastic illustrator tutorial. Thanks
Sweet! I know someone who’ll love this :)
Thanks because with your help we are getting a more friendly internet for all.
@elcodigodebarras appart from the Ningas attacking this page ;)
ha ha ha ha ha ha ha ha brilliant.
thanks.
Thank you so much for this tutorial. I’m new to Illustrator CS3 so thanks again. Here is my outcome:
http://i40.tinypic.com/zttdw6.png
*Remember this is my first time working with Illustrator as I usually work in Photoshop.
Thanks for tutorial – you have a great method of explaining each step in such an easy way – that makes it easy for all of us!
Craig
Aw, cute little ninjas.
very cute but in a easy manner……….
very cute but in a easy method……….
Very nice tutorial, the methods you described here can be used in InkScape too.
Funny and nice. These ninjas remember Pucca characters ..
This is so easy, my kids gonna love this! Me too!
They’re adorable. Thanks for the tutorial, I thought it was gonna be harder but it was pretty easy :)
How dou u get the circle and the square to be like that i didnt say ..
fa:
place the square over the circle where you want it and then press ctrl+[ or cmd+[ to move it behind the circle
Thanks for this great tuto. But for the arm and legs of the ninja, we don’t need to “add shapes to area”…. Just select it and the body. Go in the opacity control pan (pallette in french) and select “clarify” in the dropdown. The border is black and the “into” is grey, so black claryfi to grey. You have the same result, but you can yet move the arms and the legs ;)
Thanks Delavy, that’s something I’ve not tried myself but I’ll be sure to check it out!
lol excellent post.
its great how everyone has their own individual style within the same software.
love seeing characters take shape and gain a personality
http://calvin-t.blogspot.com/
You are my hero. That was awesome.
simple n nice…
Nice tutorial…
This is a great step by step tutorial. You do make it look so easy.
dude this is so awesome … thanks for the tut …
These little guys are very cute! Thanks for sharing this instruction.
Real nice and useful!
Have nothing to do in job, so i tried to make some :)
http://www.bildites.lv/images/qlvoroao76vm1iz23bgv.jpg
Big thanks for all the commenters, I hope you had as much fun following the article as I did making it!
Sweet very helpful
this good tutorial,.
Thanks so much. This was a lot of fun and I learned a lot about the appearance panel and choosing colors. I was also reminded of the usefulness of the pathfinder panel. Top notch tutorial.
Couldn’t get the nunchucks to turn out right, though! My pen skills need training.
aw these guys are so cute!
Great tutorial! Thanks for the post!
Awesome tut. Thanks!
Awesome! Thanks!
Great tut. You covered a lot of useful tips in this tutorial. Thanks man!
Cheers,
Miguel Reyes
Thanks Thanks Thanks
I want too learning Illustrator and this is a awesome begin.
hi… it’s a nice blog… keep it up… i really like it!…. (daretospeakup.blogspot.com)
ready to fight??? i am! *muahaha*
…your blog is awesome =)
Easy and really cute design
Thank you. You have a well crafted technical document. most helpful.
thanks thanks thanks..