This post was originally published in 2008
The tips and techniques explained may be outdated.
A reader commented on a previous post with the great idea of creating a tutorial on how to produce vector illustrations in the style of the safety cards found in aircraft, as seen on examples from Airtoons.com. Follow this step by step guide to creating your own illustrations, ready for the combination with comedy captions!


Unless you are a talented artist, use photography as a base for your poses. This can be sourced from a stock photography website or quickly created by directing a group of friends into the relevant positions and poses. Open up your pictures into Adobe Photoshop.
Some people may want to import their images directly into Illustrator, however I find the Pen Tool much easier to work with in Photoshop.

Roughly trace around the outline of the character, minimizing some of the detail if necessary such as the folds and creases in clothing.

Continue by creating more paths outlining the shape of the face, here I've used my own discretion to give the character a stylish side parting.

Go into further detail and outline the main facial features such as the eyes, eyebrows, nose and mouth.

Select all of the paths with the Path Selection Tool and Copy (CTRL + C)
Swap over to Adobe Illustrator and Paste your selection (CTRL + V), choose the Compound Path option.

Click and drag a selection around your Path and Ungroup (SHIFT, CTRL + G).

Select only the complete outline path and add a 3pt stroke.

Next, select the paths that make up the inner details and add a 2pt stroke.

Now select the paths that make up the facial details and add a 1pt stroke.

Use this stage to draw in any additional areas of detail, such as the eyeballs.

Using a technique similar to previous character tutorials, roughly draw in a complete path keeping the points within the confines of the stroke, trace around the face to begin with.

Select your colour scheme for the illustration, here I've picked a trio of blues and filled the new facial outline with the lightest shade.
Press CTRL, SHIFT + [ to send the fill to the back of the objects.

Repeat the process by drawing another roughly path around the hair outline, this time fill with the darker shade of blue.

Continue with the eyebrows then move onto the rest of the character, filling each section with the relevant tone.

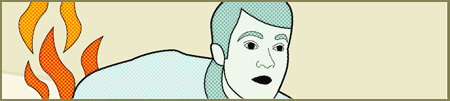
Once finished, you will be left with a stylized character illustration. However, the theme is not complete without a hazard to relate to the safety instructions.

Produce a generic flame shape by starting with an oval, with the Pen Tool selected hold ALT and click on the top and bottom points to remove their Bezier curves. Use the Direct Selection Tool (White Arrow) to individually select and rotate the Bezier curves of the left and right points by 45 degrees (hold Shift).

Copy and Paste the shape multiple times, rotate and reflect (Object > Transform …) each one to give a bunch of flames to represent a fire.

Give the flames a colour swatch of orange, starting with a dark tone at the base and giving the top flame the lightest shade. Make sure all the flames have a 2pt stoke.

To finish off the illustration Select All (CTRL + A) and Copy, then switch back over the Adobe Photoshop and Paste the image into a new document.
Duplicate the layer by dragging the layer into the New icon in the layers paletter.
Go to Filter > Pixelate > Color Halftone to give the impression of the cheaply printed feeling usually associated with these safety instructions.

In the Color Halftone options, enter 4px for the minimum size, then change the channels to 45.

Change the blending mode to Overlay at 50% opacity, then duplicate the original layer and place above all other layers. Change this layers blending mode to Multiply and drop the opacity to bring back the darker colour scheme while keeping the halftone pattern visible.

Finish off the illustration by drawing in a basic background of beige shapes using the Polygonal Lasso Tool on its own layer at the bottom of the stack.
Think of a comedy caption to compliment your safety illustration, then maybe draw up a few more to make a complete set of safety instructions. The key areas to remember are to begin with generic poses and give the characters blank facial expressions.
Cheers mate, top stuff!
That was a pretty quick turnaround.
Thanks again mate,
daniel!
That was an even quicker comment, the post has only been live for about 2 minutes! :-)
I hope it comes in useful.
Chris
Haha that is great! Nice tutorial yet again.
Hilarious idea
That’s great! He looks so calm, just like the airplane safety illustrations. Thanks!
I will definitely use this in the future!
Great stuff.
This is absolutely brilliant!! Thanks!
Hi,THis is really great. However not being a PS pro yet, i just wondered how you’d recommend to go about drawing with the Pen tool. Freeform or normal mode?Any other tips?
Also how do you recommend tracing around a male haricut which has a spiked up fringe….?
Hey David
Freeform or normal is all down to personal preference, I tend to stick with normal and waste away the hours click after click!
With regards to spiky hair cuts, I would probably go down the route of placing lots of points to follow the lines, or simplify the outline to make a single spike out of many strands.
Chris
very cool tutorial; i’ll probably give this one my own spin this weekend while working on an illustration job i have coming up.
I’m suddenly reminded of Fight Club
Yeah, i was definitely reminded of Fight Club! Thanks for the Excellent tutorial
it is nice!!
i can create my own pic….
thanks so much!!
Can’t I continue doing it in Photoshop, even after drawing? if yes please tell me how >.<
Good times! I can’t wait to try this one out.
Hahaha, I love i!
I am not a big fan of this technique.You have completely missed the expression on his face! I think what would have been cooler was if you had sketched him, added a few elements or characterestics of your own and then maybe traced it.
Great I Like the Idea.. Very interesting!
Hi, I have problem doing th colour halftone step. The options that appear in PS are only the max radius, along with 4 channels. When I randomly just key in a number, nothing seems to have happen. Could you explain what went wrong?
Lol – This one was funny! Cool to see how one can work from a photography.
hahaha, Its like a movie of art ;-) if you start seeing it from top to bottom. Really nice work